
Now that your Enforcer is connected and system settings are configured, it’s time to establish the core of your network security: threat blocking rules. This step is where you define what traffic should be allowed, blocked, or monitored, based on your organization’s security needs. Setting up these rules ensures your Enforcer actively protects your network by filtering out malicious traffic and potential threats.
For these steps, you should be logged into the threatER Portal using your admin credentials. The threatER Portal is located at https://portal.threater.com.
Review Lists in Collect
Let’s start in Collect, located in the left menu.

Collect is threatER’s centralized SaaS solution to aggregate all of your threat intelligence. Collect provides you access to best-in-class cyber intelligence feeds and threat lists, as well as the ability to create your own lists of allowed and blocked connection criteria. This is the data used by the threatER software to perform enforcement.
On the Collect page, you will see a number of default lists that are already set up for you. Most of these are third-party and open-source allow and block lists, including IPs for common services.
There are three types of lists:
-
Allow – Lists of connections that are explicitly allowed (or whitelisted) by IP and domain.
-
Block – Lists of connections that are explicitly blocked, also by IP and domain.
-
Threat – Enhanced block lists of potential threats, with additional data: category and confidence score
💡 What to learn more about Lists? Check out our detailed article on Lists.
The Webroot BrightCloud threat list is included in all threatER subscriptions. You will see the Webroot threat list on this page, which will look something like this:
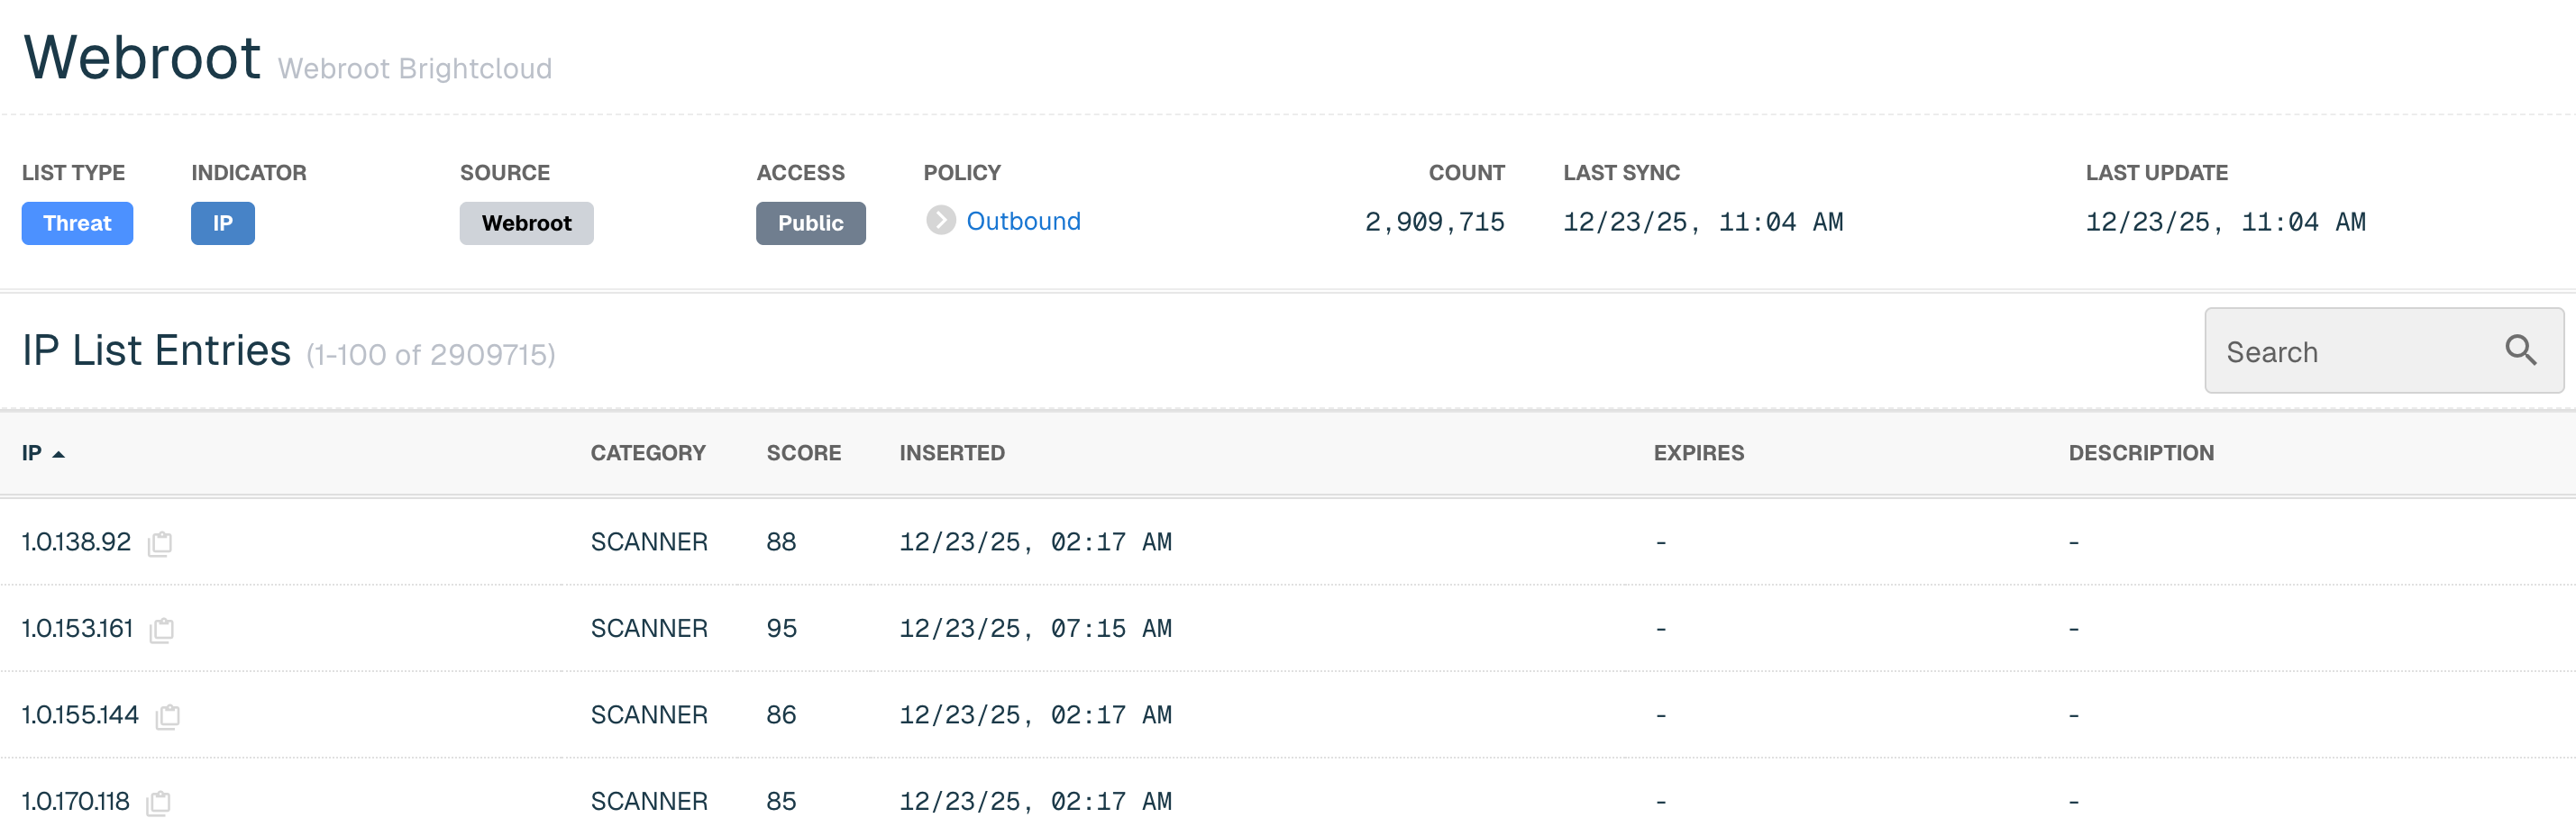
To configure your threat posture, we’re going to be using thresholds that use the confidence score to fine-tune your network. But first, let’s create your first list!
💡How can I further increase my threat intelligence? threatER integrates third party and premium threat intelligence feeds via the Marketplace. The Marketplace provides threatER customers with even greater access to high-value, multi-source cyber intelligence data and services from leading intelligence providers. Learn more about Marketplace here.
Create Your First List
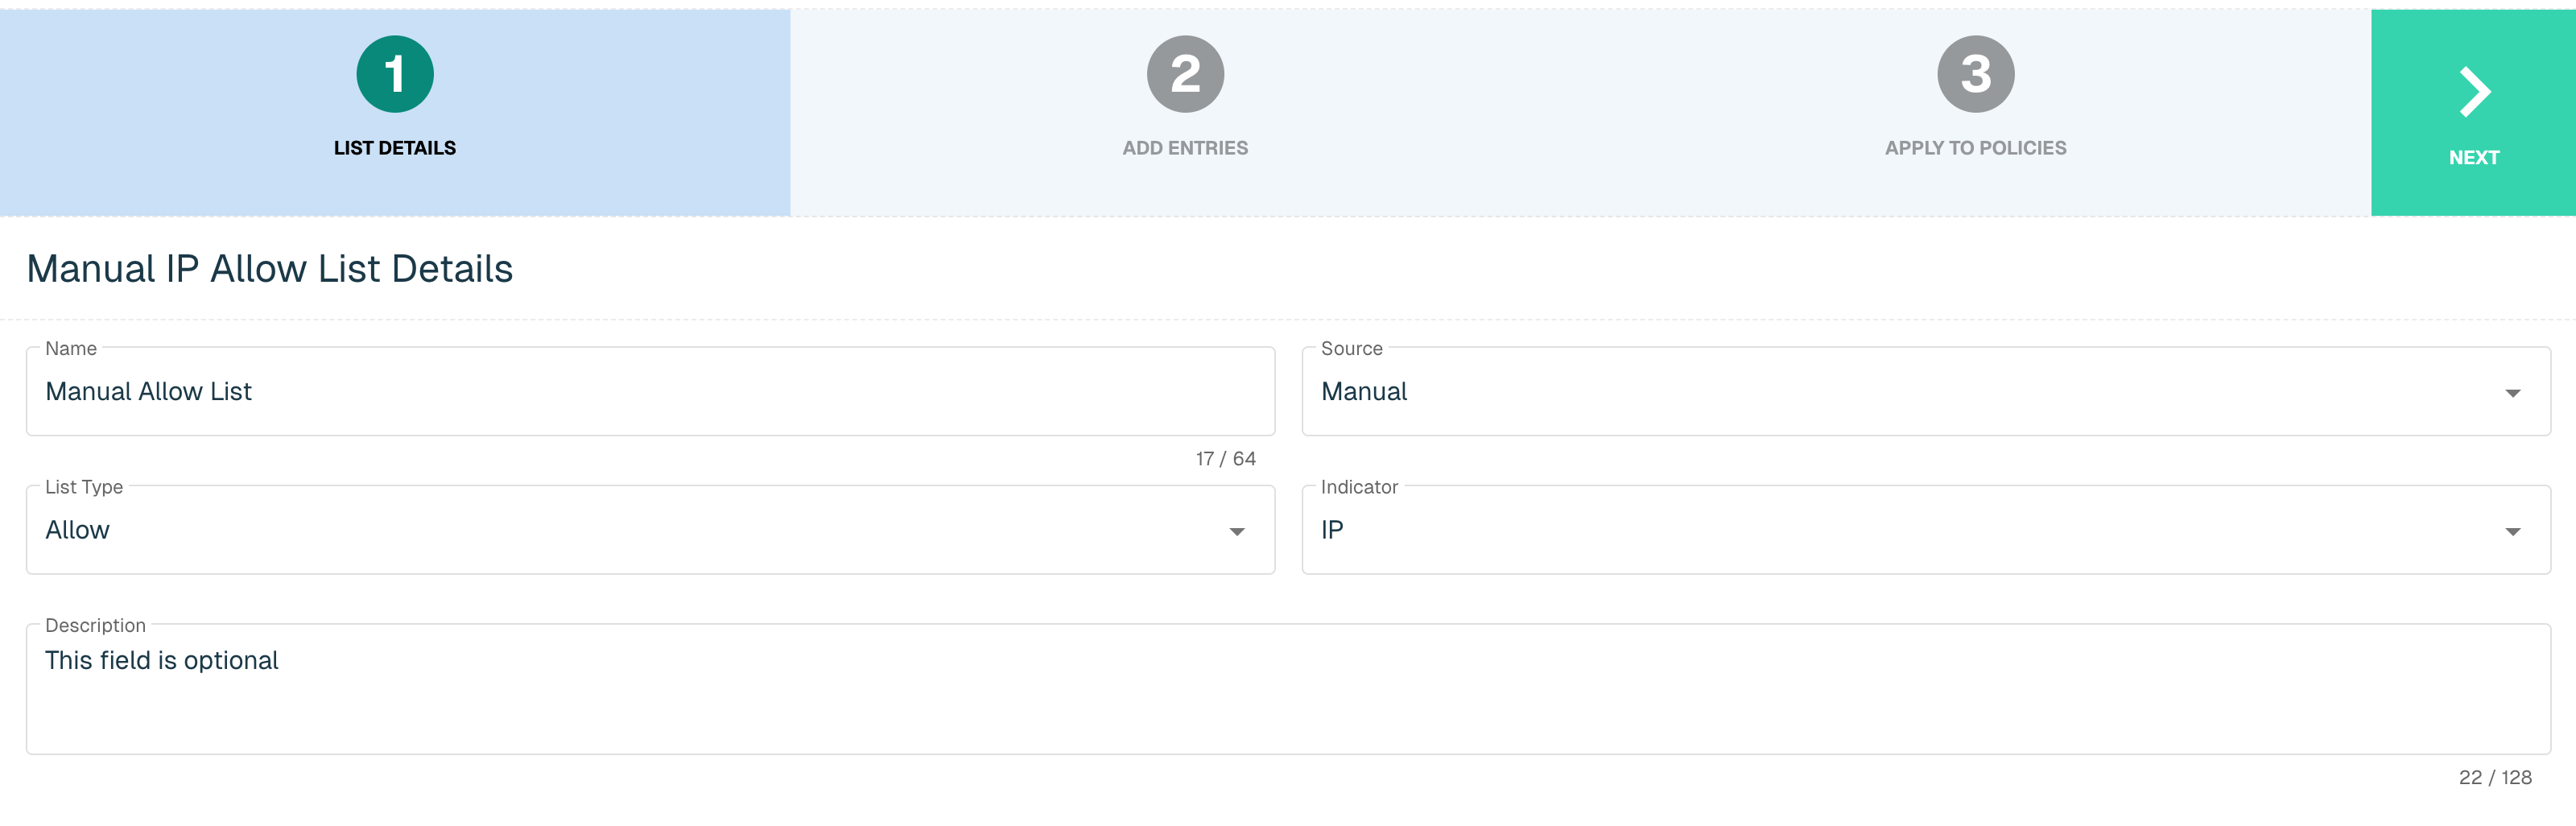
We’re going to create a manual allow list—you’ll use this list to whitelist any known services and resolve unexpected blocks later on.
On the main Collect page, click the green ⊕ icon in the top right.
Name your list (e.g., “Manual Allow List”).
Set the following parameters:
-
Source: Manual
-
List Type: Allow
-
Indicator: IP
Add a Description if so desired, then click Next.
The next screen will show you how to add items to the list. We won’t be adding anything just yet, but you would add your allowed IPs (with maskbits as appropriate) to the Create IP field.
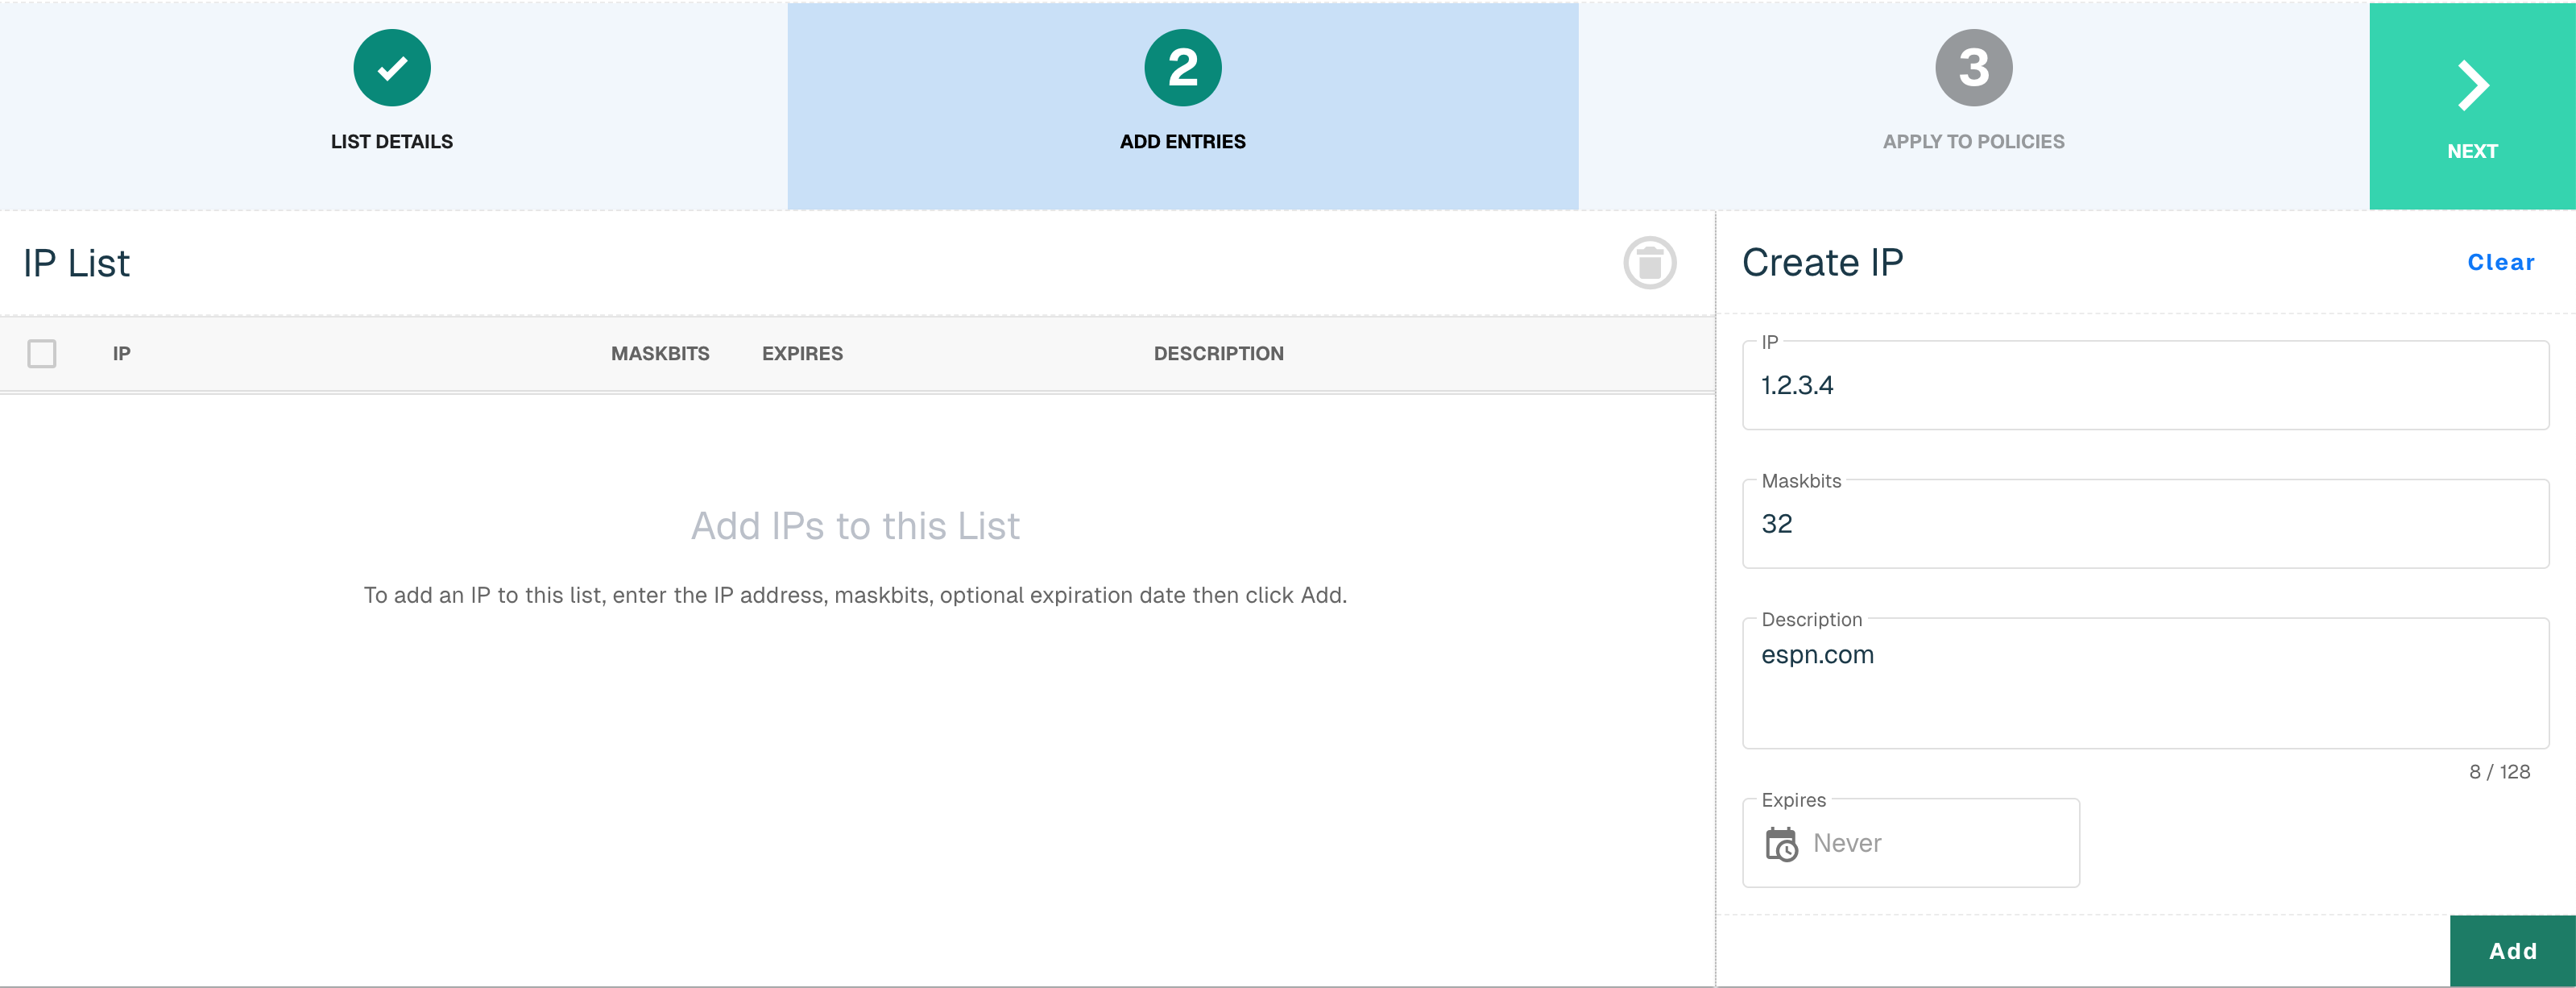
💡 Setting temporary exceptions? Note that you can also set an expiration date—e.g., if an employee is traveling and you know this would be a limited-time entry.
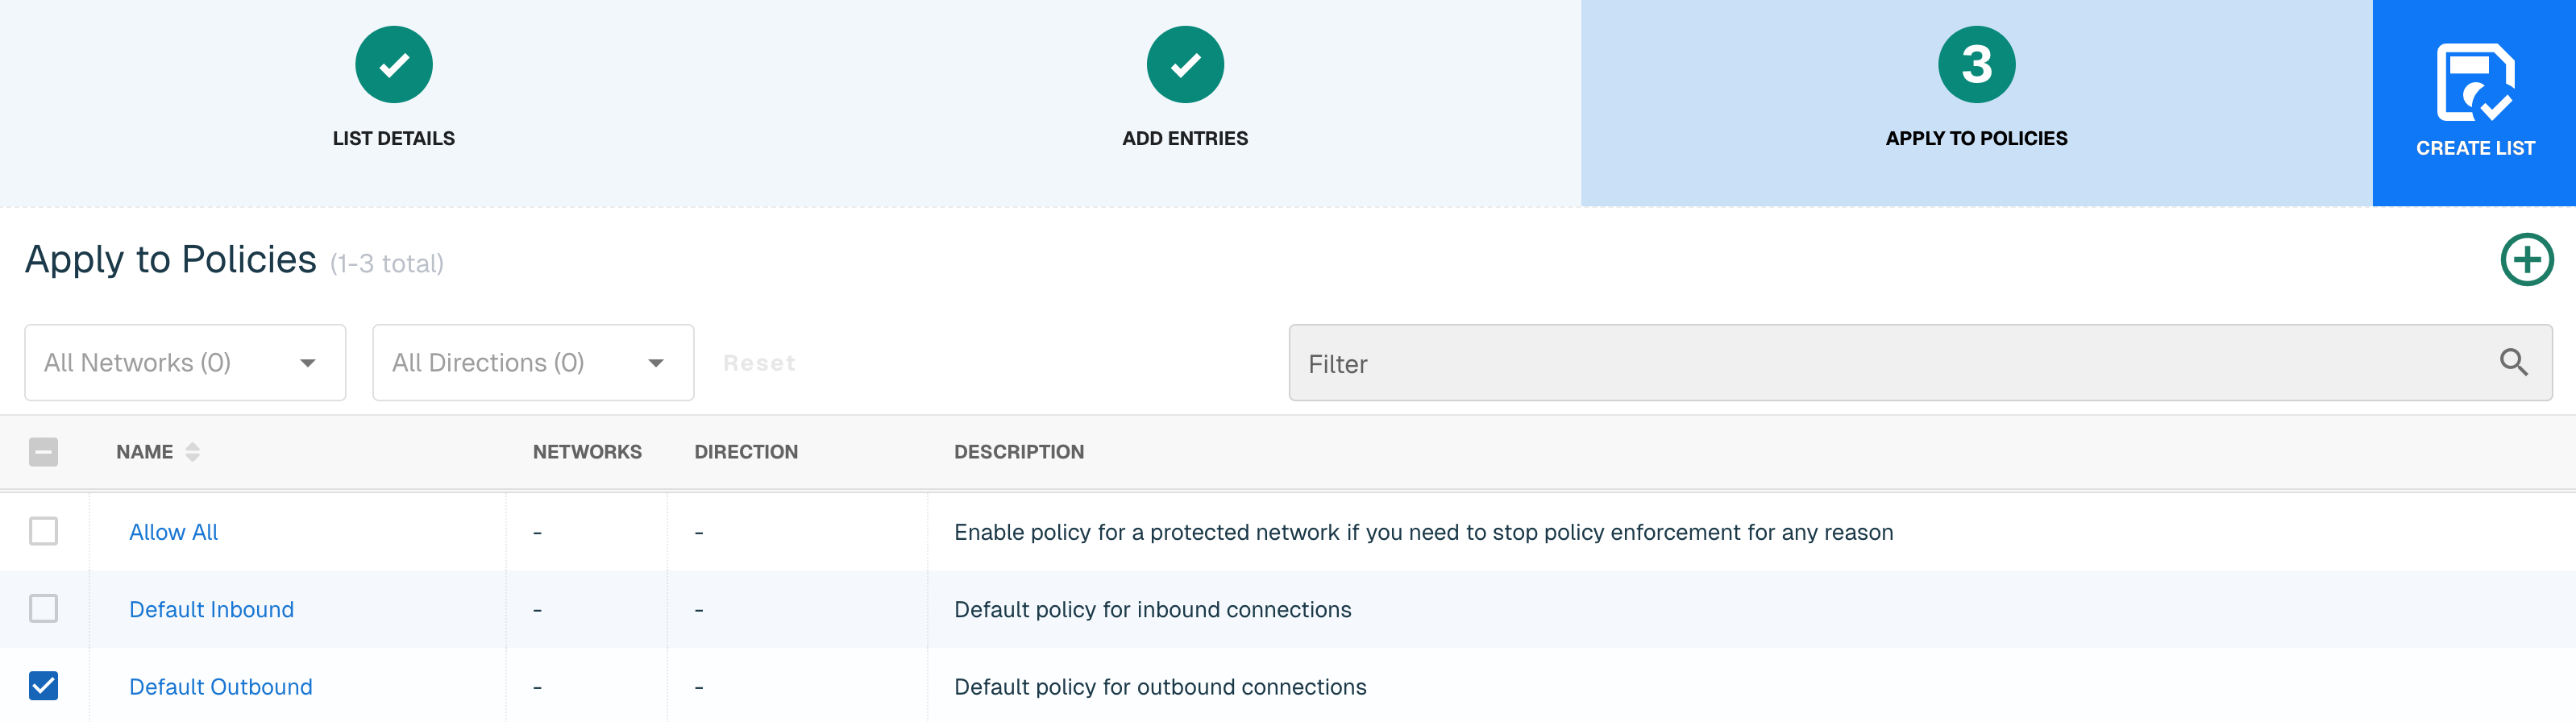
Click Next to continue. Finally, we will apply this List to a Policy. You will see the three default Policies we create for you—we’ll be reviewing these further in the next steps. For now, select the Default Outbound policy and click Create List.

Congratulations, you created your first list!
Create Lists for Microsoft and More
If you are a Microsoft 365 (e.g., Exchange) user, you will want to allow the traffic associated with these or other products.
💡 Why aren't these lists set up by default? We recommend you configure lists only for the products you use, so every user will have a unique configuration.
On the main Collect page, click the green ⊕ icon in the top right. Name your list (e.g., “Microsoft Services”) and set the following parameters:
-
Source: Plugin
-
List Type: Allow
-
Indicator: IP
Click Next to continue.
This time, instead of a list of manually-entered IPs, you will see a list of connectors. You can use this approach to host and manage your own set of lists via CSV (e.g., on OneDrive or AWS) or HTTP.
From the Select Plugin drop-down, select Microsoft. Set the Interval to 60: this means threatER will check for updates every 60 minutes.
From Service Areas, select the services your organization uses. Note that Common includes all 365 services, and Skype includes Microsoft Teams.
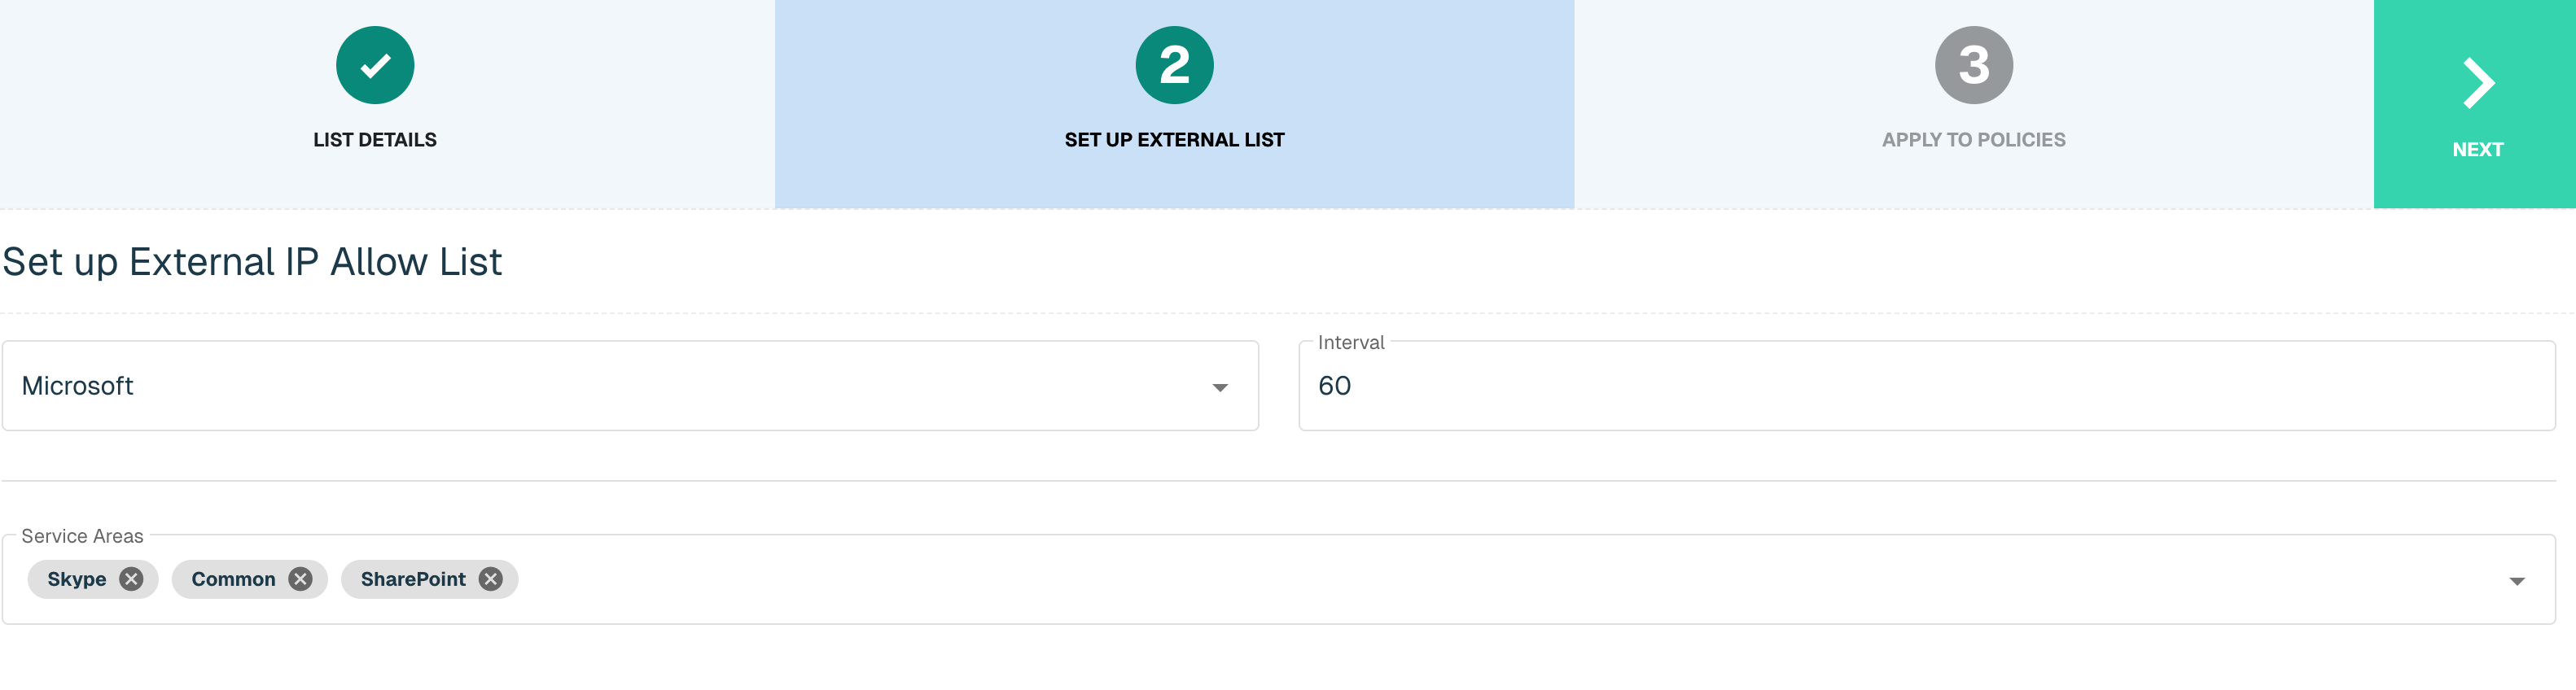
Click Next to Continue. Check Default Outbound, and click Create List.
Repeat this step for other enterprise services you may need. Most providers publish lists of IPs associated with their services.
Set Up Inbound Policies
We’ll now apply these Lists and other criteria to monitor and enforce your organization’s traffic. Policies allow users to determine what is allowed through networks or ports.
Click Enforce in the left column, then Policies in the blue bar.
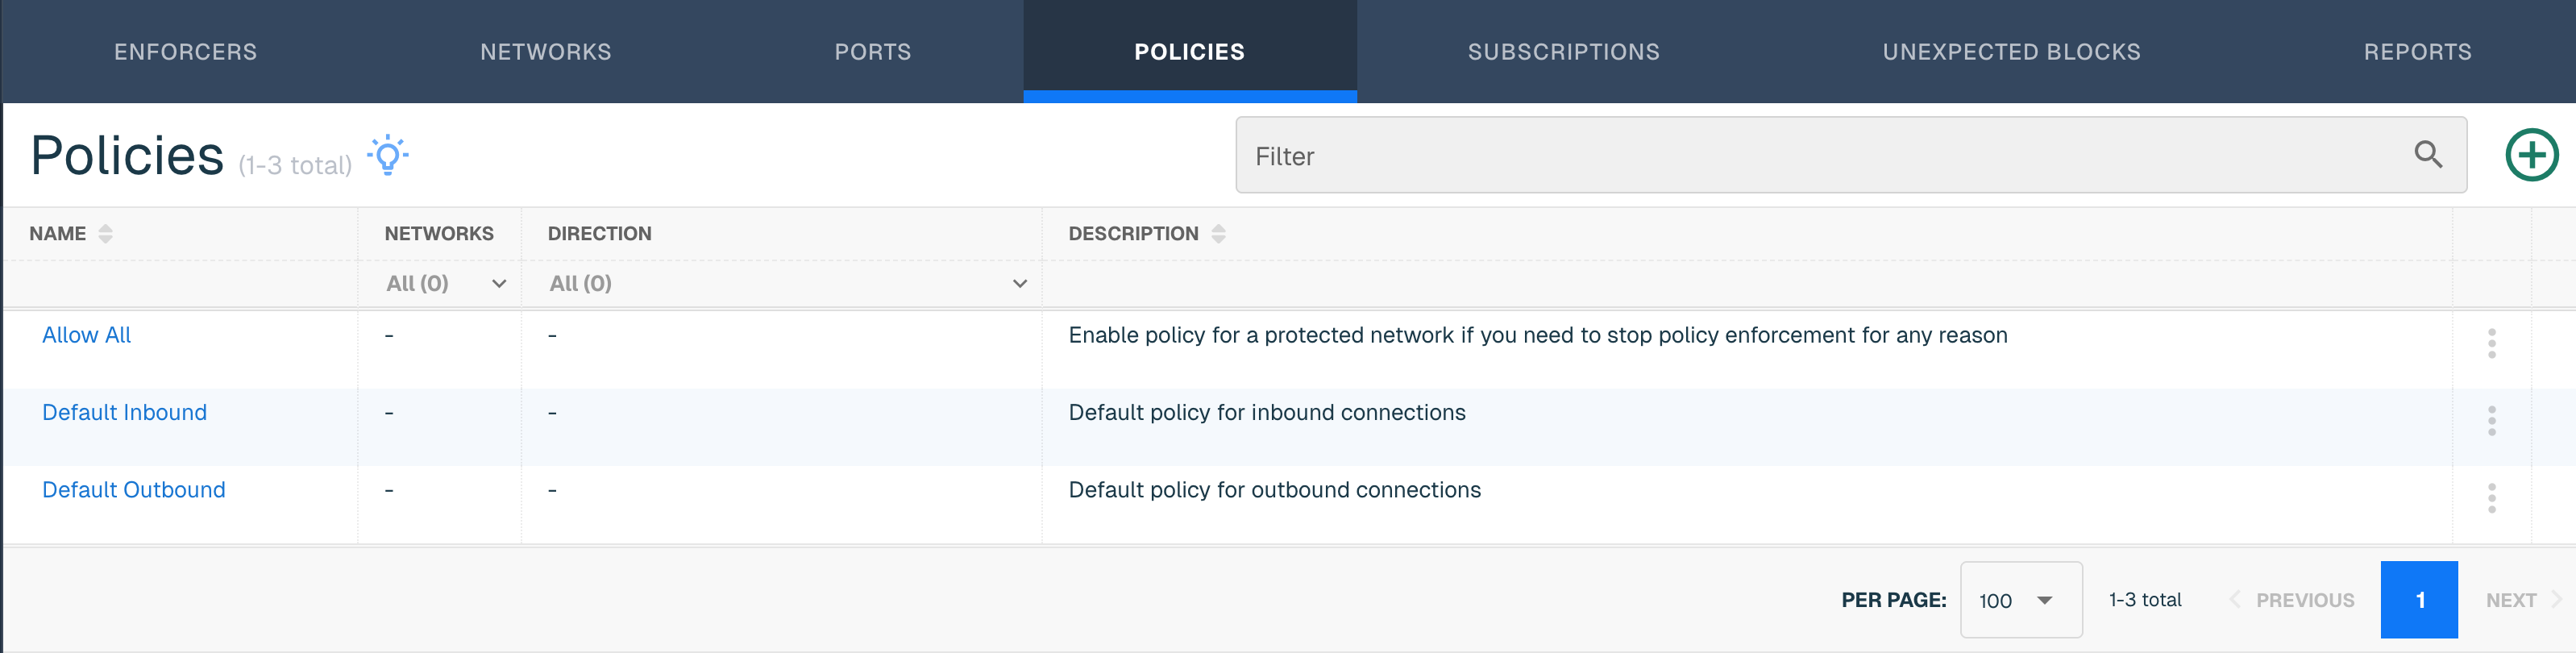
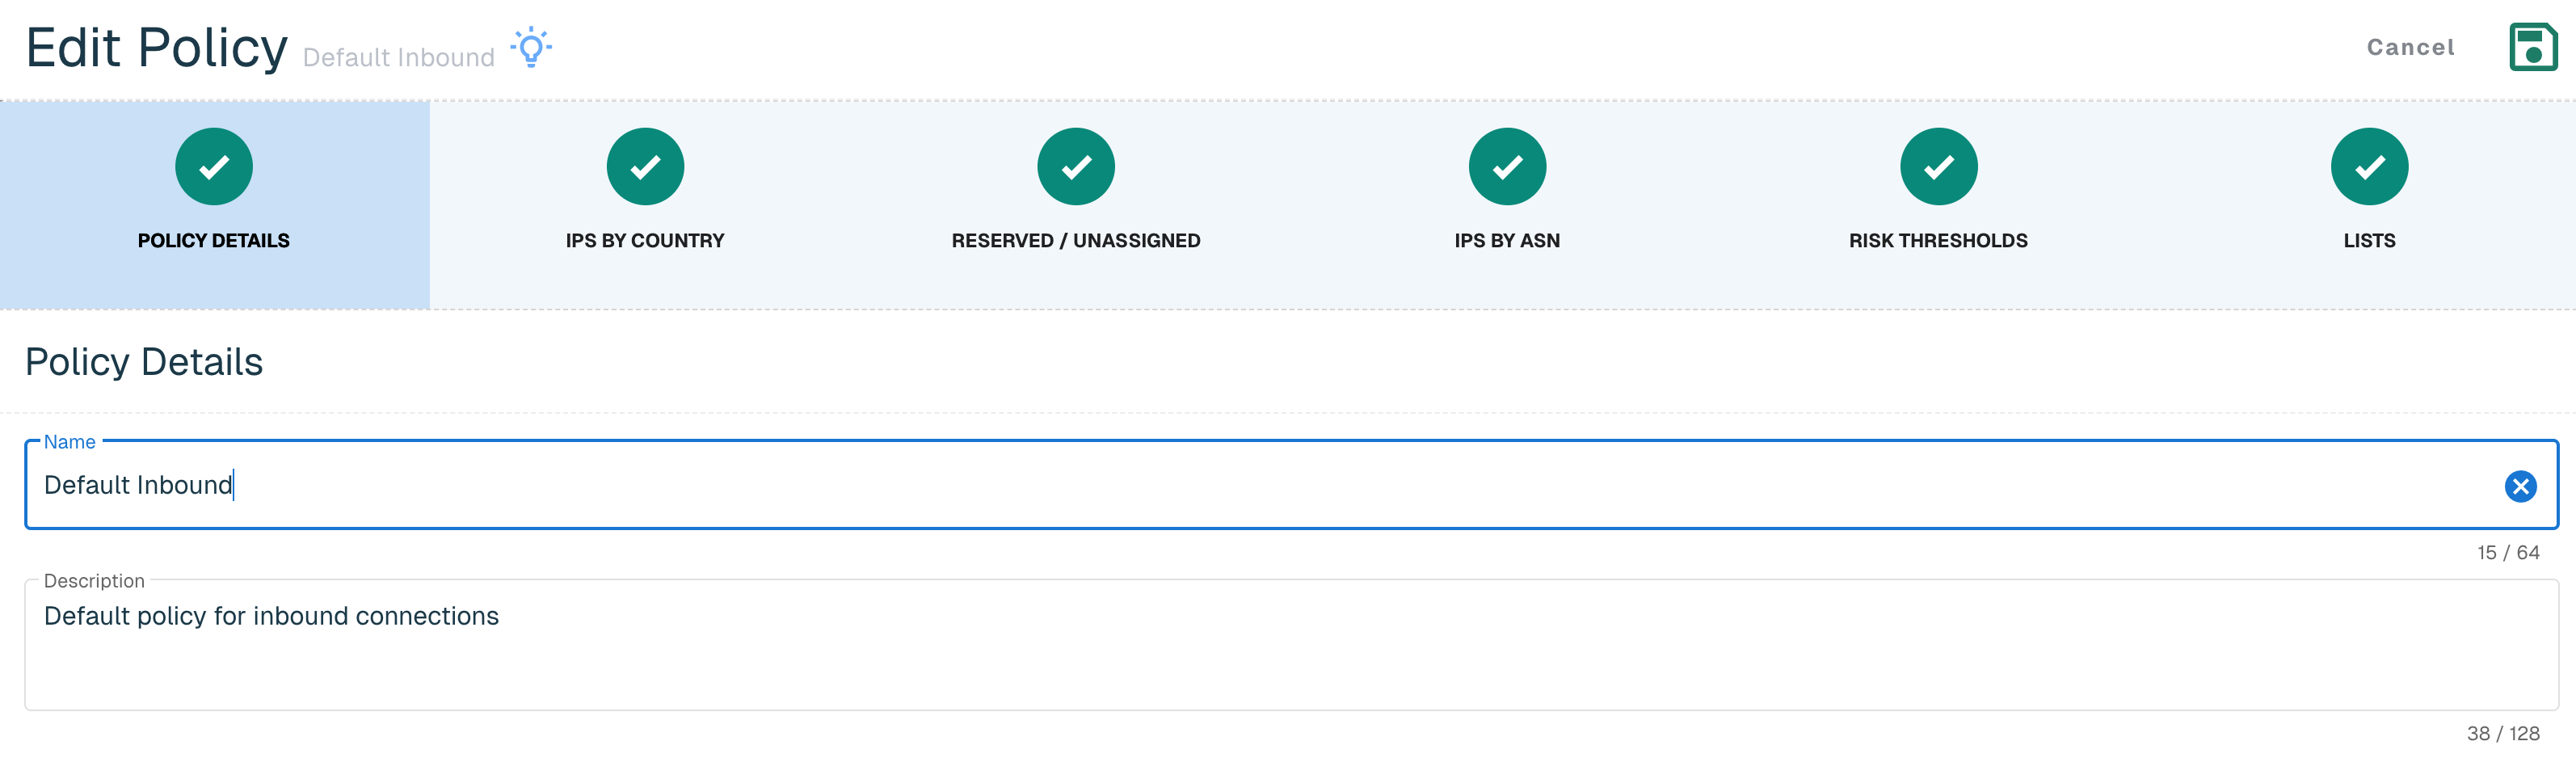
Start by clicking the Default Inbound policy. This will show a summary of the policy that we’re about to review.
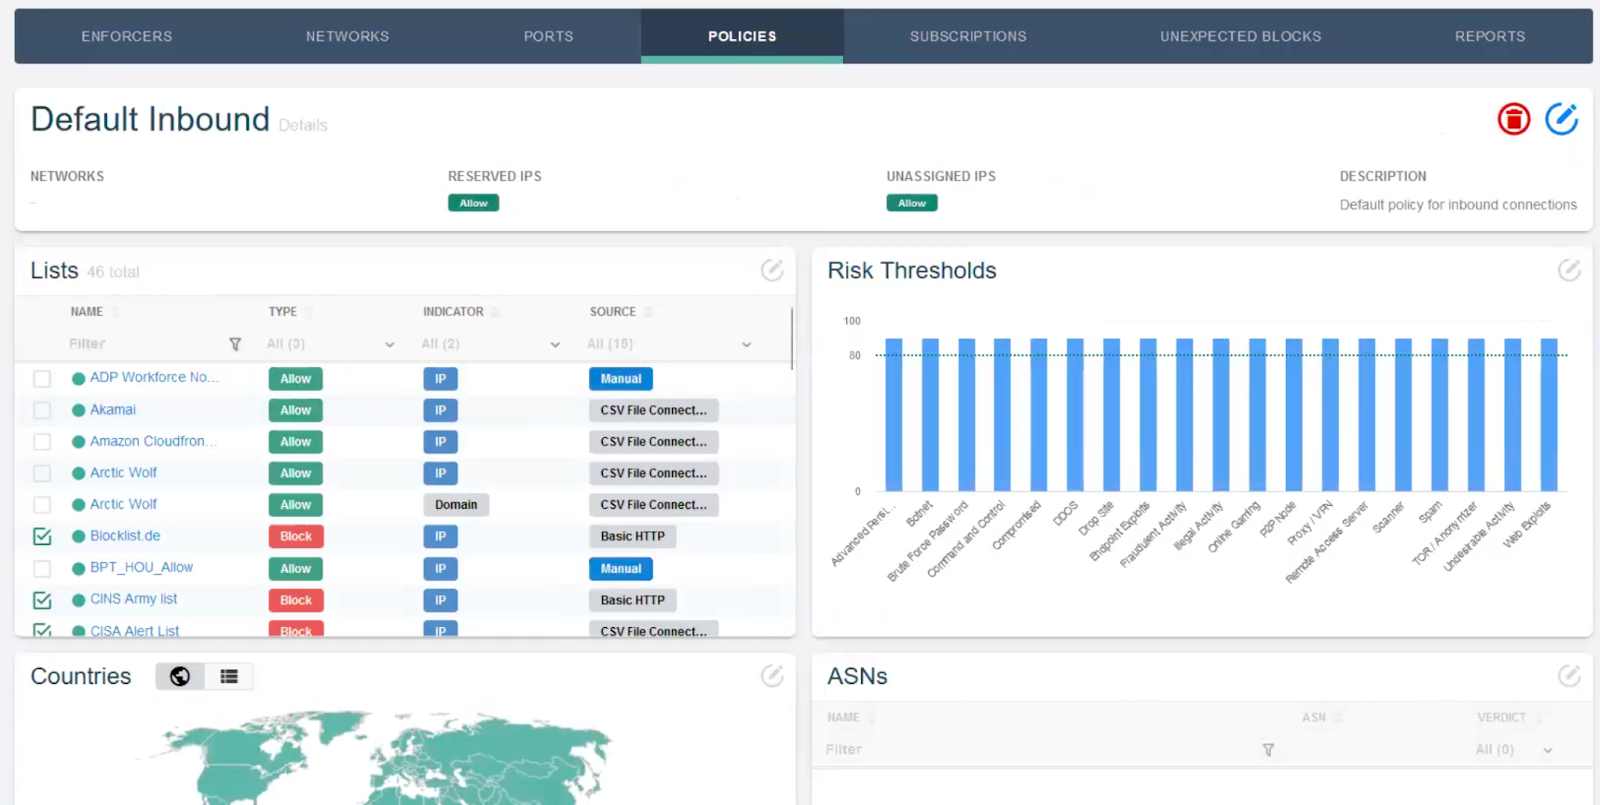
Click on the blue pencil icon in the upper right to enter the Policy workflow.
Policy Details
The Policy Details page summarizes the name and description of your Policy. Users can create as many Policies as they need to protect each of their networks—there is no limit to the number of policies that can be created.
IPs by Country
A key element to a fully-configured Policy is geo-blocking: blocking traffic from specific regions or countries associated with common threats.
💡 Doesn't my firewall do geo-blocking? Yes, firewalls typically do some light geo-blocking as well, but threatER can do it at scale, reducing the load on your firewall. Because the Enforcer typically sits between your ISP and firewall, threatER can reduce the CPU usage on your firewall by 30–50%, freeing up firewall for further deep-packet inspection.
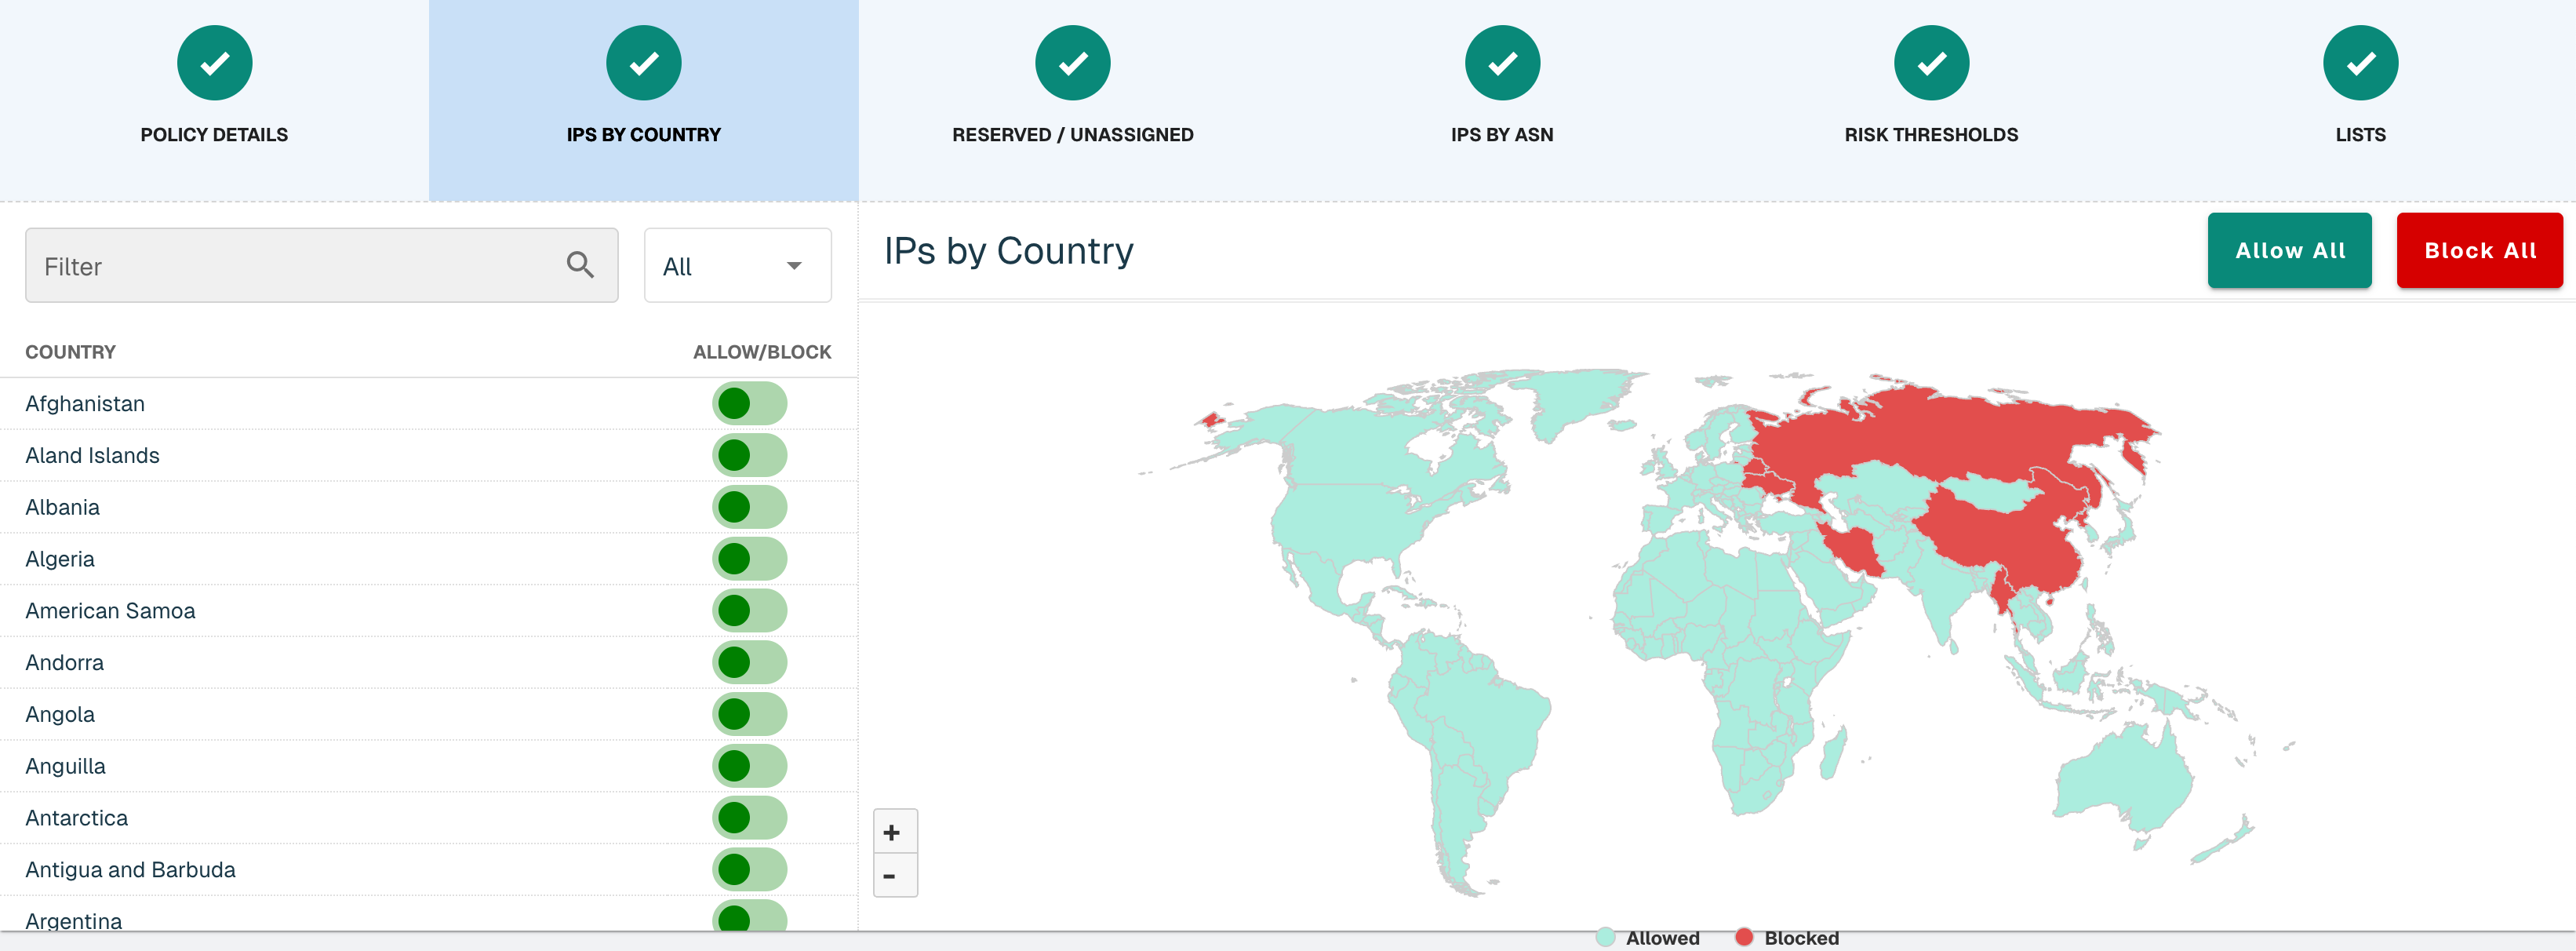
If your organization only expects traffic within your country, you may select "Block All", then allow only your country.
Alternatively, threatER recommends blocking the following countries in a typical installation:
-
Russia
-
China
-
Belarus
-
Bulgaria
-
North Korea
-
Iran
-
Myanmar
💡 Why Myanmar? Myanmar is a country on the southern tip of China. There was a 2024 article in the Washington Post about how Chinese bad actors are kidnapping Chinese citizens, smuggling them into Myanmar, where they’ve set up cyber-attack centers. Wild!
Block these countries by toggling the switch next to the countries you want to block or clicking on the individual countries on the map.
Reserved & Unassigned IPs
For non-routable IPs, IPs that haven’t been registered, or private IPs, country data is not available. For this reason, they are indicated separately from county blocking in our system. There’s no specific reason to block these, but threatER offers the ability to do so if so desired.

IPs by ASN
threatER allows for allowing or blocking by host ASNs. For example, if you type “Facebook” into the Search ASNs field, you will see all the IPs hosted by Meta registered under the Facebook ASNs. If you wanted to allow or block all of Facebook (or other Meta products), you could do so via ASN.
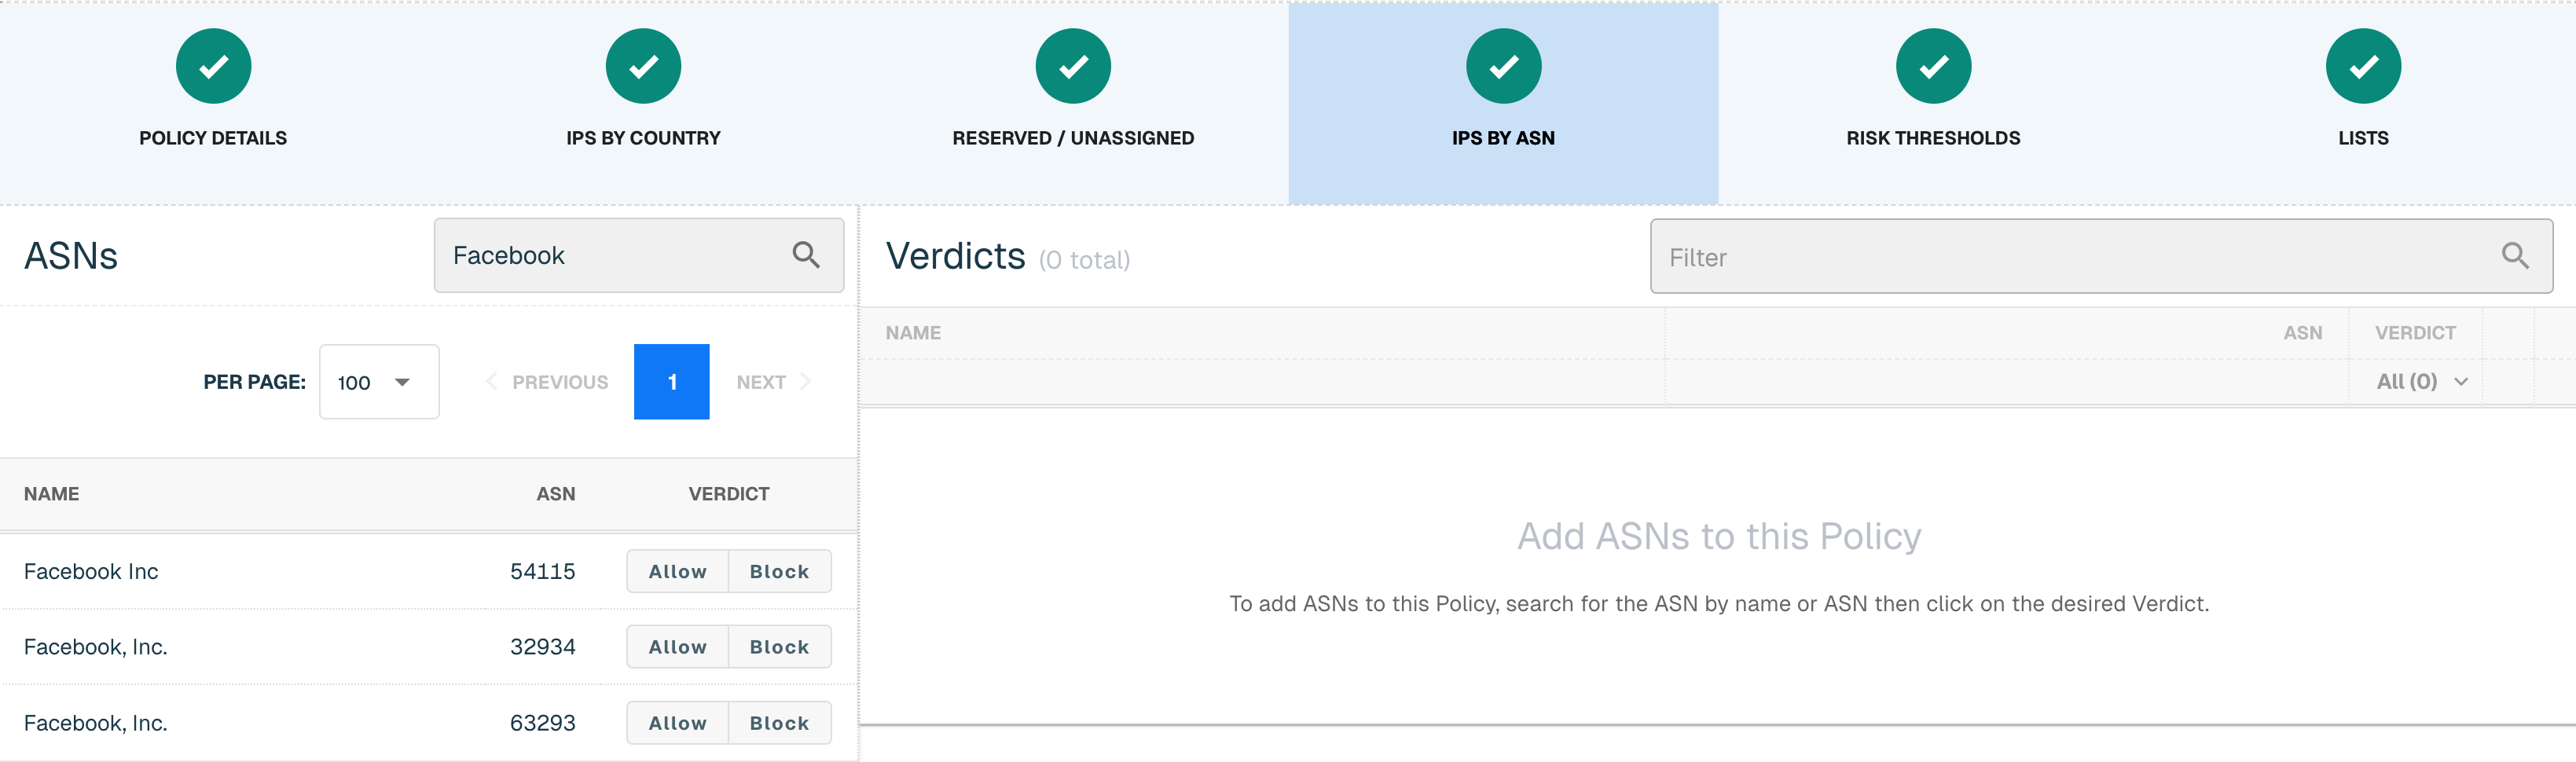
All selected ASNs will appear in the Verdicts field.

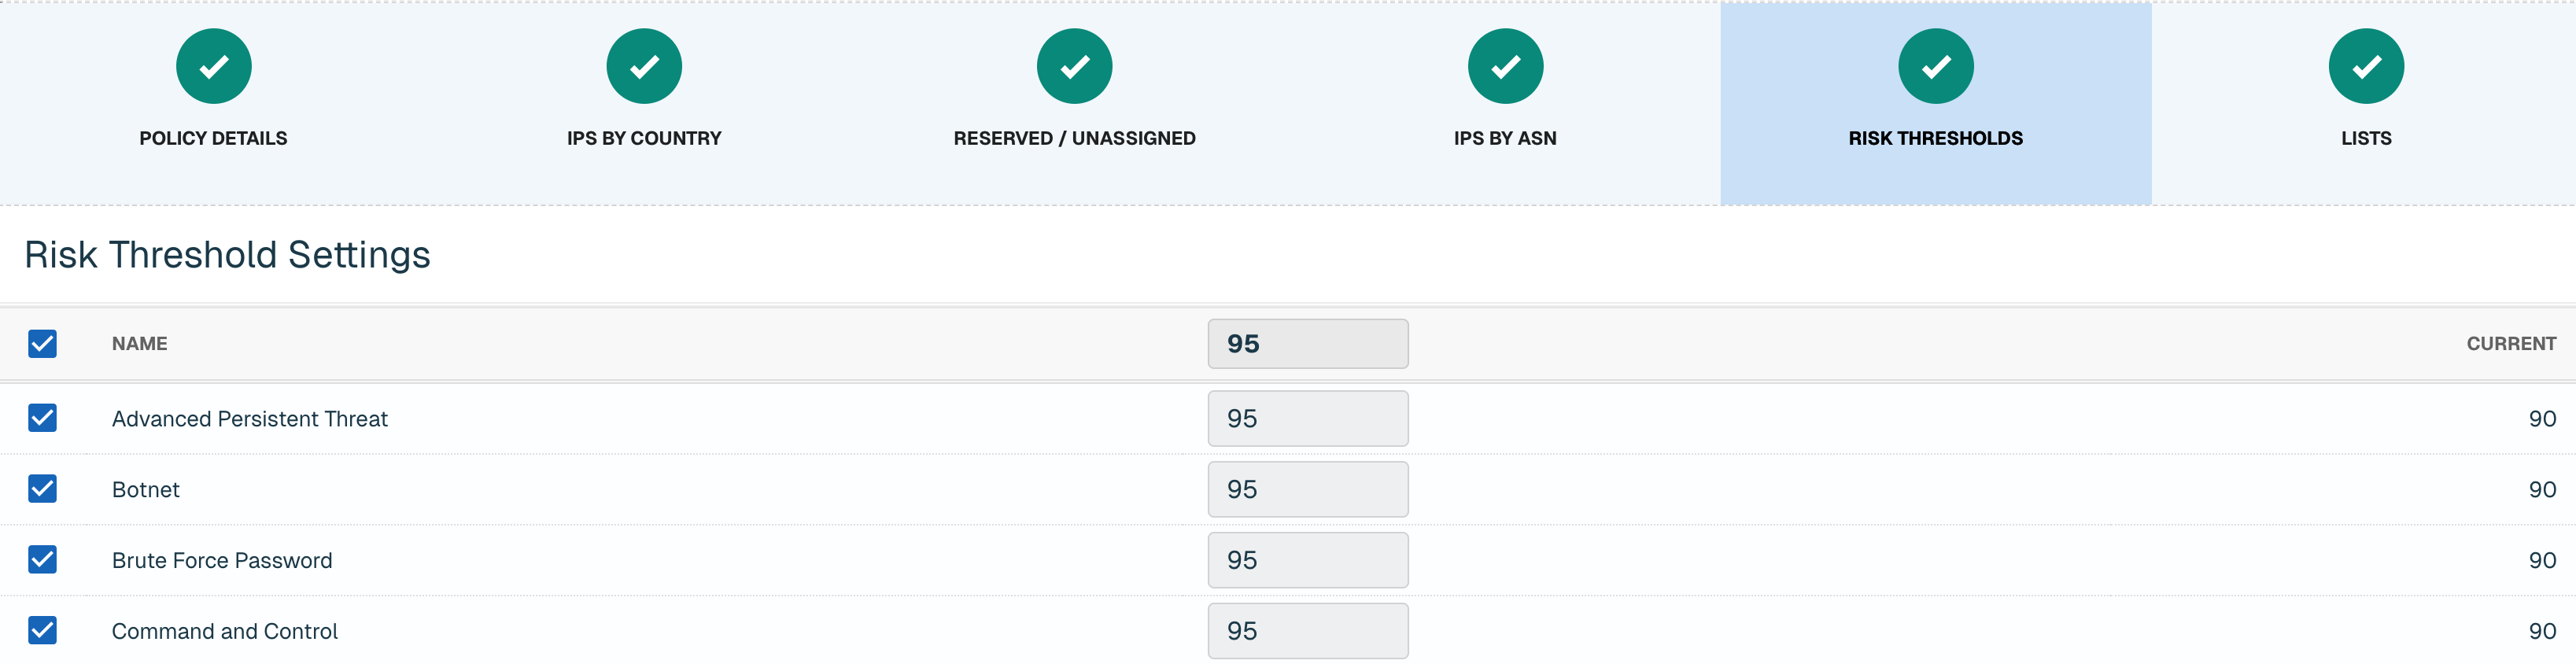
Risk Thresholds
This page is where you will set the risk thresholds for the elements contained in your Threat Lists (e.g., the default Webroot list).
By default, we recommend enabling all categories with the risk threshold set to 90. This means that all requests from an associated IP with a confidence score >=90 will be blocked.
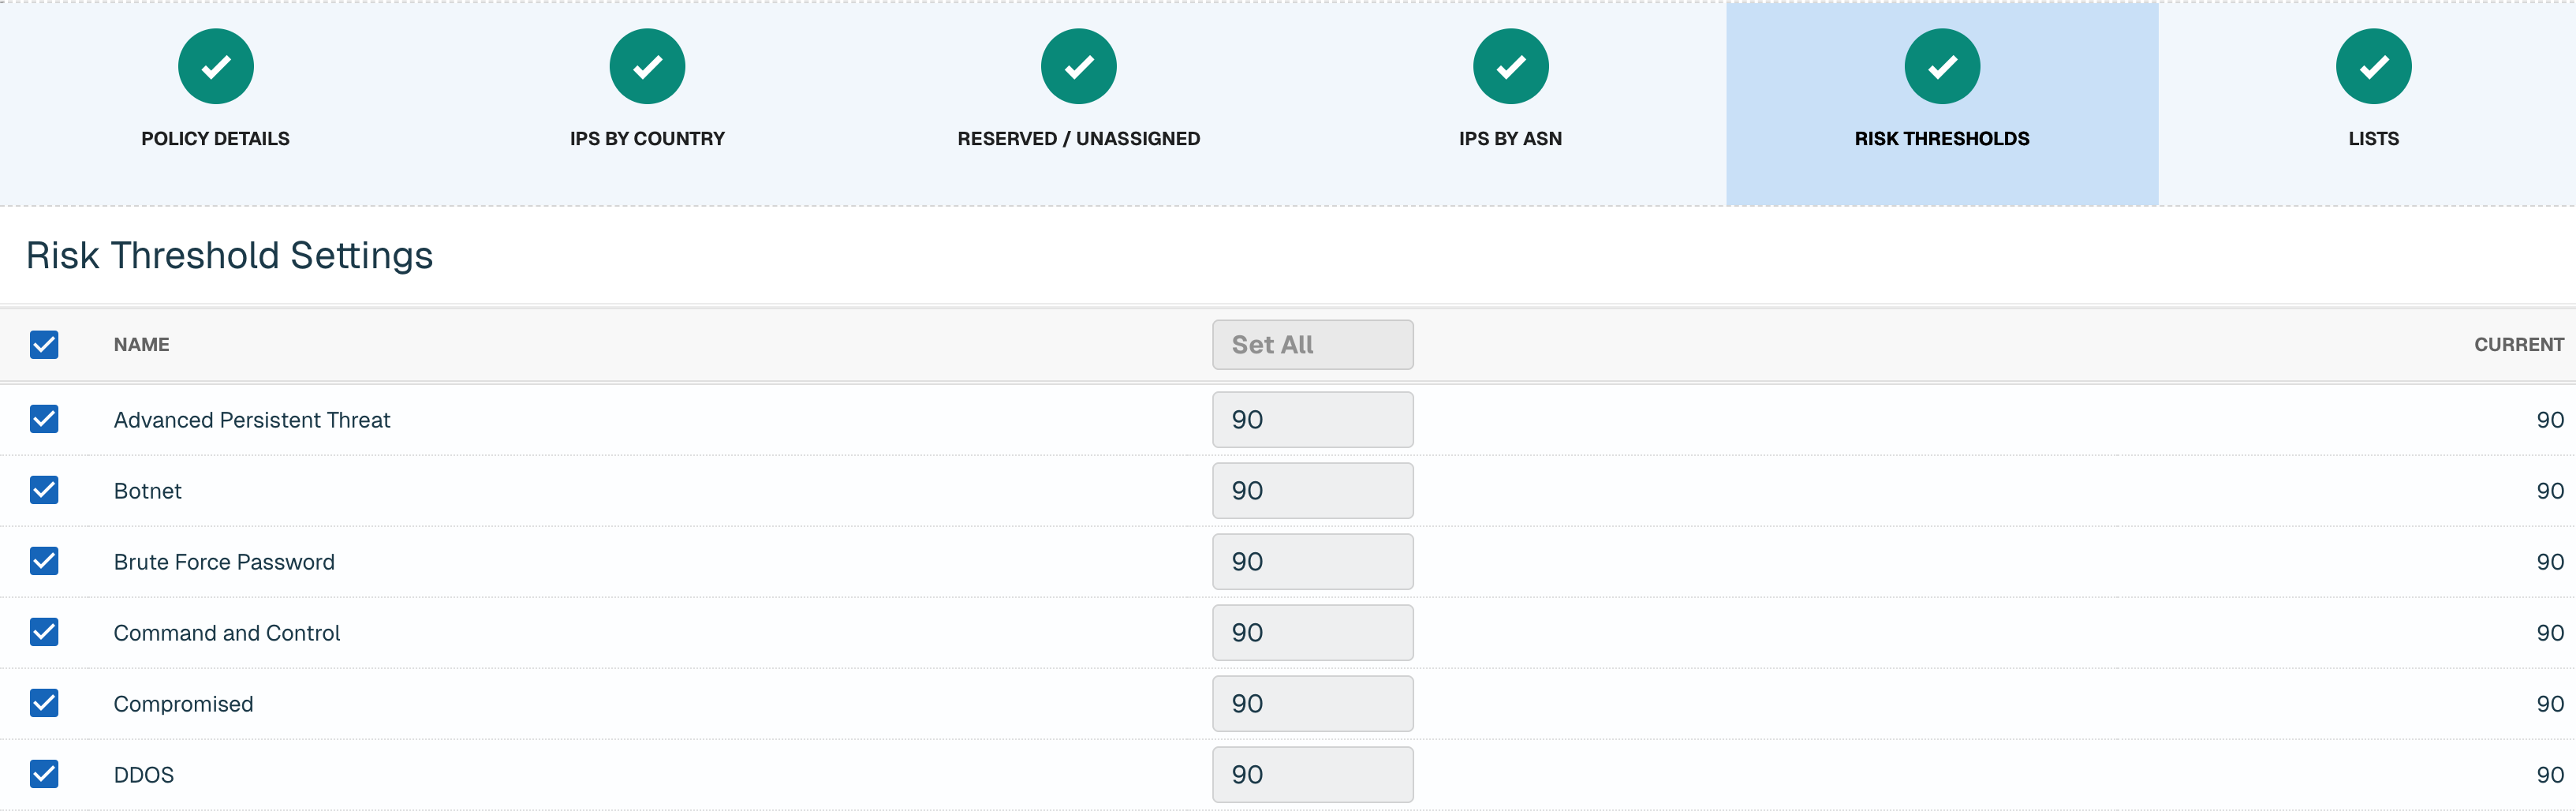
You can refine these further once you’ve deployed (e.g., reducing the threshold to block lower-confidence threats and further increase your security), but the defaults are a fine place to start.
Lists
Finally, Lists are where you apply the default and customized Lists we reviewed earlier on the Collect tab.
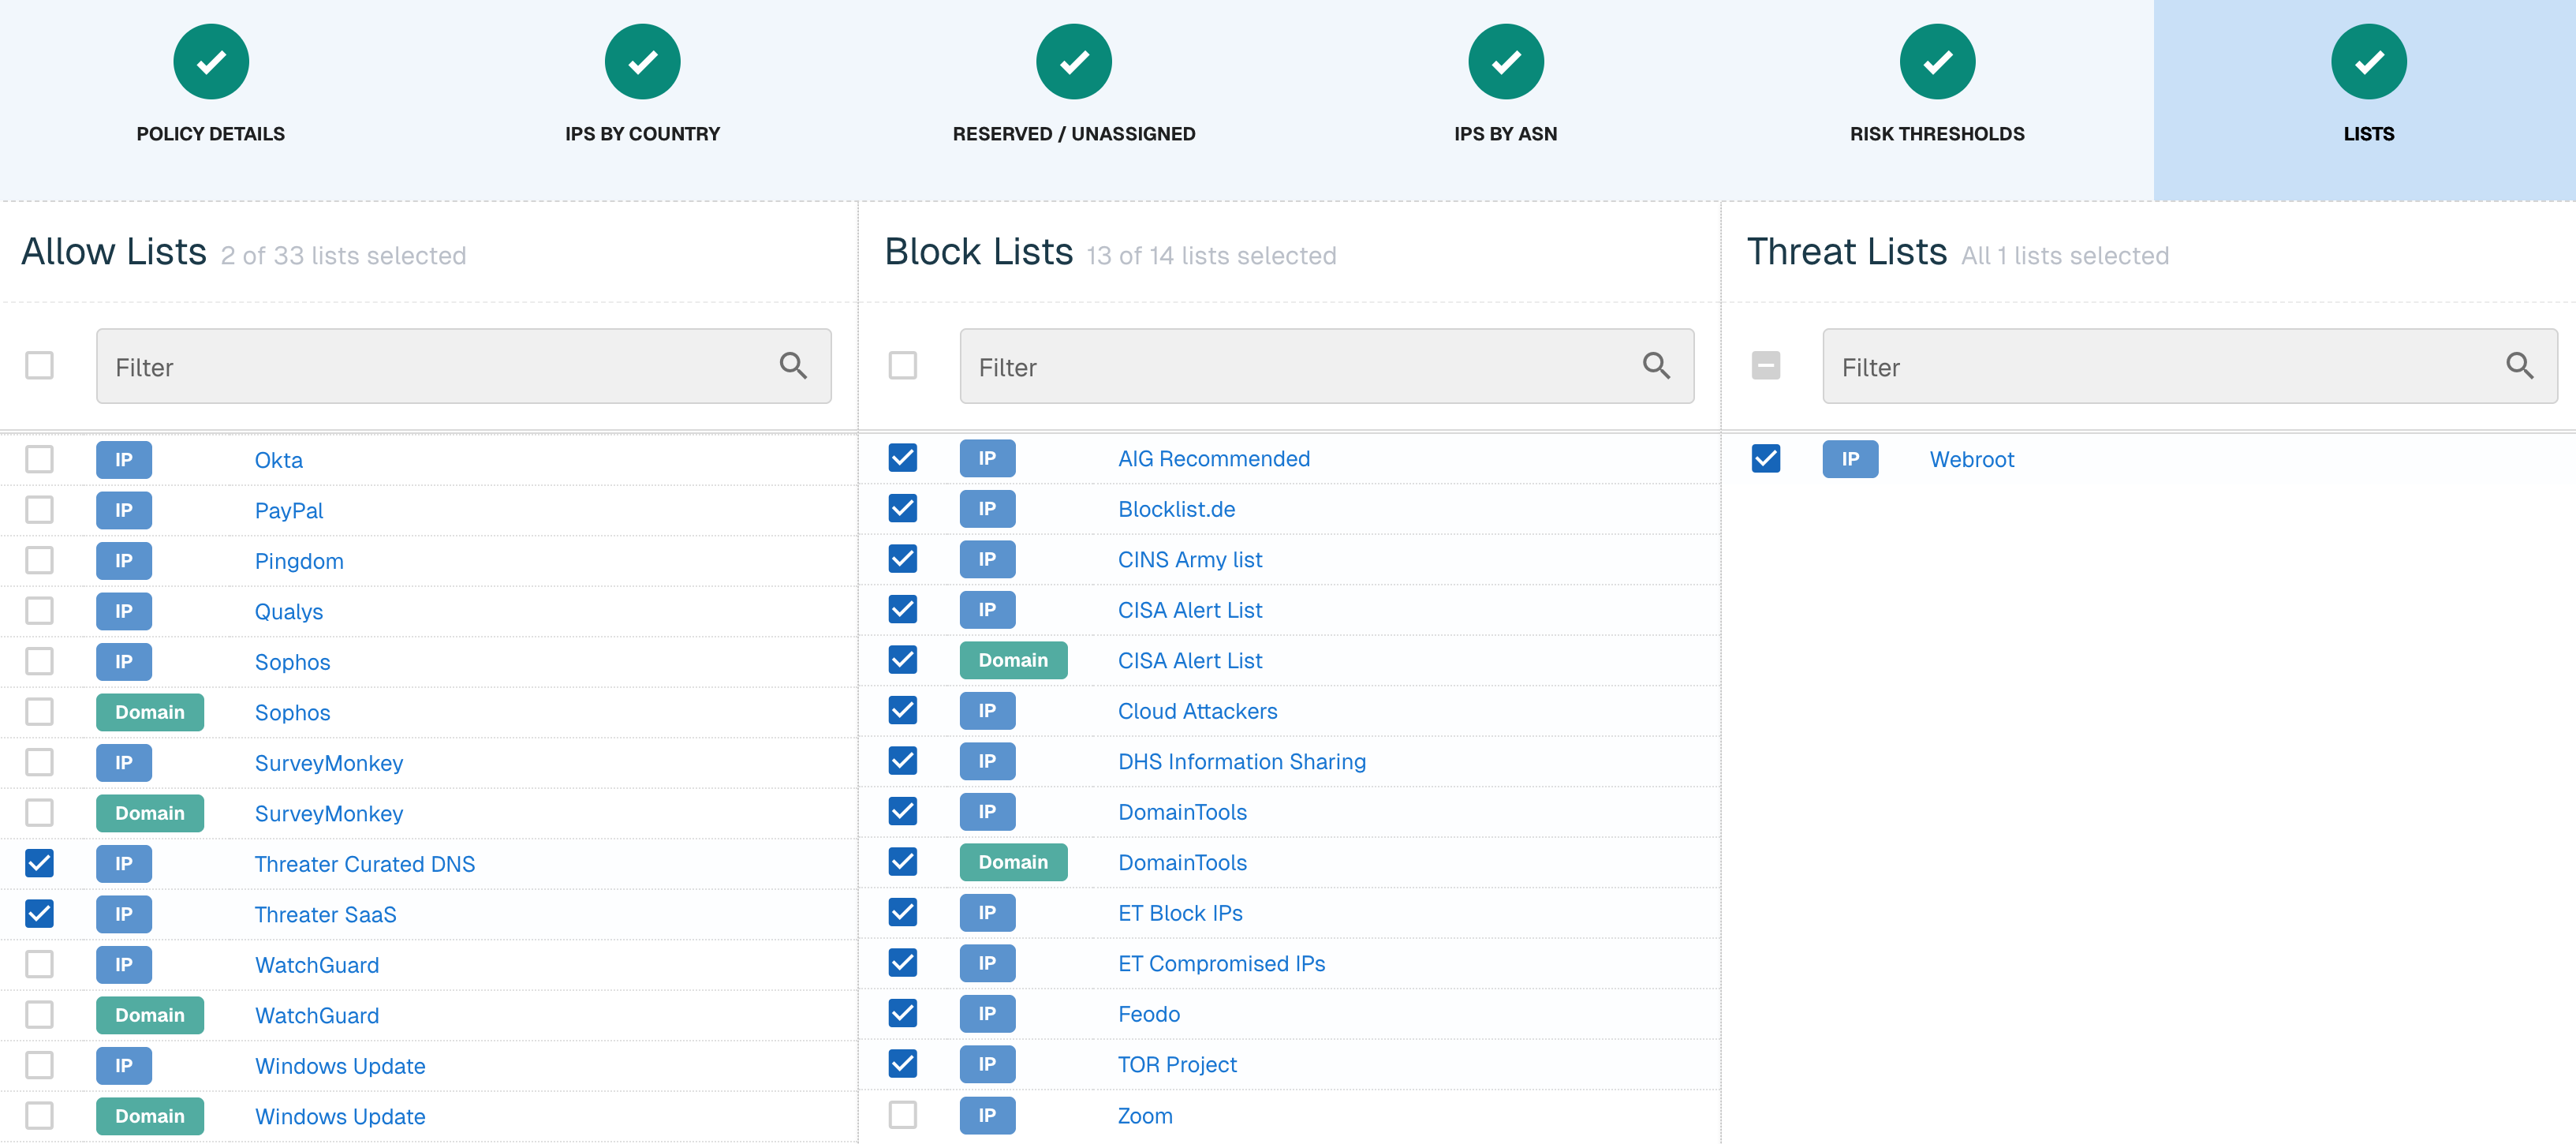
Most block lists are blocked by default. The inbound allow lists largely don’t need to be enabled, though threatER has enabled a Curated DNS (e.g., 8.8.8.8) and SaaS (e.g., the threatER Portal) lists by default.
💡 Why is Zoom on both the Allow and Block lists? During the 2020 global pandemic, Zoom faced some security issues (Zoombombing or Zoom Raiding) so we provided the option for Zoom to be blocked if necessary. Zoom has addressed those issues so we recommend keeping Zoom disabled under the Block list.
Click Save to save your policy and return to the main Policies page.
Set Up Outbound Policies
Repeat the previous steps (5.4) for your Default Outbound policy. Below are unique outbound policy notes for IPs by Country, Risk Thresholds and Lists.
IPs by Country
When we think of outbound geo blocking, it is a little different from inbound geo blocking. Though we recommend being as secure as possible, people in your network might be trying to get to sites that are hosted in other countries.
It is not uncommon for customers to be less secure outbound. Hosts like Amazon and Google have hosts across the world in countries like Brazil, the Netherlands, Ireland, Australia and Japan. You want to balance being as secure as possible with understanding that customers are trying to access sites hosted outside of their home country.
At a minimum, we recommend thinking about blocking the following countries in a typical installation:
-
Russia
-
China
-
Belarus
-
Bulgaria
-
North Korea
-
Iran
-
Myanmar
Risk Thresholds
By default, we recommend enabling all categories with the following parameters:
-
Fraudulent Activity and Proxy / VPN categories set to 97
-
The remaining 17 categories set to 95
This means that if an IP came into the Fraudulent Activity or Proxy / VPN score came in with >=97, the connection will be blocked. For the other 17 categories, a score with >=95 will be blocked by threatER.
💡 Why are the risk thresholds different between the inbound and outbound policy? We want to make that when you first deploy threatER in your environment that you are not overwhelmed with unexpected blocks. You can refine these further once you’ve deployed (e.g., reducing the threshold to block lower-confidence threats and further increase your security), but the defaults are a fine place to start.
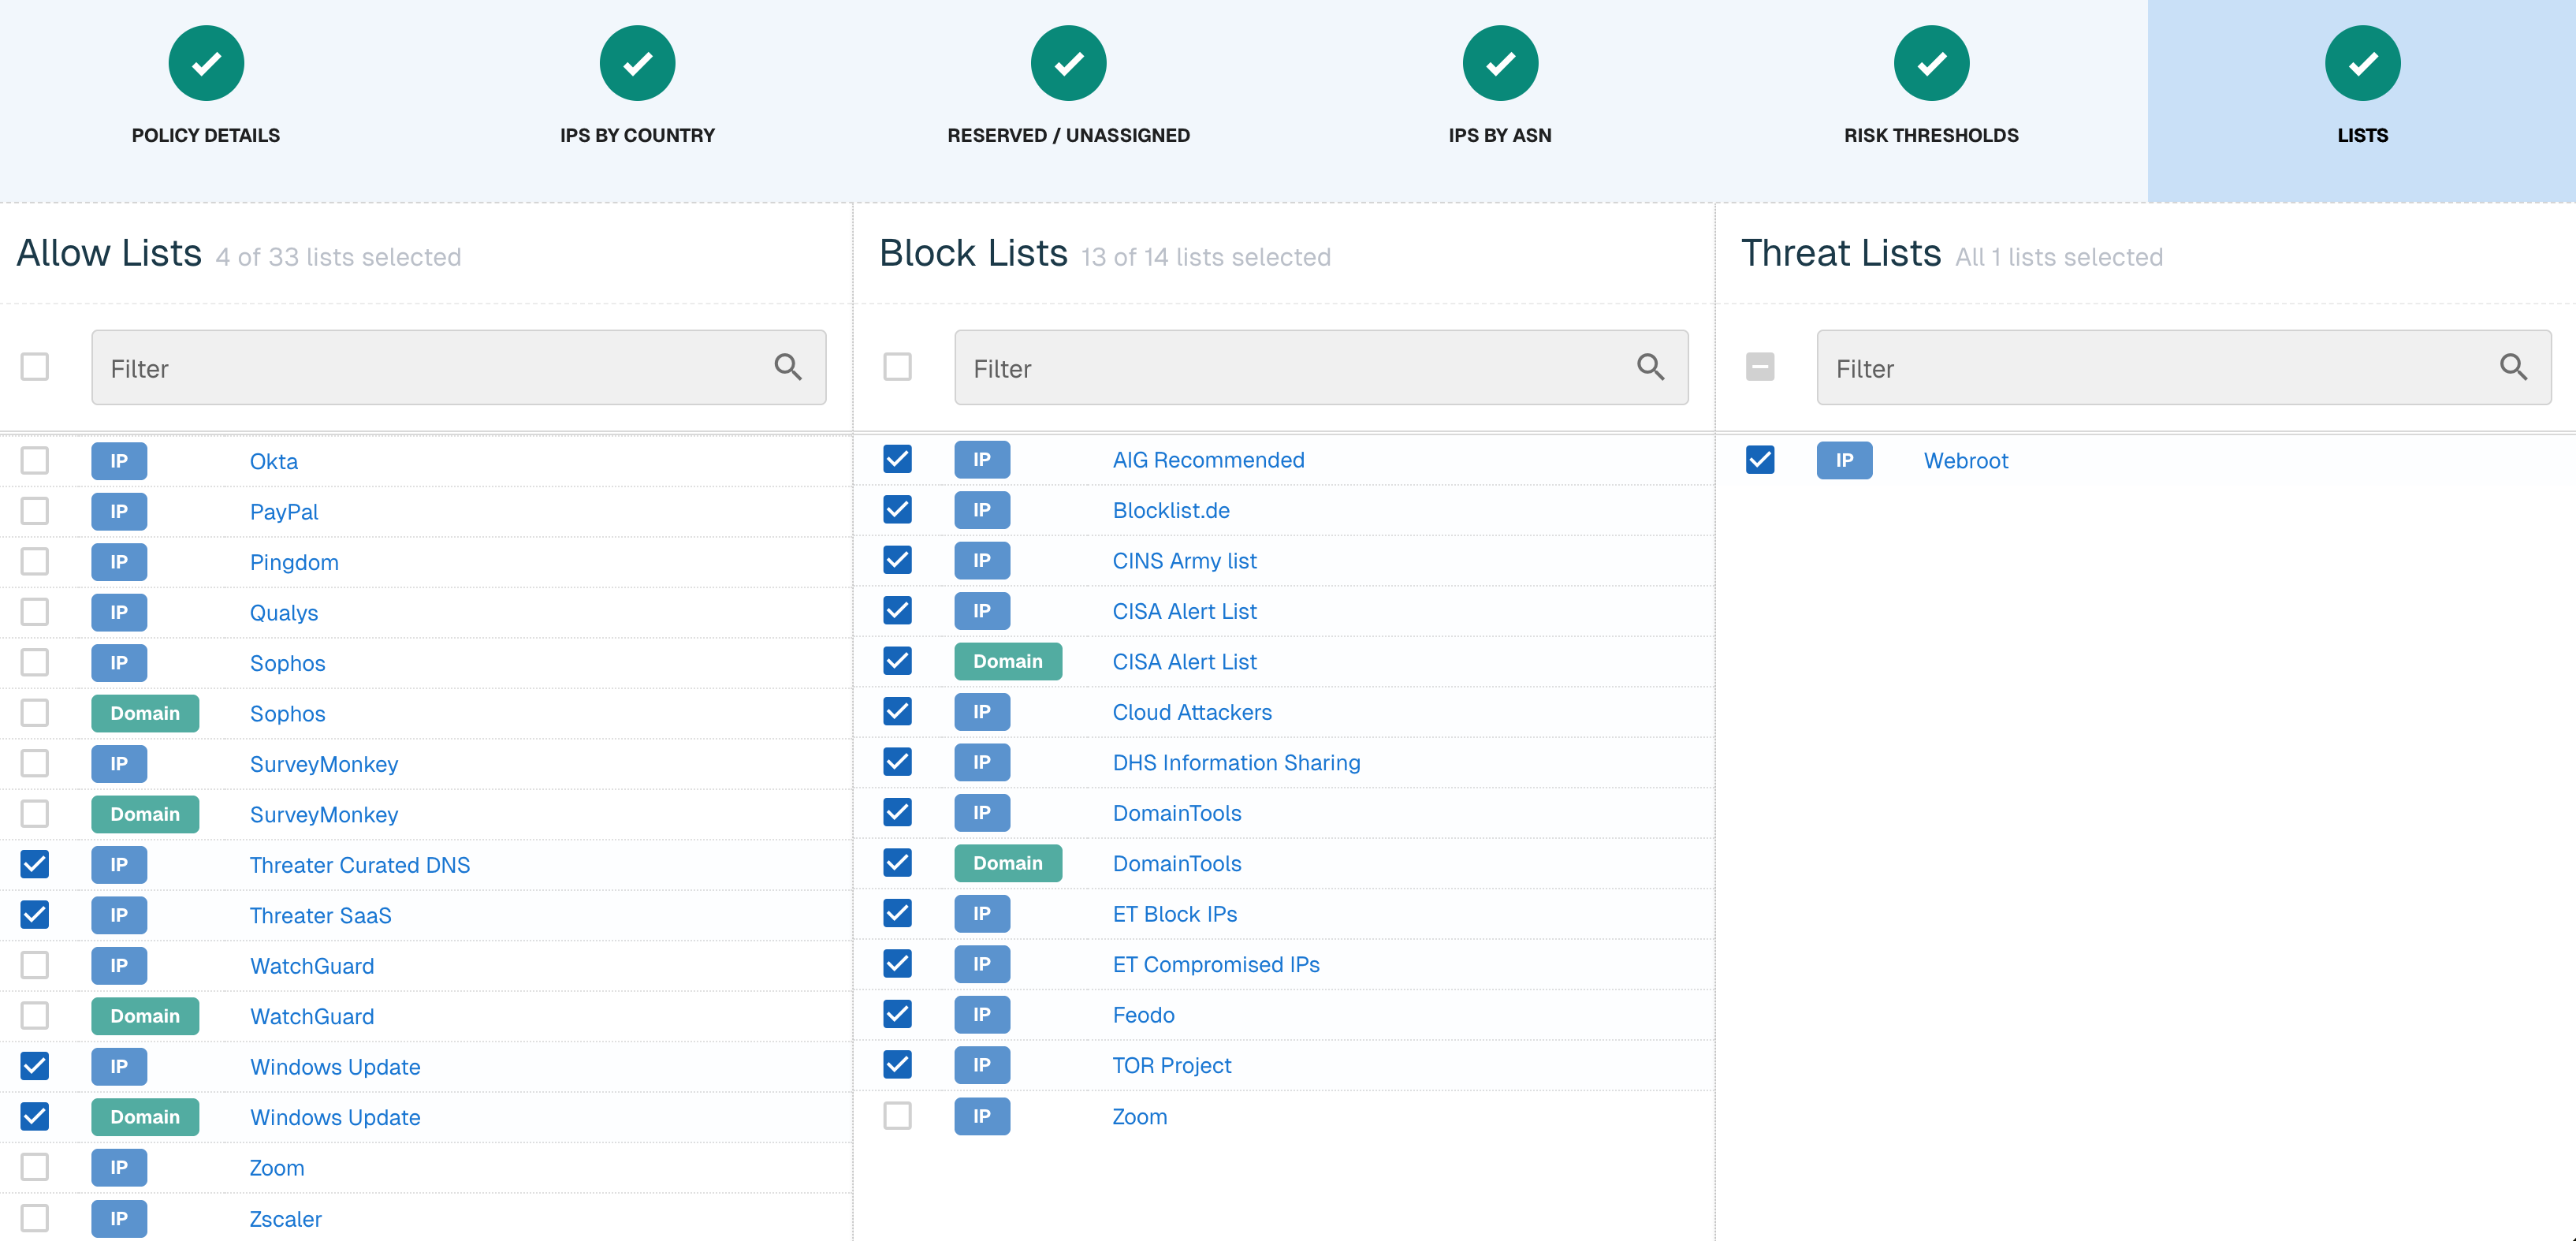
Lists
When we created your Manual and Microsoft lists, we enabled them for the outbound policy, which is why they are selected here. For the outbound policy, you can consider enabling out of the box lists if they are in use by your company (DocuSign, GitHub, Cisco Webex, etc).
💡 What is the Google Allow List? Google publishes their IPs and it is for Google Workspace and products like Google Maps that uses Google APIs. Allow lists are an insurance blanket. Just because they are not selected, doesn't mean you will be blocked from using these services. If a Google IP ends up on a block or threat list or is in a country that you are blocking, the allow list would supersede your blocking mechanism and allow the connection to pass through.
As part of your initial set up, we don't recommend enabling CDNs like Akamai, Amazon Cloudfront, Cloudflare CDN and Fastly (for inbound or outbound policy). CDNs are cloud-based hosts, which will contain 3rd party data that might be exploited by bad actors.
If you are a Windows shop, you can enable both the IP and Domain Windows Update allow list. This will ensure that all updates and processes are being allowed even if it is on a block or threat list or in a country that you are blocking.
Click Save to save your outbound policy.
Create a Network
One or more network rules comprise a Network, and each network is identified as a device, asset, or subnet on your network. If the Enforcer receives traffic for the configured IP, then it will allow traffic according to the policy associated with the Network. Each Network configuration includes a protocol and port, or range of ports, so that you may restrict specific policy activity to as granular a level as required.
On the Networks tab, click the green ⊕ icon.
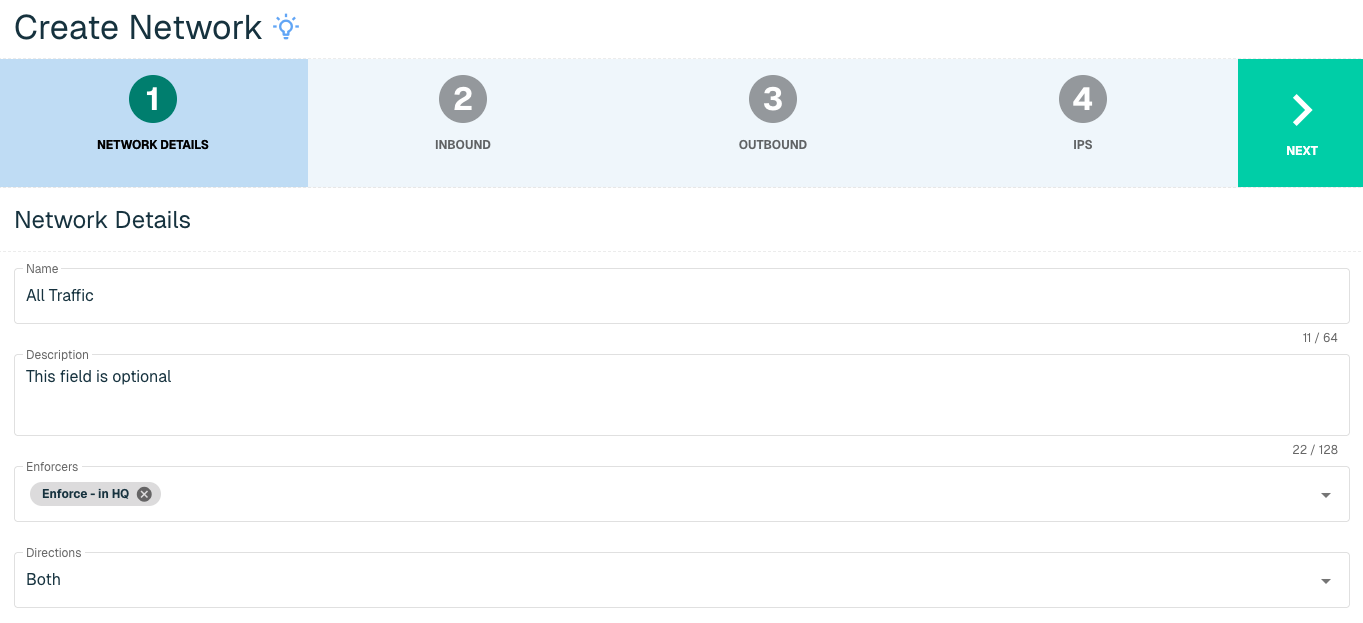
Name your network as appropriate, and assign the appropriate Enforcer(s) to that network. Under Directions, you will likely want to set the value to Both. Click Next to continue.
There are two options for your initial deployment:
-
Start in an "allow all" posture. This would allow the software to accumulate logs and connections without blocking anything. You can then adjust the Networks to a blocking posture when ready.
-
Deploy immediately in a blocking posture.
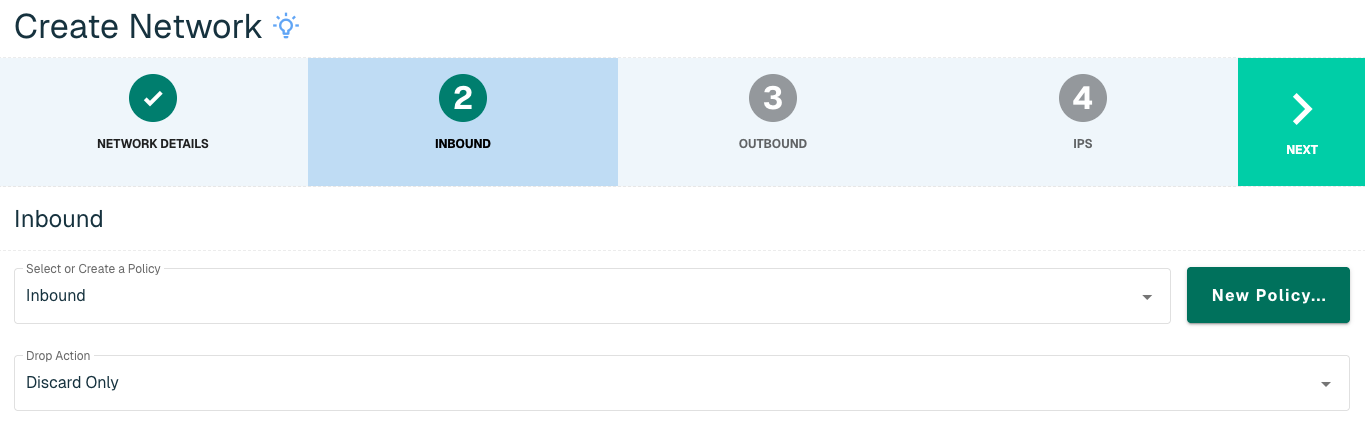
On the Inbound step, set the Policy to the Inbound or Allow All policy and set the Drop Action to Discard Only. Discard Only means that when we are in a blocking posture, we will drop the packet.
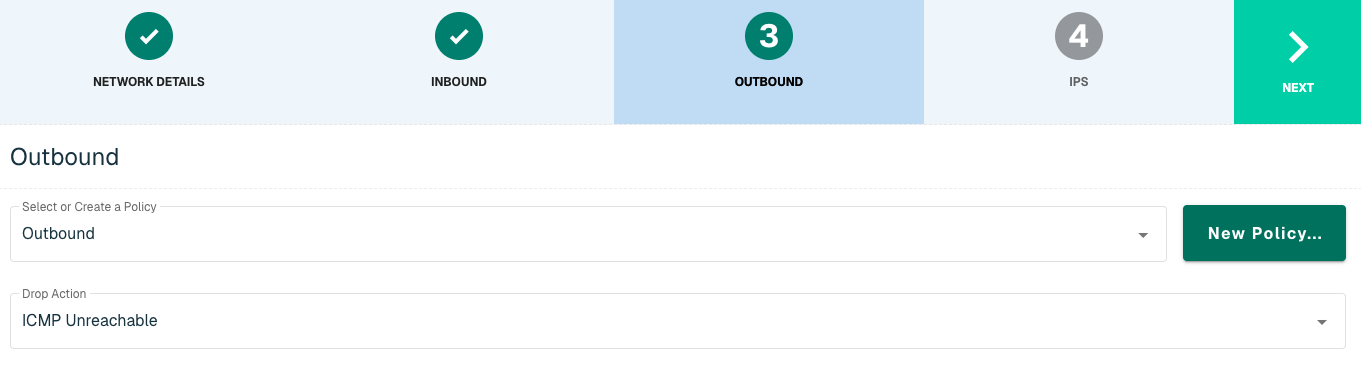
Click Next, then set the Policy to Outbound or Allow All policy for the Outbound Policy. For outbound connections, we recommend ICMP Unreachable as the Drop Action and this means that the web browser would display an unreachable message.
The last step is to define what is being protected in your network. We will want to configure your network for all traffic. Under the IP field, input 0.0.0.0 to ensure that threatER is looking at every IP in and out of your network. For Maskbit, input 0.
We are capable of applying a custom policy or a non-default policy to a specific resources in your network. For example, if you had an on premise email server and you don't want to block any traffic that is coming inbound to that specific email server, we can set up a second network where you would input the IP of the email server.
We can also protect specific protocols and ports. In this case, since we are protecting the entire network, we want to keep the port as All Protocols. Click Add to add the Network under "Network IPs."

Select the Create Network button to create the Network once all IPs are added.
Explore threatER Enforce
Check out some of the other tabs on the Enforce page as well.
Unexpected Blocks
Unexpected Blocks is where you will manage and resolve user reports of websites or services being blocked. This feature pulls a subset of logs (e.g., all outbound requests on port 443) from your Enforcer to pinpoint the IP that is causing the issue. We’ll come back to this feature later once we have traffic to review.

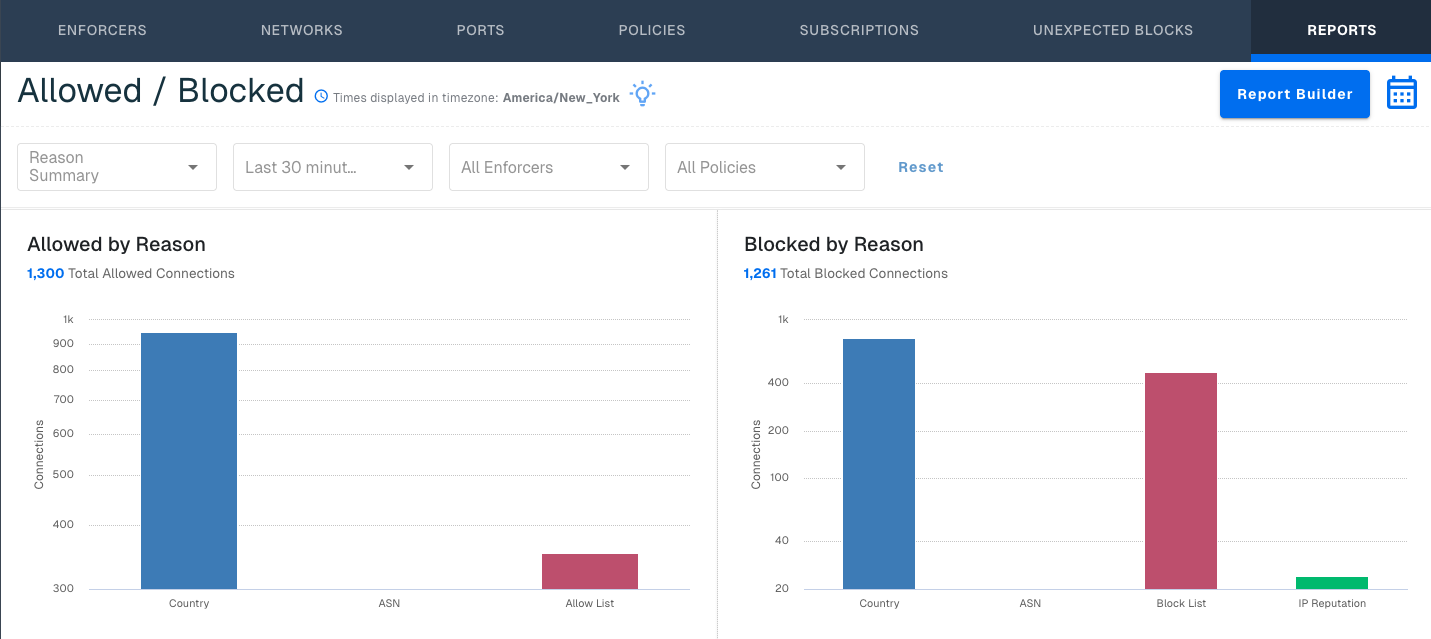
Reports
Reports will be your standard landing page, and show you an overview of your traffic and blocking results.
Next Step
Once you’ve configured your threat blocking rules to your satisfaction, you’re ready to fully deploy threatER into your network environment. You can deploy either in Allow All or in a blocking posture.
If you would like to deploy first in allow all:
Proceed to Step 6 – Deploy in Allow All
If you would like to deploy in a blocking posture: