The Enforcers tab displays all Enforcers that have been activated to your threatER account.
Navigate to Enforce > Enforcers in the left-hand navigation menu to view your organization's Enforce instances.
Enforcers
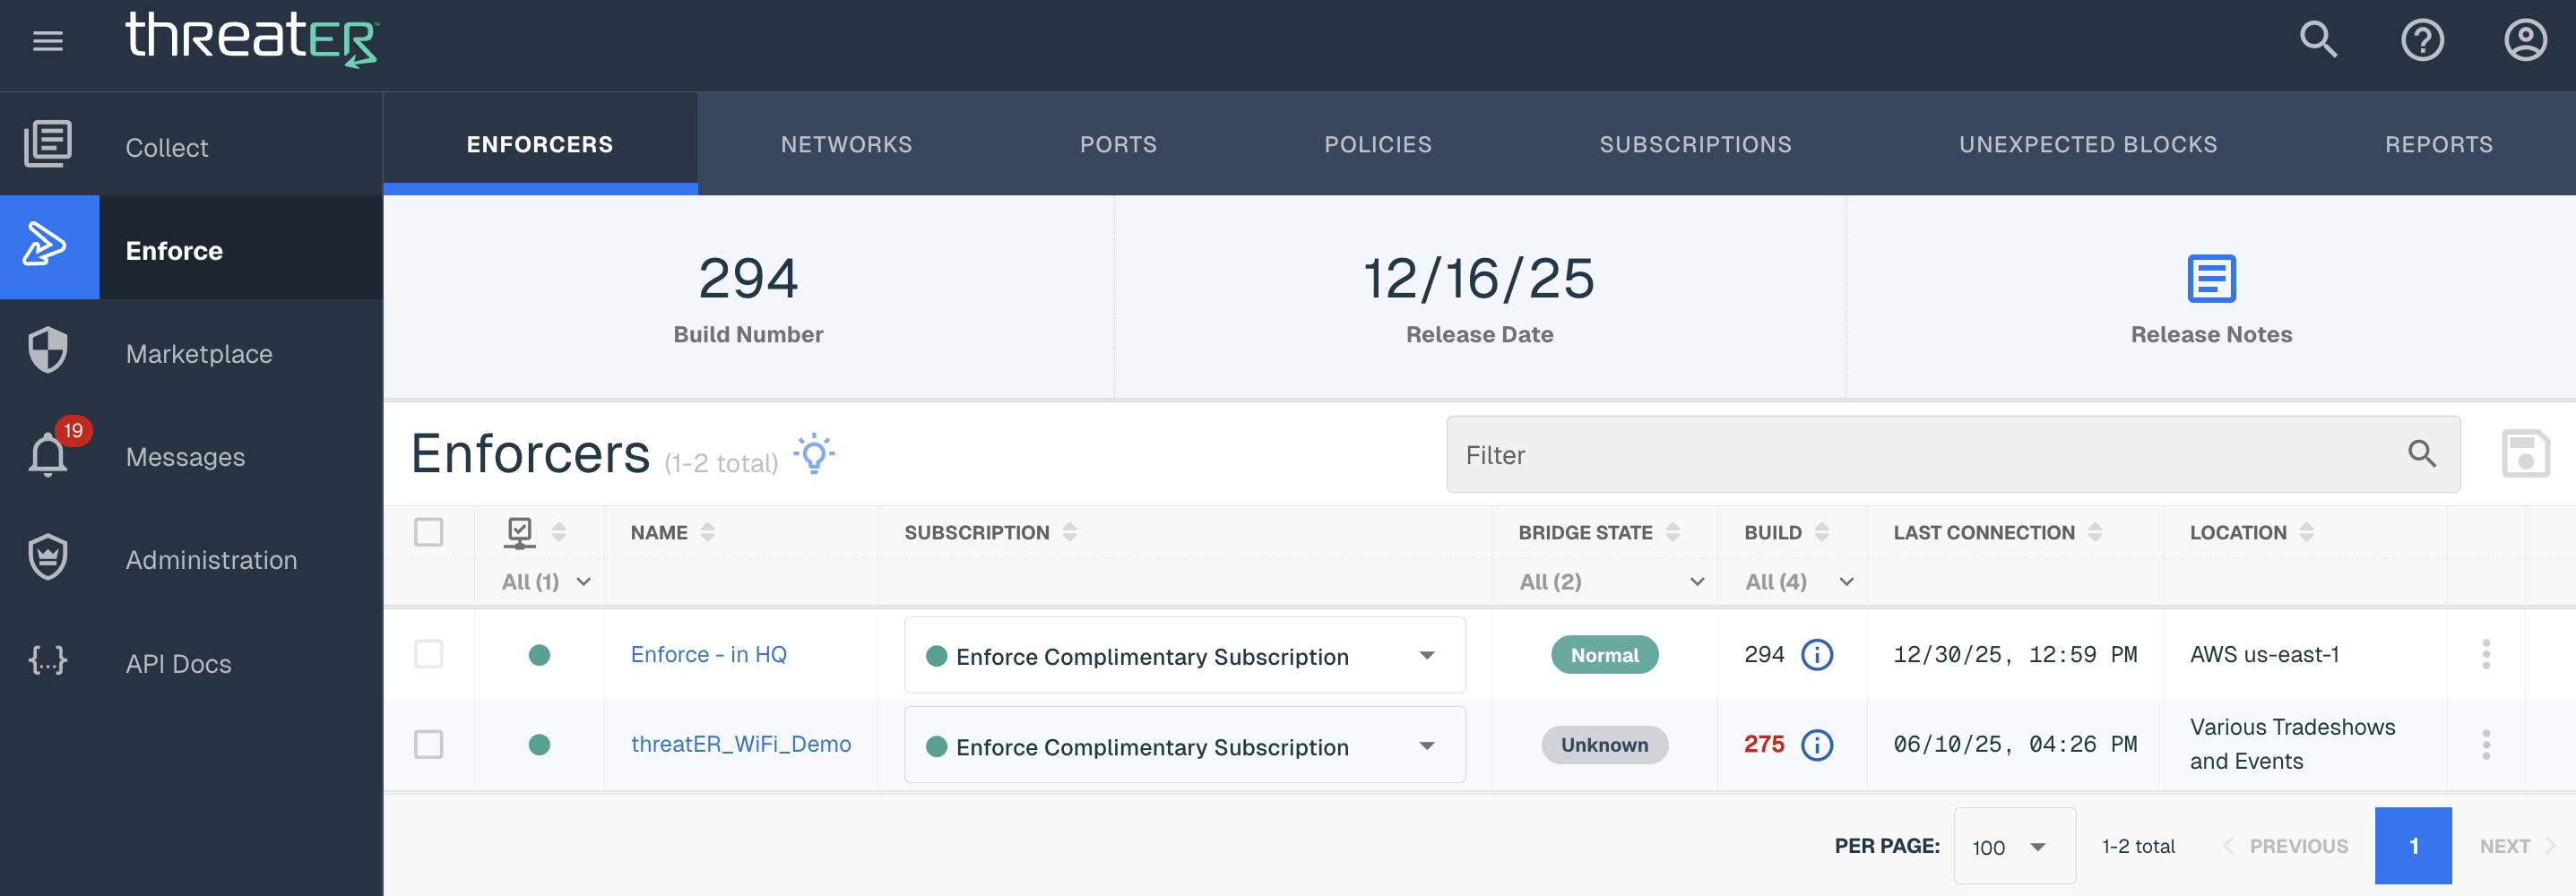
The following details display for each Enforcer:
|
Column Name |
Description |
|
Enforcer Name |
The name that is generally provided during activation time, but can be changed as needed. If no such name is available, a unique identifier is displayed. |
|
Subscription |
Enforce software subscription assigned to the Enforcer |
|
Bridge State |
Four options including: Normal, Hardware Bypass, Unknown and Wifi. Hardware Bypass indicates an Enforcer that is in hardware bypass mode. Unknown is displayed for any Enforcer running legacy software, or if the Enforcer's current state is unknown. Wifi indicates an Enforcer that has been deployed on a wifi router. |
|
Build |
Displays the Enforce software build the Enforcer is currently running. If the Enforcer is not on the latest build, the build number will display in red and an end user can hover over the "i" label to show the number of builds the instance is behind. |
|
Last Connection |
Indicates the date and time the Enforcer last connected to the Theater Portal. This should normally be within a few minutes of the present time. |
|
Location |
The location of the Enforcer if available. A "-" will show if no location is provided. |
Click on the hyperlinked Enforcer Name in the table to view additional details of the individual Enforce Instance. The additional data will display:
|
Name |
Description |
|
Subscription Throughput |
Refers to the Subscription Throughput section and see below for more details. |
|
Admin IP |
Available to find administration IP to locally access Enforce or to troubleshoot with the Customer Success team |
|
Configuration |
Refers to the Configuration section and where end users can manage the Enforcers. |

Updating Enforce Software
The Portal provides customers the ability to install the latest Enforce software build onto their Enforcer(s). Users can access the latest build by selecting Enforce > Enforcers in the left-hand navigation menu.
Users have the option to perform an immediate update, or to schedule an update at a later time. Installing new software will force a reboot of the Enforce instance. The instance will be offline and in bypass mode during the install. If a new build becomes available between now and the Scheduled Date, the latest available build will be installed.
Note that unless otherwise stated in our threatER Enforce release notes, the Enforcer will always be updated from the existing version to the latest version, even if there are versions in between. The standard update will take approximately 10 minutes and at the end of the update there will be a brief disruption as the Enforcer reboots once to complete the installation. Any exception to this will be called out in the release notes.
More information on performing a software update can be found at this knowledge base article.
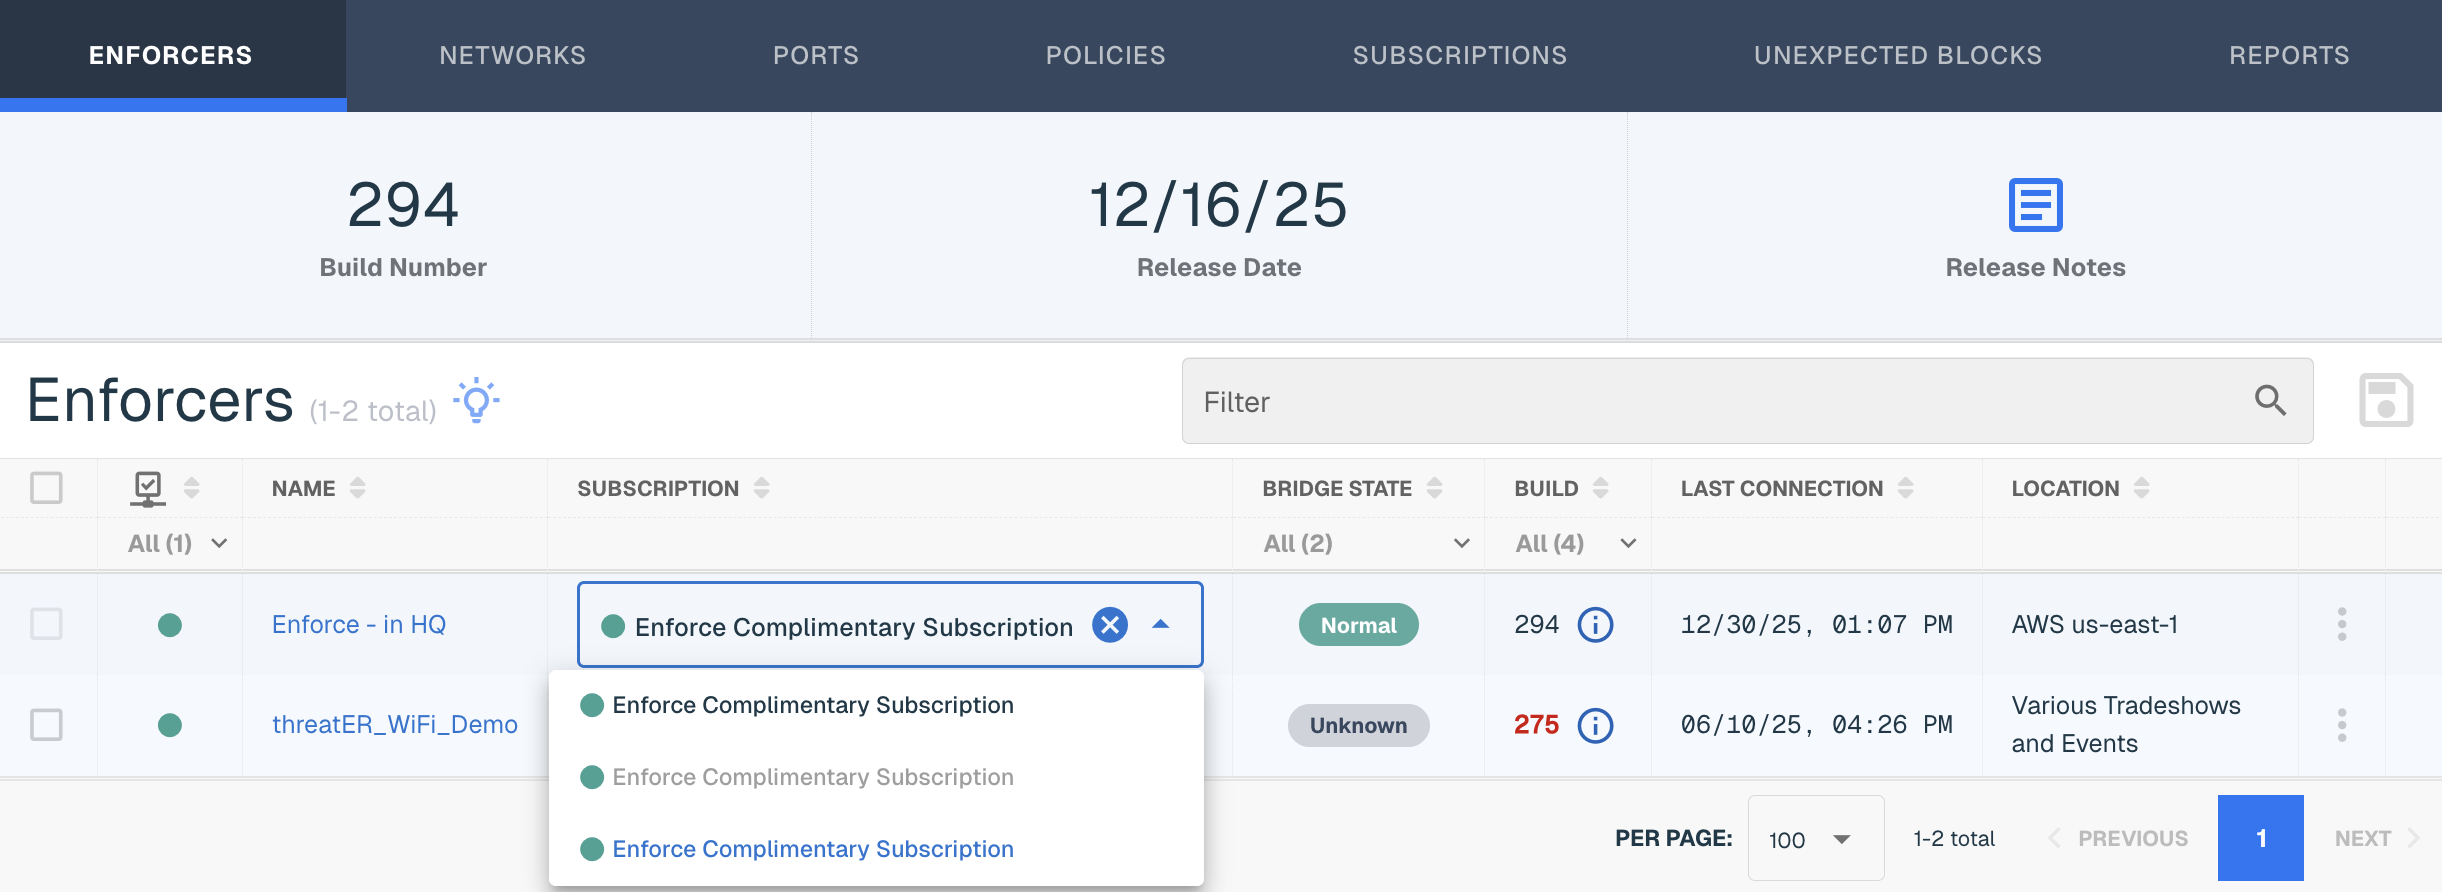
Subscription Management
To manage subscriptions from the Enforcers tab:
-
Select (or remove) a subscription from the drop-down
-
Make any additional necessary subscription updates to other Enforcers
-
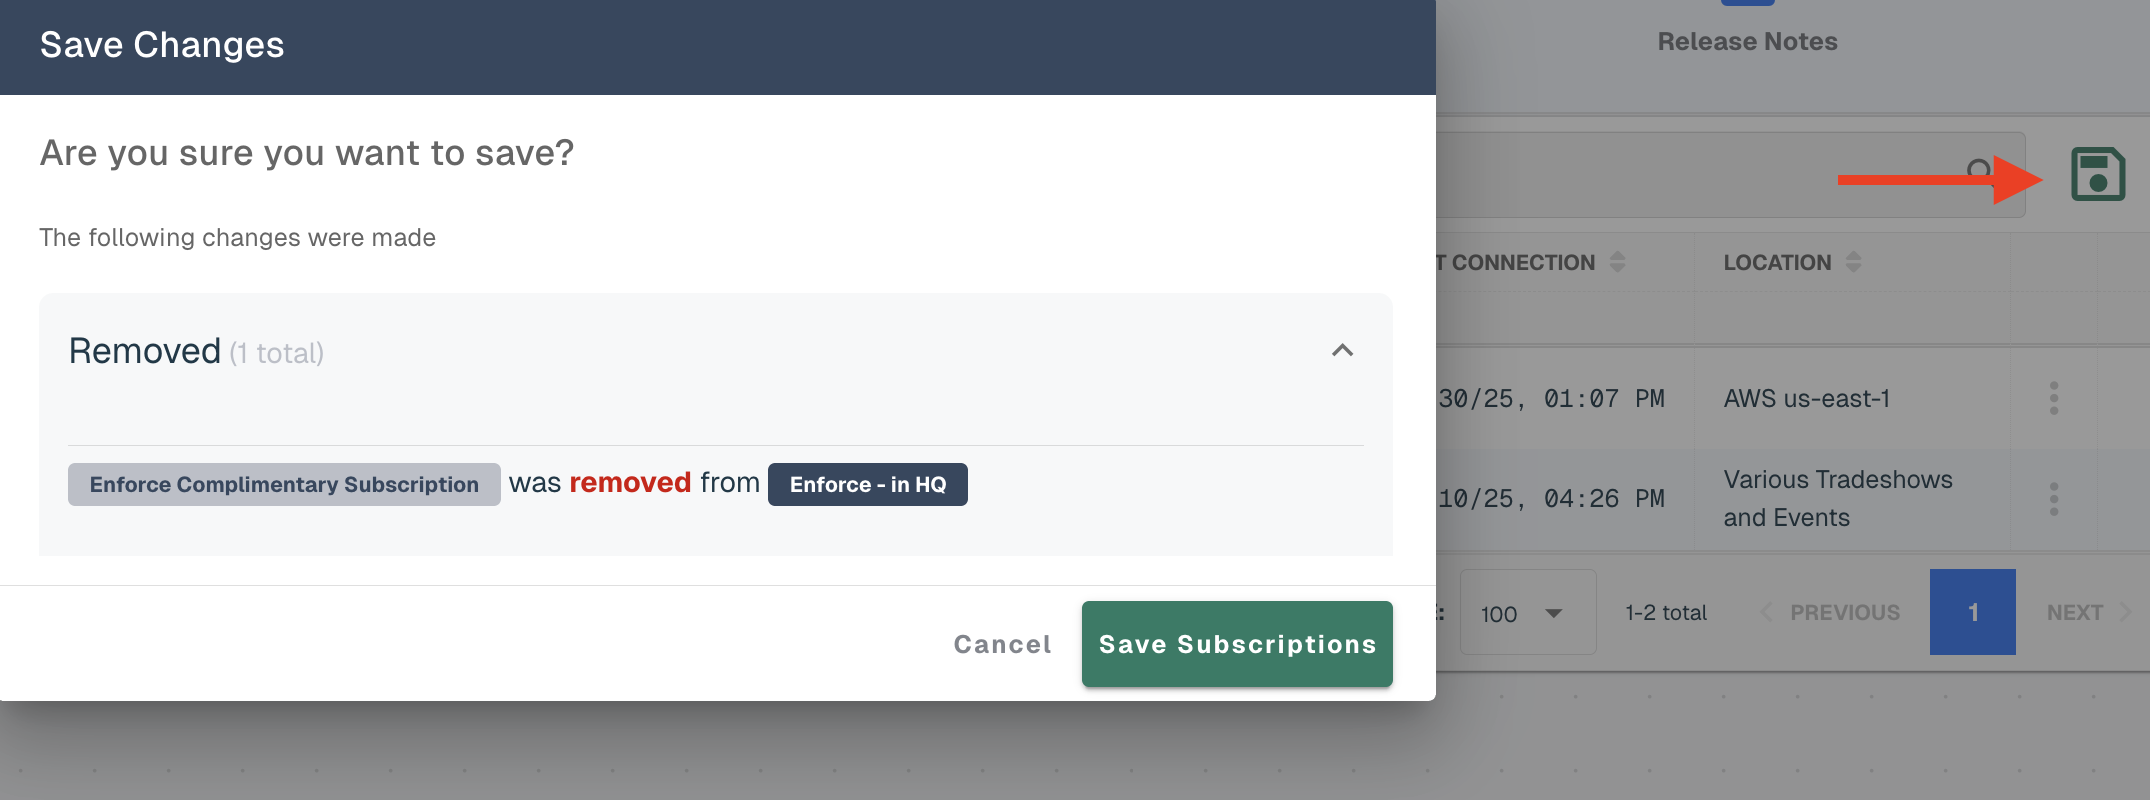
Select the Save Subscriptions button at the top of the table
Review the selected changes on the Save Changes modal and then select the Save Subscriptions button.
Subscription Status Indicators:
-
Green - subscription is actively supported
-
Yellow - support has lapsed; any Enforcer assigned a subscription in this state may not receive updated threat intelligence and as a result may be in an Allow-All state. You should contact our Customer Success team to review your subscription status.
Editing Enforcer Name and Location
Admins can edit the Name and/or Location of an Enforcer to help simplify and identify instances according to own network naming conventions.
Find the Enforcer in the table and select the vertical ellipsis and click Edit in the far right column. Enter the desired name or location and select Save.

SSH Password Reset Capability
The Enforcer must be on build 284 to access this feature. Company Master user accounts can reset the SSH password tied to an Enforce installation directly from their Portal account. This will help facilitate the scenario of when the access credentials of an Enforce instance is forgotten.
Navigate to the Enforcers tab > Select Reset Console Password from the ellipsis menu > On the confirmation modal, click "Reset."
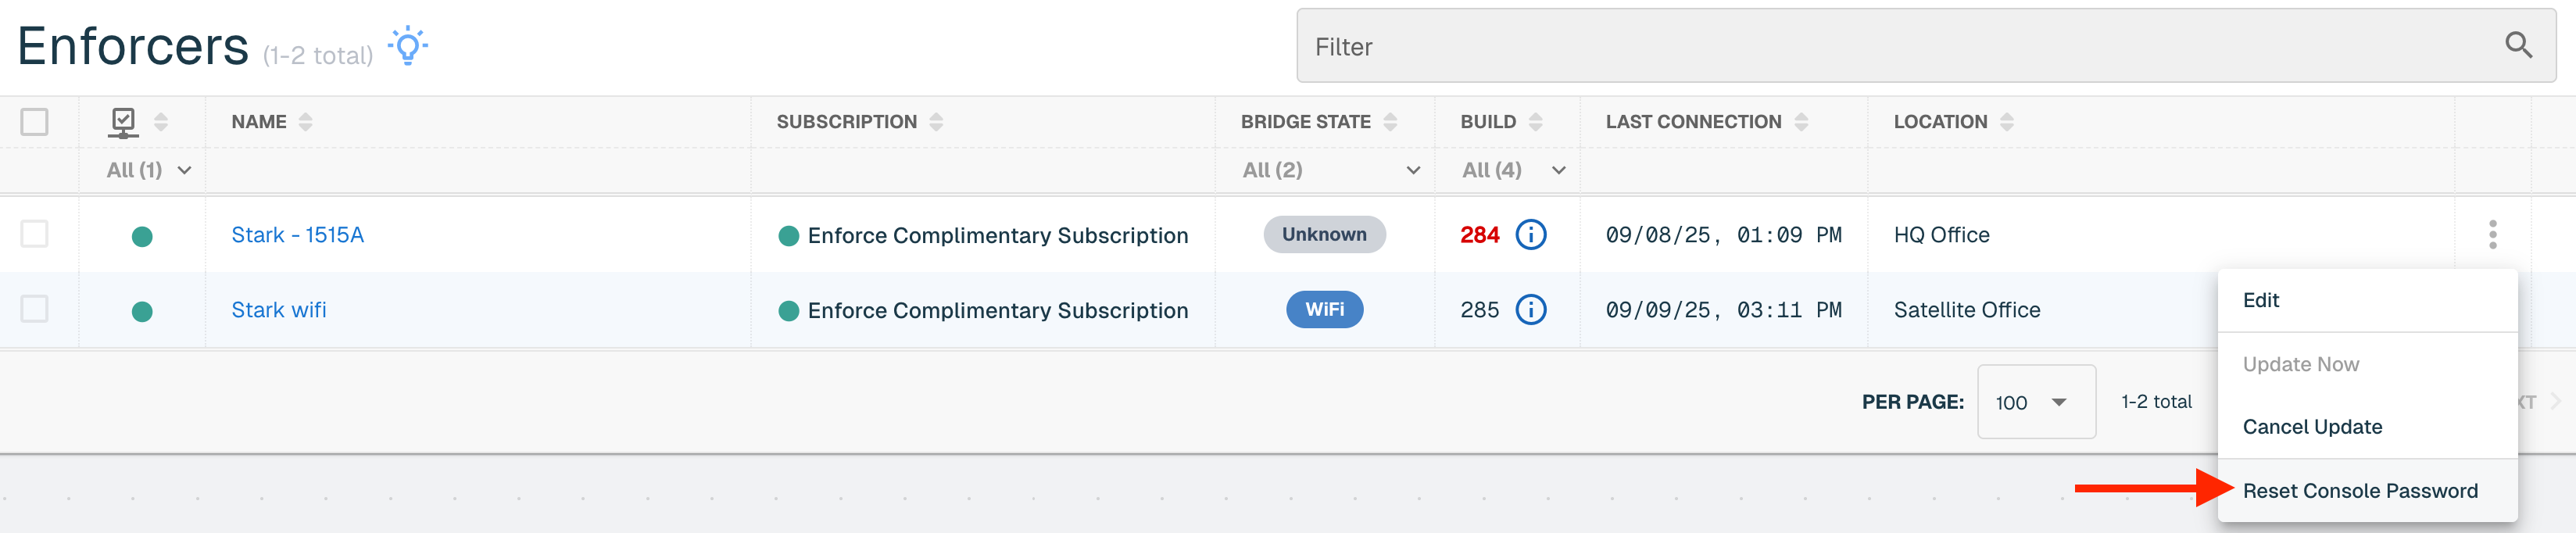
The reset password is enforce.
Enforce Configurations
The Enforcer must be on at least build 247 to access this feature. Once updated, threatER Enforce configurations can be managed directly in the threatER Portal. This configuration is for layer 2 networks including on premise, virtual (via KVM) and cloud (via AWS, Azure and GCP). Enforce Wifi Configuration information can be found at this link below.
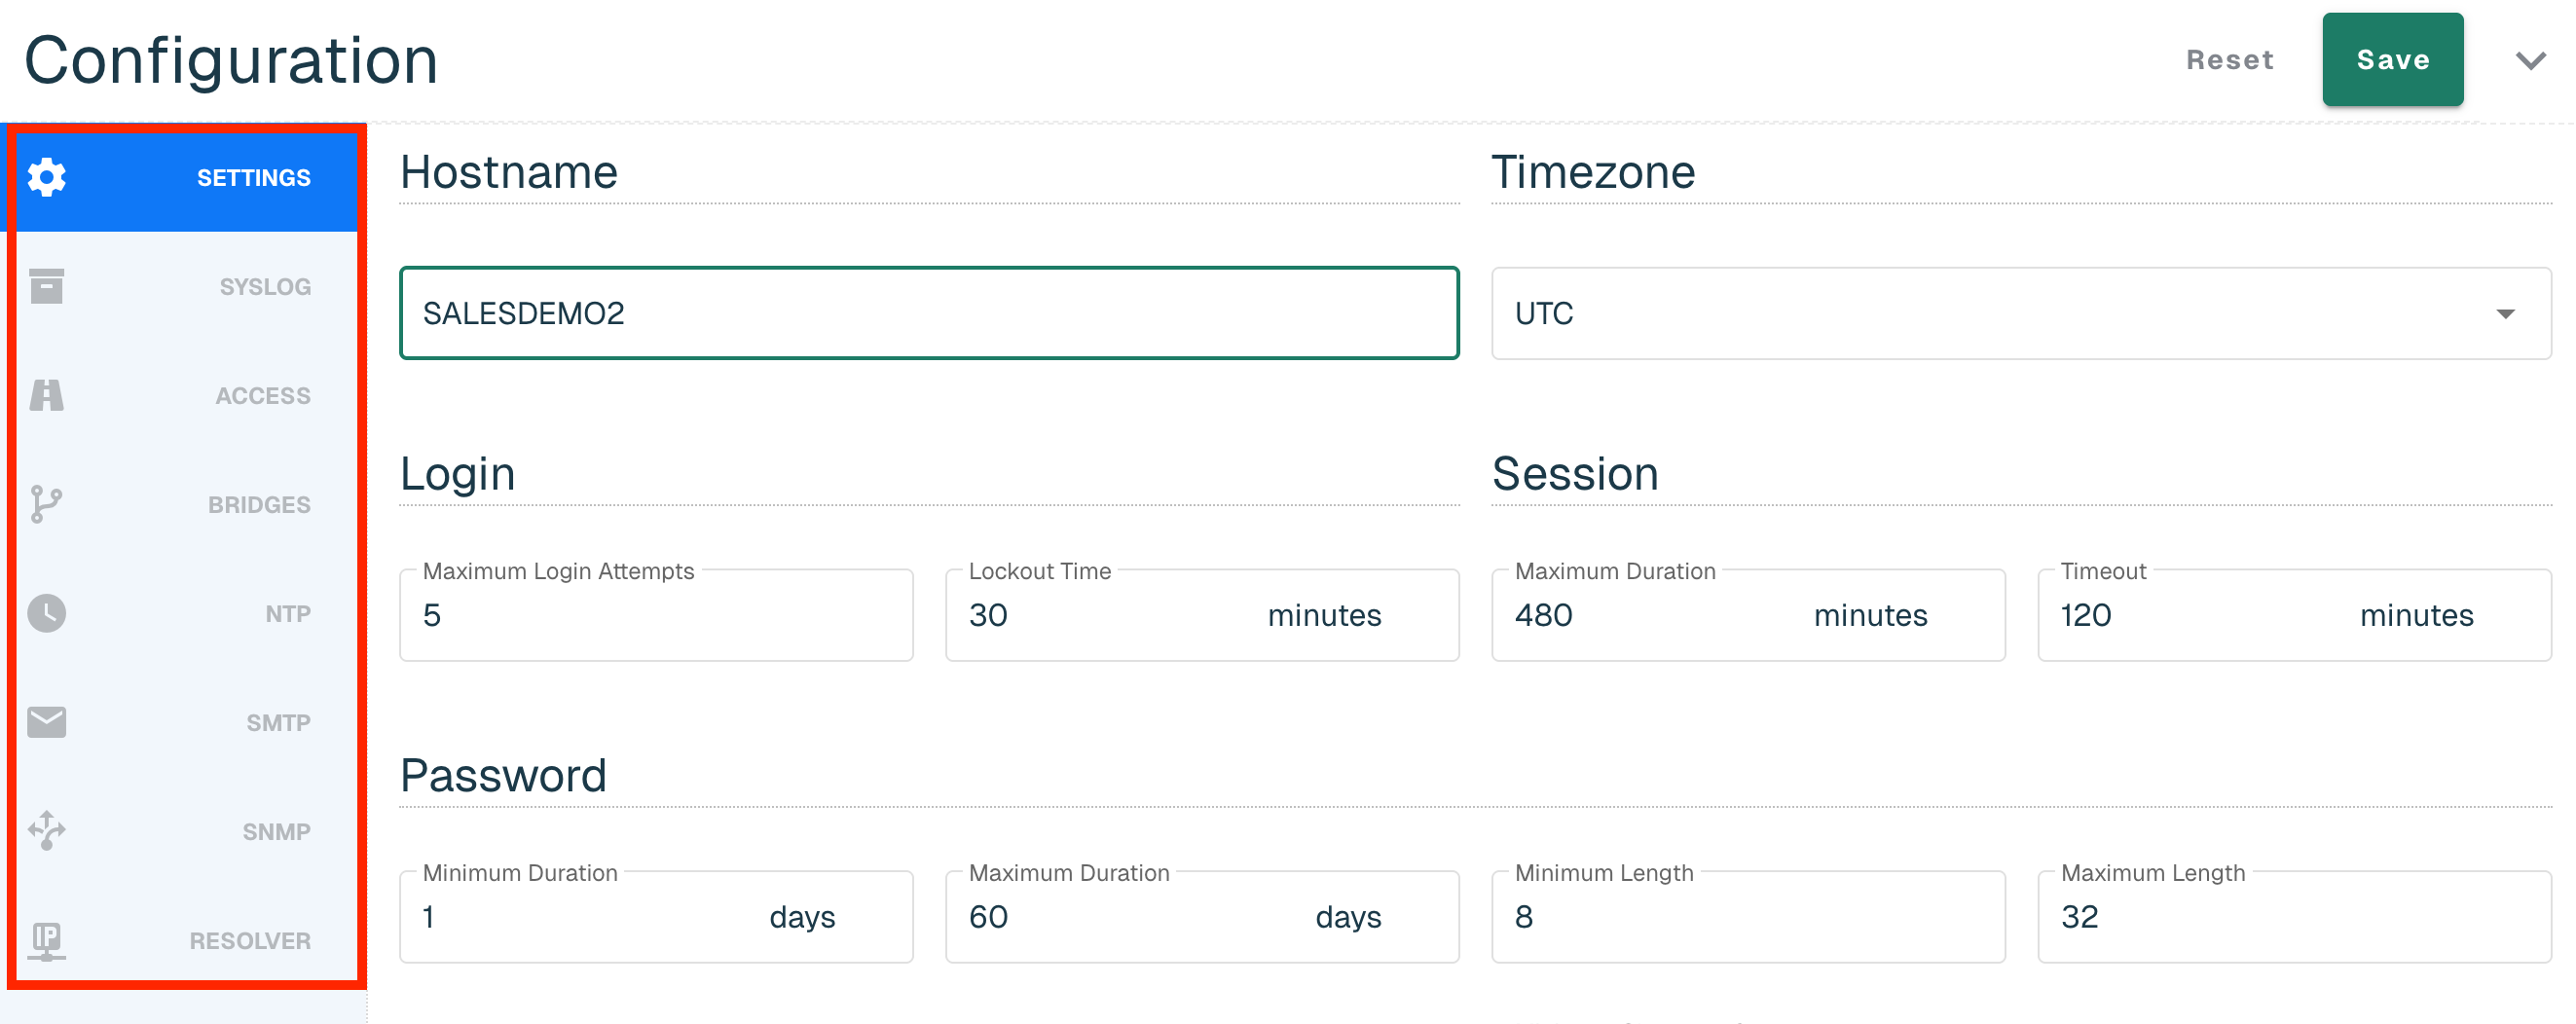
Navigate to Enforce in the left-hand navigation menu, click on the Enforcers tab and select the hyperlinked name of the applicable Enforcer. Customers on a build that is below 247 will not have access to this feature and will see the below message.
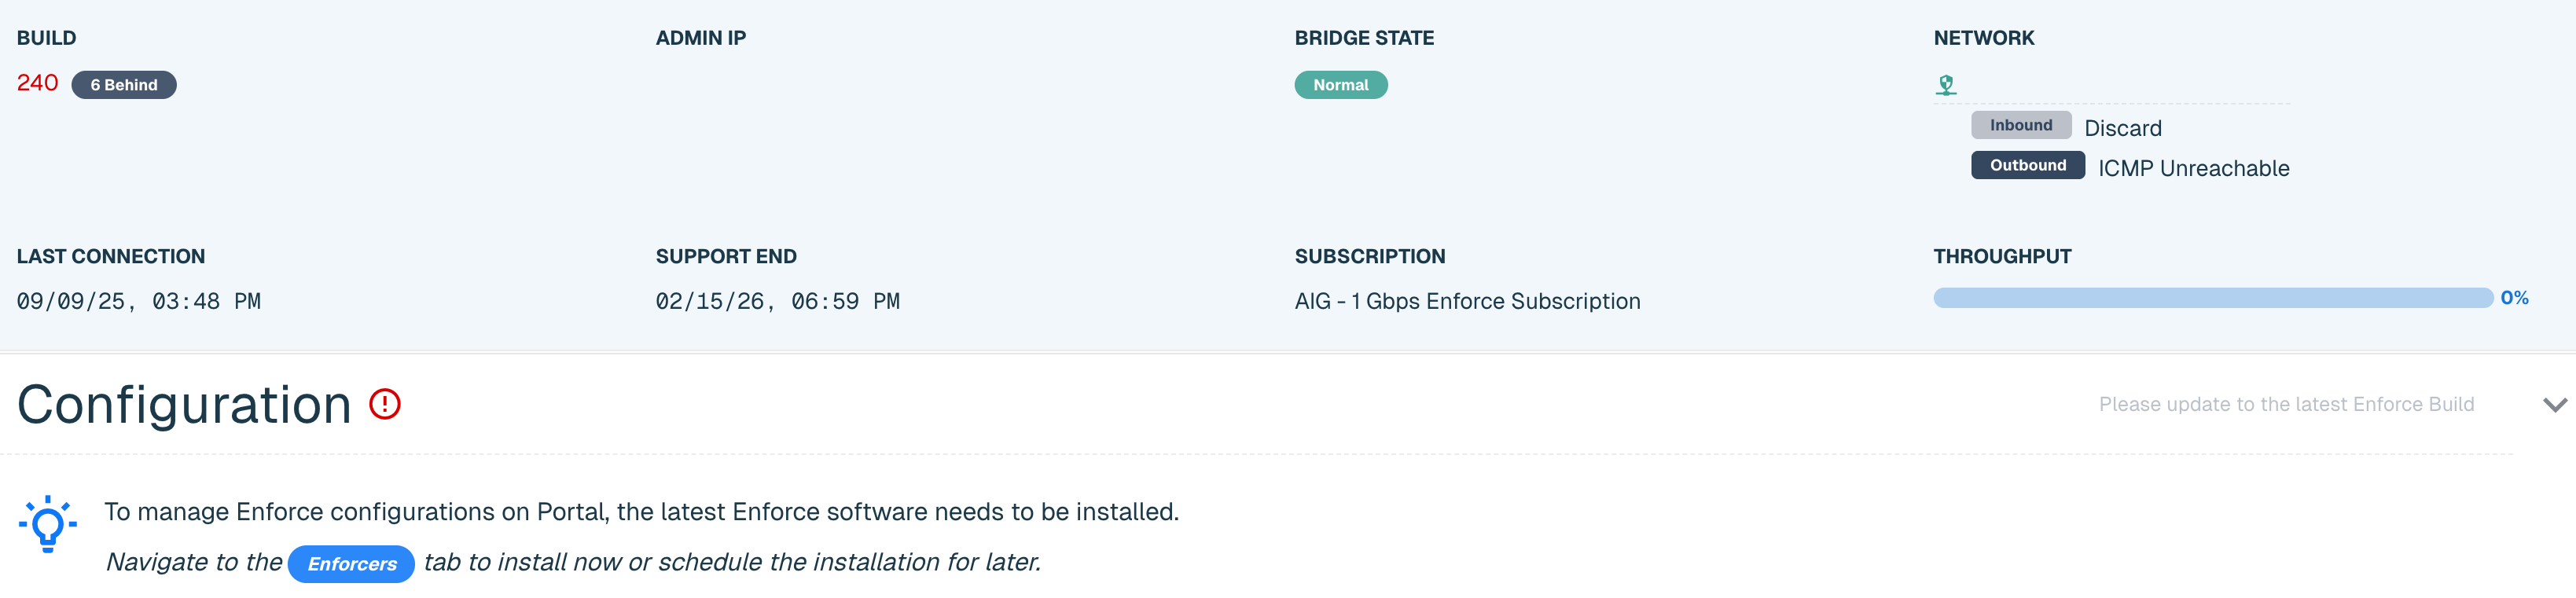
For those on build 247 and above, click on the carrot to expand the Configuration card. The Enforcer's current configurations will be copied over to the Portal as part of the build 247 installation. Configurations for Enforcers on Build 247 or greater will now be managed in the Portal and will be read-only on the threatER Enforcer user interface (UI).
Select through the Configuration navigation bar to make updates. You can save once when complete or can choose to save at each individual tab.
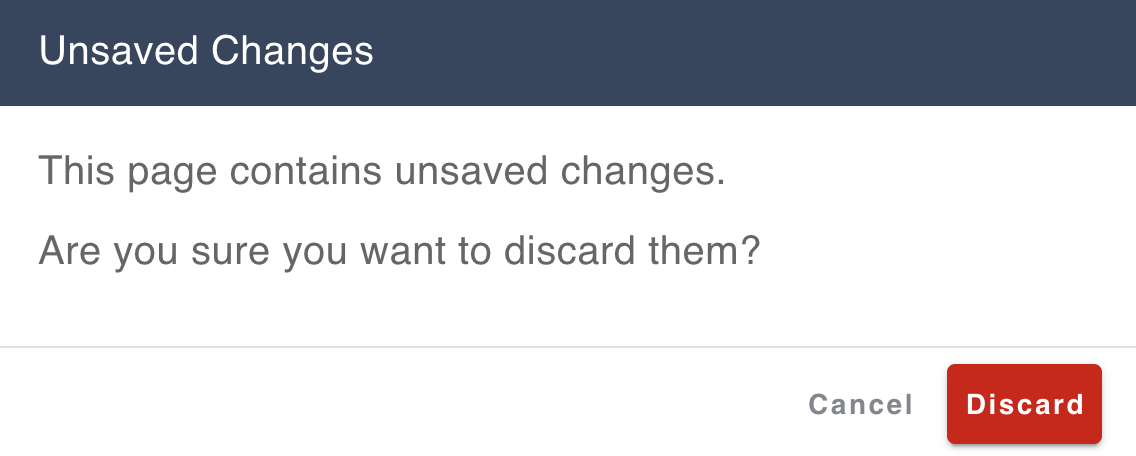
Moving away from the Enforcers tab without saving will show the "unsaved changes" pop-up message.
|
Navigation Tab Name |
Portal Configuration Setting |
Location in Enforce UI |
|
Hostname |
Settings > General |
|
|
Timezone |
Settings > Date & Time > Date & Time |
|
|
Login |
Settings > General |
|
|
Session |
Settings > General > Session |
|
|
Password |
Settings > General > Password |
|
|
Loose State Handling |
NA |
|
|
Banner |
Settings > Banner |
|
|
Servers |
Logging > External Syslog |
|
|
Access Rules |
Network > Access |
|
|
Bridge |
Network > Bridging Interface > Bridging Interface |
|
|
Bypass |
Network > Bridging Interface > Bypass Mode |
|
|
NTP Servers |
Settings > Date & Time > NTP Servers |
|
|
SMTP |
Settings > SMTP |
|
|
SNMP |
Settings > SNMP |
|
|
Resolver |
NA |
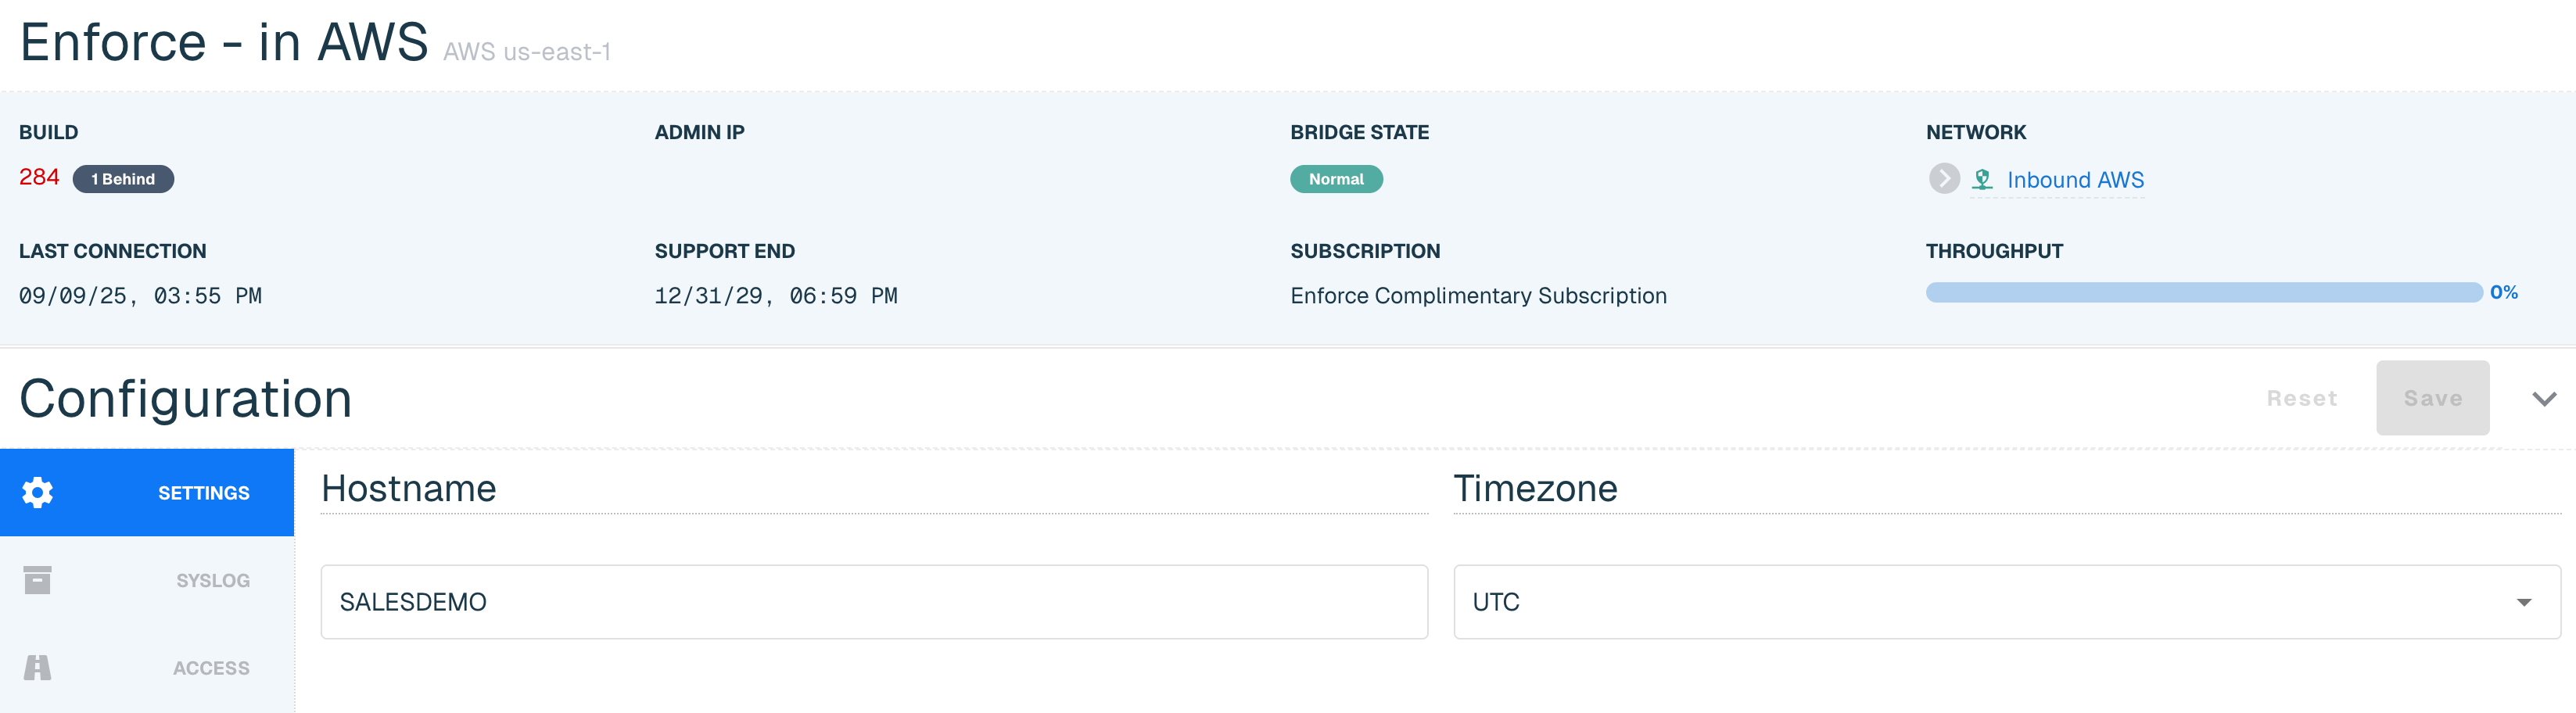
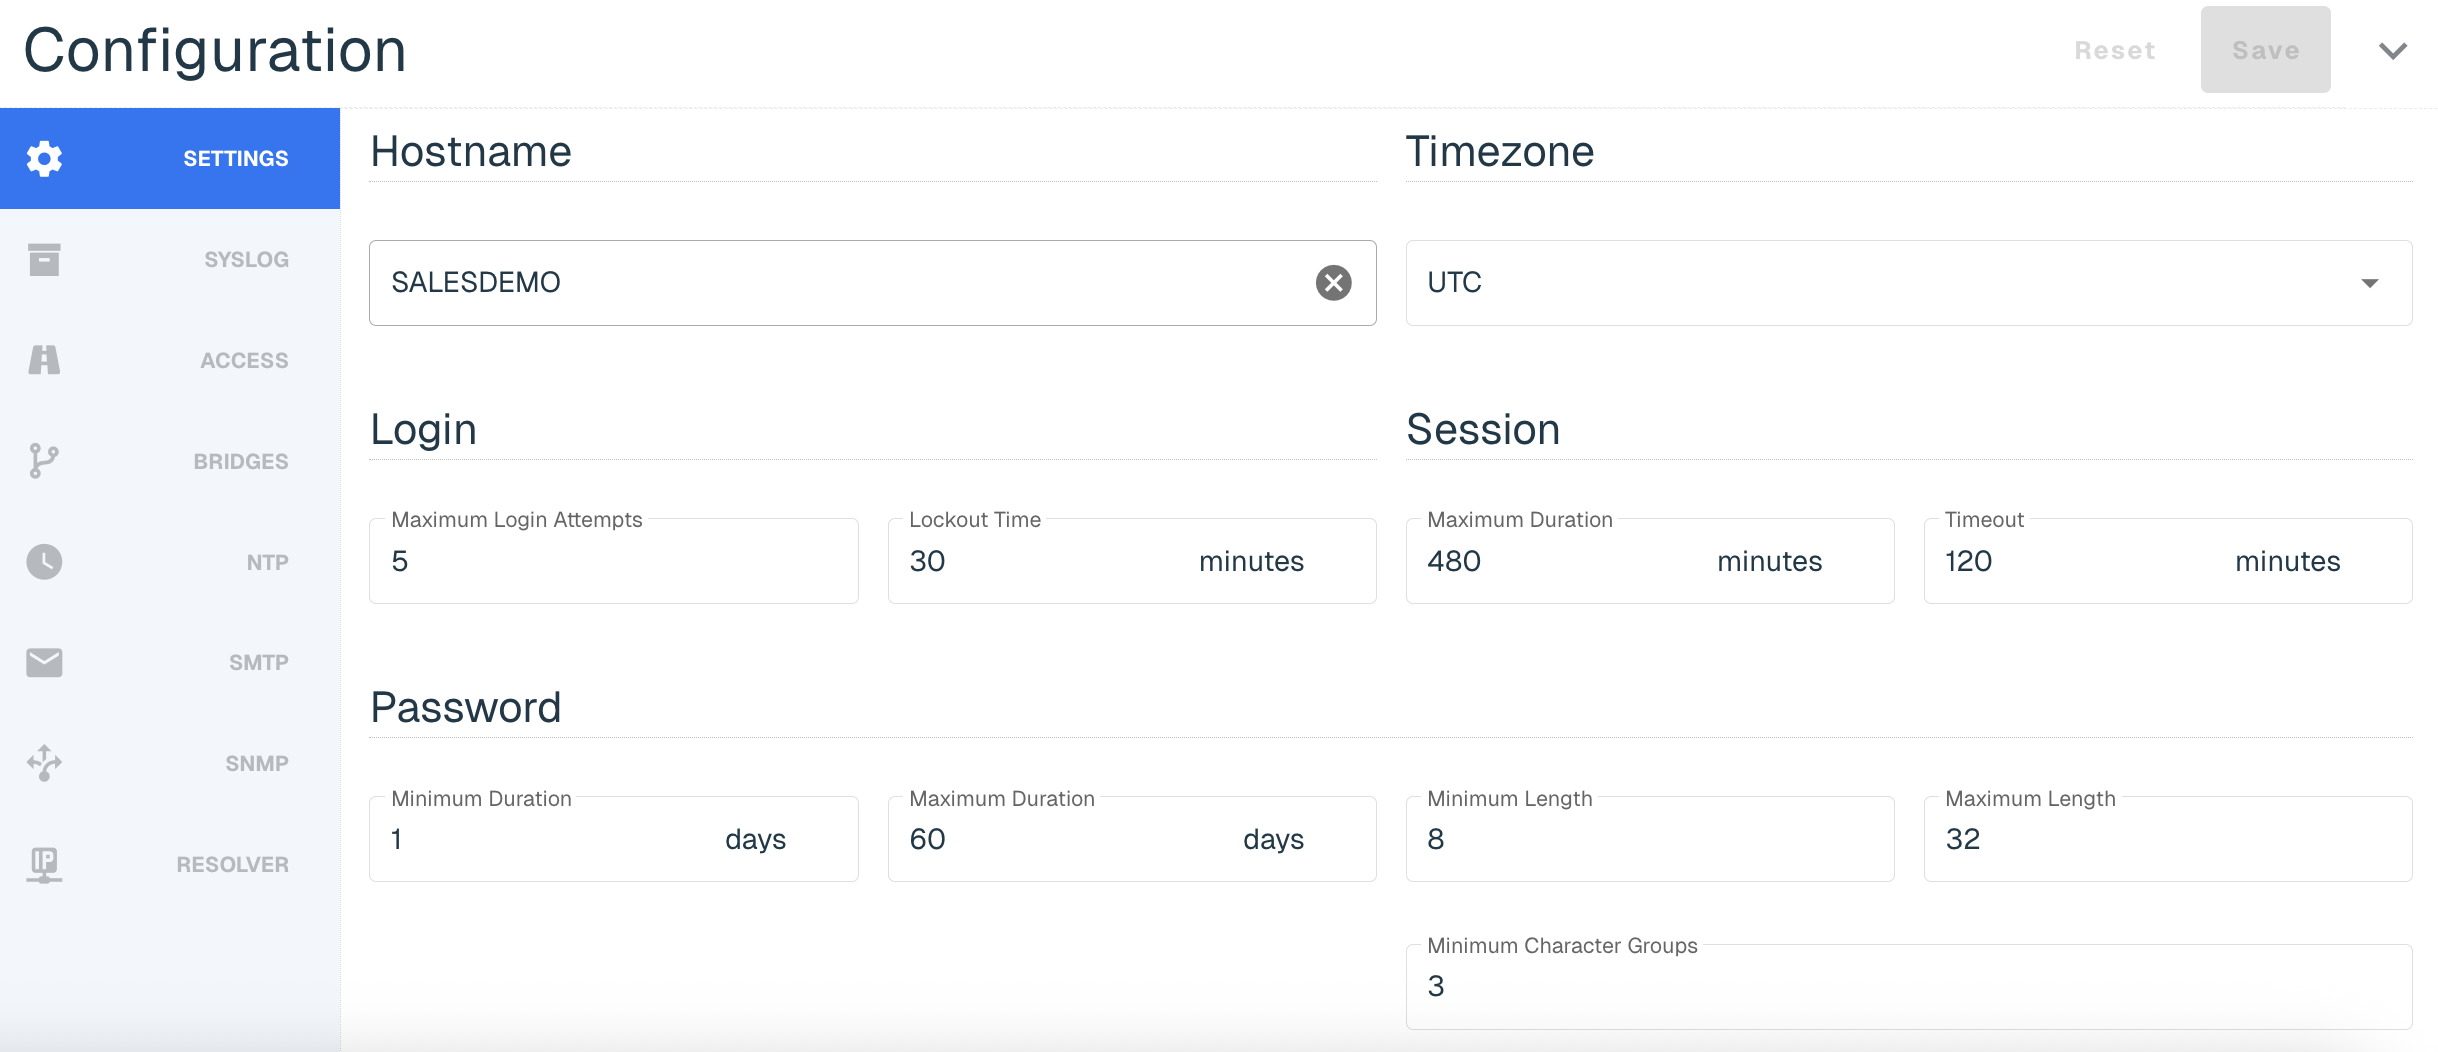
Settings
The Settings tab allows you to configure the following:
|
Section Name |
Field Name |
Description |
Default Setting |
|
Hostname |
Hostname |
A unique label identifying the Enforcer. |
n/a |
|
Timezone |
Timezone |
Time zone for the location where the Enforcer will be deployed. |
UTC |
|
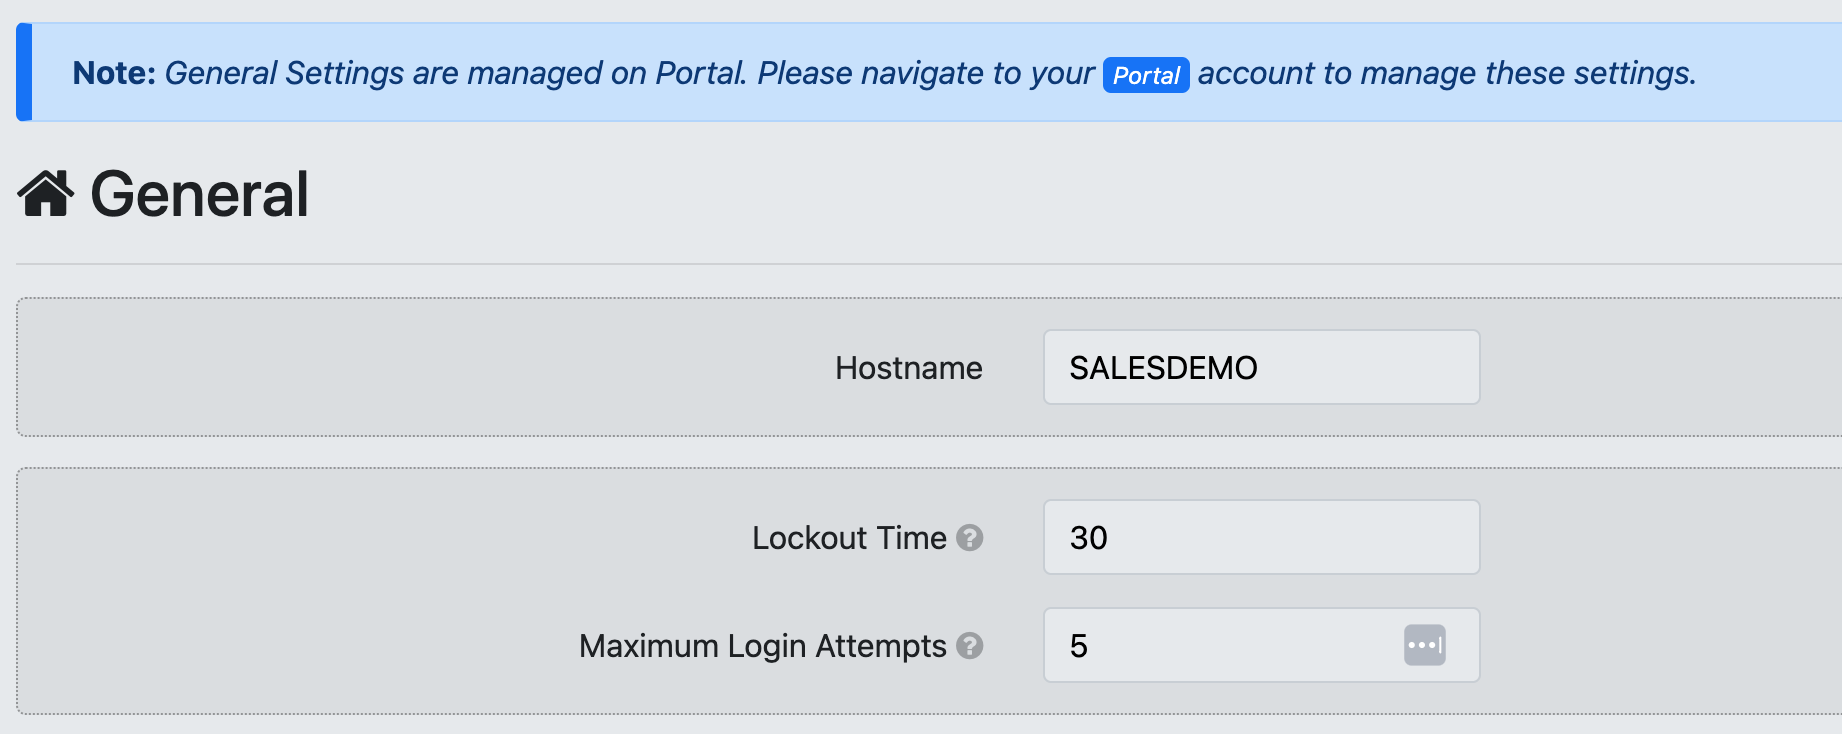
Login |
Maximum Login Attempts |
Restricting the number of login attempts allowed until the lockout time is reset. Choose any value between 1 and 90 attempts. |
5 |
|
Lockout Time |
Prevents a user from logging in again for a specified amount of time after multiple failed attempts. The value is in minutes and must be between 0 and 1440 minutes. 1440 minutes = 24 hours. |
30 min |
|
|
Session |
Maximum Duration |
Specify a maximum duration of a session before it ends. The value is in minutes and must be between 30 and 1440 minutes. 1440 minutes = 24 hours. |
480 min |
|
Timeout |
Determines the time a user can remain idle before the session id is terminated and the user must log in again. The value is in minutes and must be between 1 and 120 minutes. 120 minutes = 2 hours. |
60 min |
|
|
Password |
Minimum Duration |
Minimum duration password age is a password policy setting that prevents users from changing their password multiple times a day. The value must be between 0 to 90 though we recommend a minimum duration age to one day for security purposes. Setting the number of days to 0 allows immediate password changes. |
1 day |
|
Maximum Duration |
The maximum length of time a password can be used before it needs to change. The value must be between 1 and 365 days. 1 calendar year = 365 days. |
60 days |
|
|
Minimum Length |
Determines the minimum number of characters that can be used in a user account password. The minimum length must be between 5 to 64 characters. |
8 |
|
|
Maximum Length |
Determines the maximum number of characters that can be used in a user account password. The max length must be between 16 to 64 characters. |
32 |
|
|
Minimum Character Groups |
Determines the least number of characters that can make up a password. The value must be between 1 and 4 characters. |
3 |
|
|
Loose State Handling (LSH) |
Description |
Loose State Handling (LSH) is effectively trying to ascertain the direction of a conversation when you jump in the middle of it. This can happen in network security enforcement points when the Enforcer is deployed and operating as a layer 2 bump in the wire. This includes when an Enforcer is first placed in-line, when it is shutdown and powered back up, when it reboots (software upgrade), and when it is taken in and out of bypass mode. When the Enforcer sees the packet that it can't attribute to a known conversation starter, the Enforce software uses some simple logic to attempt to make an educated guess as to the direction of the conversation.
The LSH configuration setting provides the user a level of control over how LSH should be handled and supports the below modes:
|
Always On |
|
Always On |
Always performs the LSH logic and is how the Enforcer software exclusively operated prior to this configuration being available in the Portal |
||
|
Always Off |
Allows you to tell the Enforcer to completely disable the LSH logic and just use packet direction for those scenarios when it isn't sure. |
||
|
Timed On |
Enables LSH for the specified time period after an "LSH event" occurs, where those events are things like power on, bypass toggling, adding bridge pairs, and so on. |
||
|
Banner |
Accepted Text |
A quick note or alert across the login page for a successful login attempt. There is no character text limit and the toggle must be enabled to use. |
N/A |
|
Declined Text |
A quick note or alert across the login page for an unsuccessful login attempt. There is no character text limit and the toggle must be enabled to use. |
N/A |
Syslog
Syslog exports are an industry-standard way of exporting data in a concise, timely manner. Our syslog export format is compliant to RFC-5424 and ensures seamless integration alongside any number of external tools like:
-
Security information and event management (SIEM) tools, such as Splunk and IBM QRadar
-
Data analytics tools like Gravwell
-
Full open-source tools like syslog-ng
Our Syslog export is not designed with any particular SIEM tool in mind. We focus on the comprehensive data contained in our syslog exports, enabling you to parse are logs by any tool that can ingest RFC-compliant syslog exports.
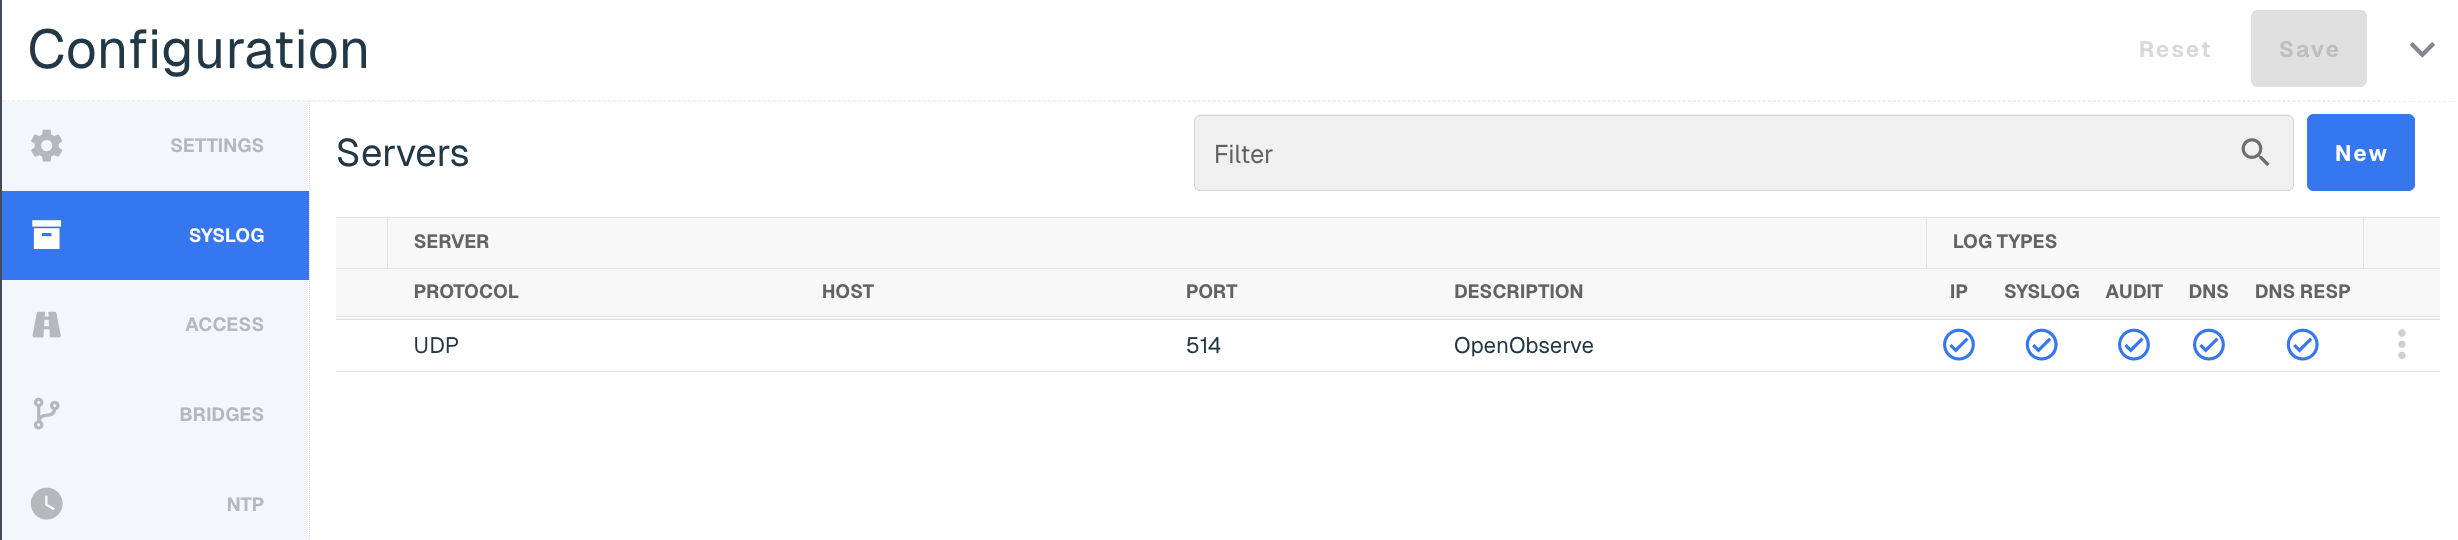
More information on the Syslog requirements can be found at this link. Once you complete the provided steps, your syslog will display the following columns.
|
Subset |
Field Name |
Description |
|
Server |
Protocol |
UDP, TCP or TLS options. Must be on at least build 284 to access TCP or TLS options. |
|
Host |
Your Target System IP |
|
|
Port |
Input 514 for the UDP port, which is the typical listening port most systems use for syslog ingest. This can be changed if needed. |
|
|
Description |
Optional but useful for quick identification if you are sending logs to more than one system |
|
|
Log Types |
IP |
This column is checked if you are sending packet logs via Syslog Export |
|
Syslog |
This column is checked if you are sending system operating logs via Syslog Export |
|
|
Audit |
This column is checked if you are sending internal administration logs via Syslog Export |
|
|
DNS |
This column is checked if you are sending domain logs via Syslog Export |
|
|
DNS RESP |
This column is checked if you are sending DNS traffic logs via Syslog Export |
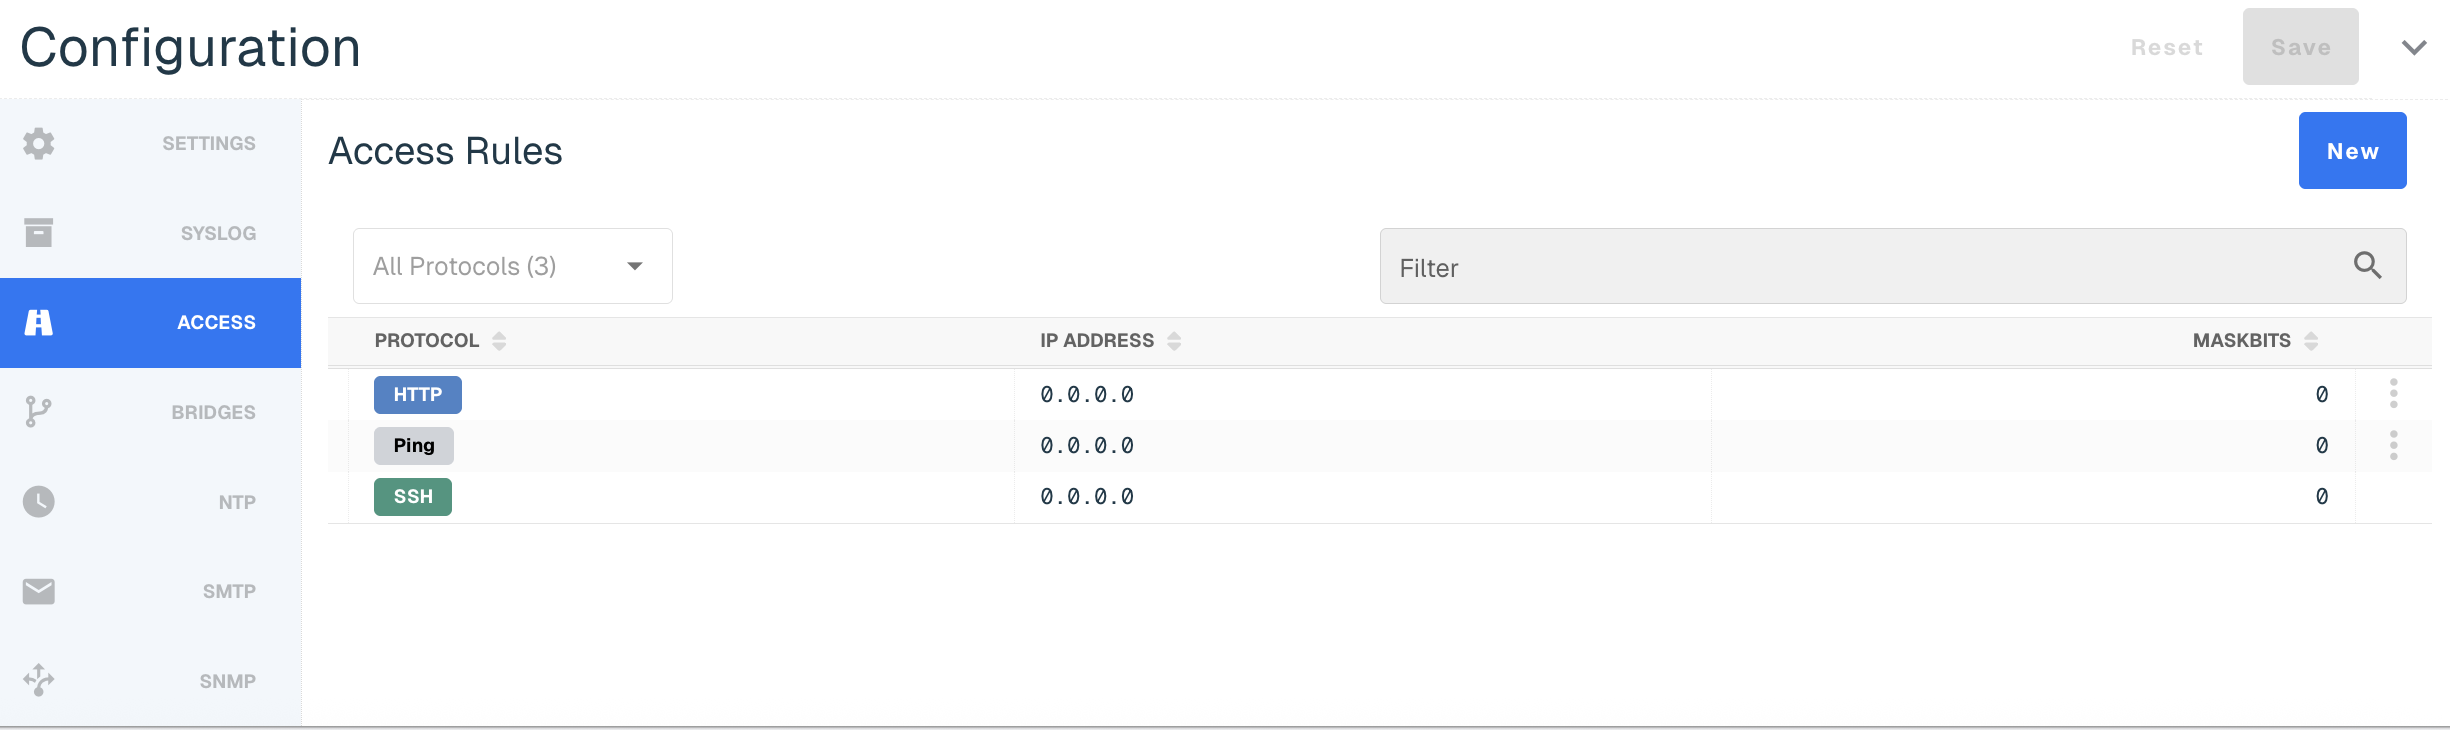
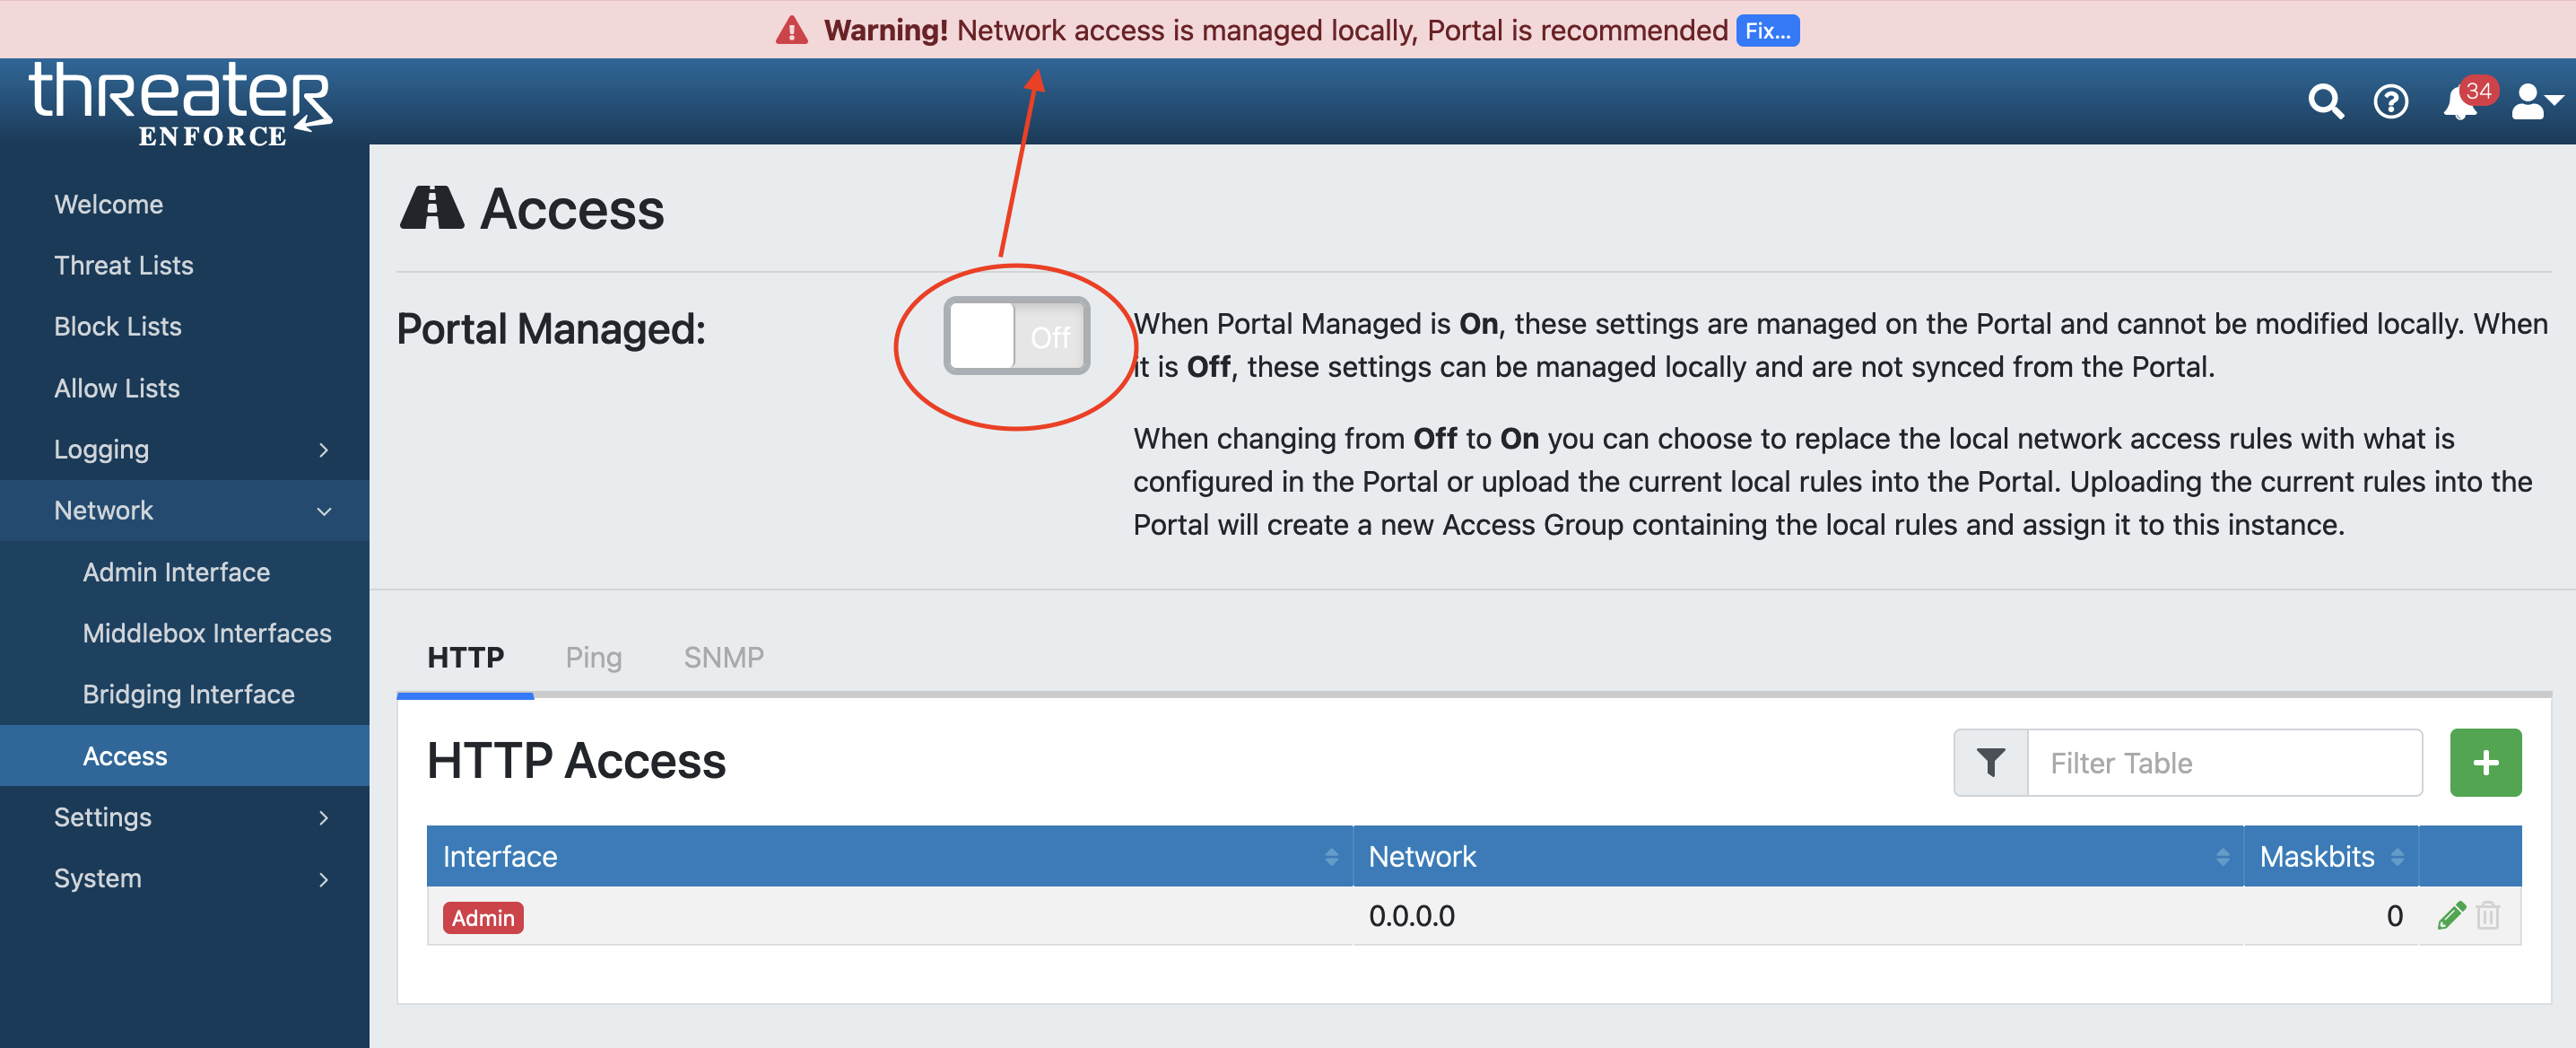
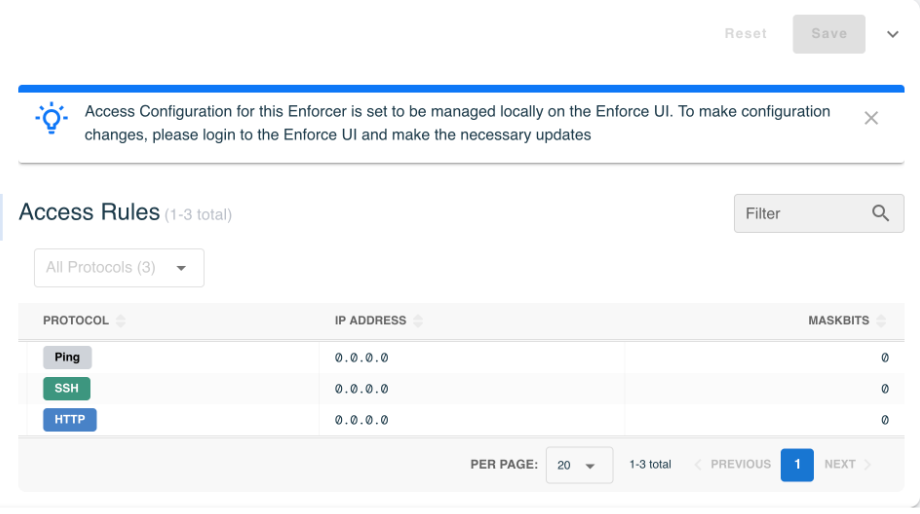
Access
Access rules can be managed in the Portal or in the Enforcer UI, depending on your company's security standards. Within the Enforcer UI under Network > Access, Security Admins (SEC_Admin) with local access will be able to toggle on and off the Portal access.
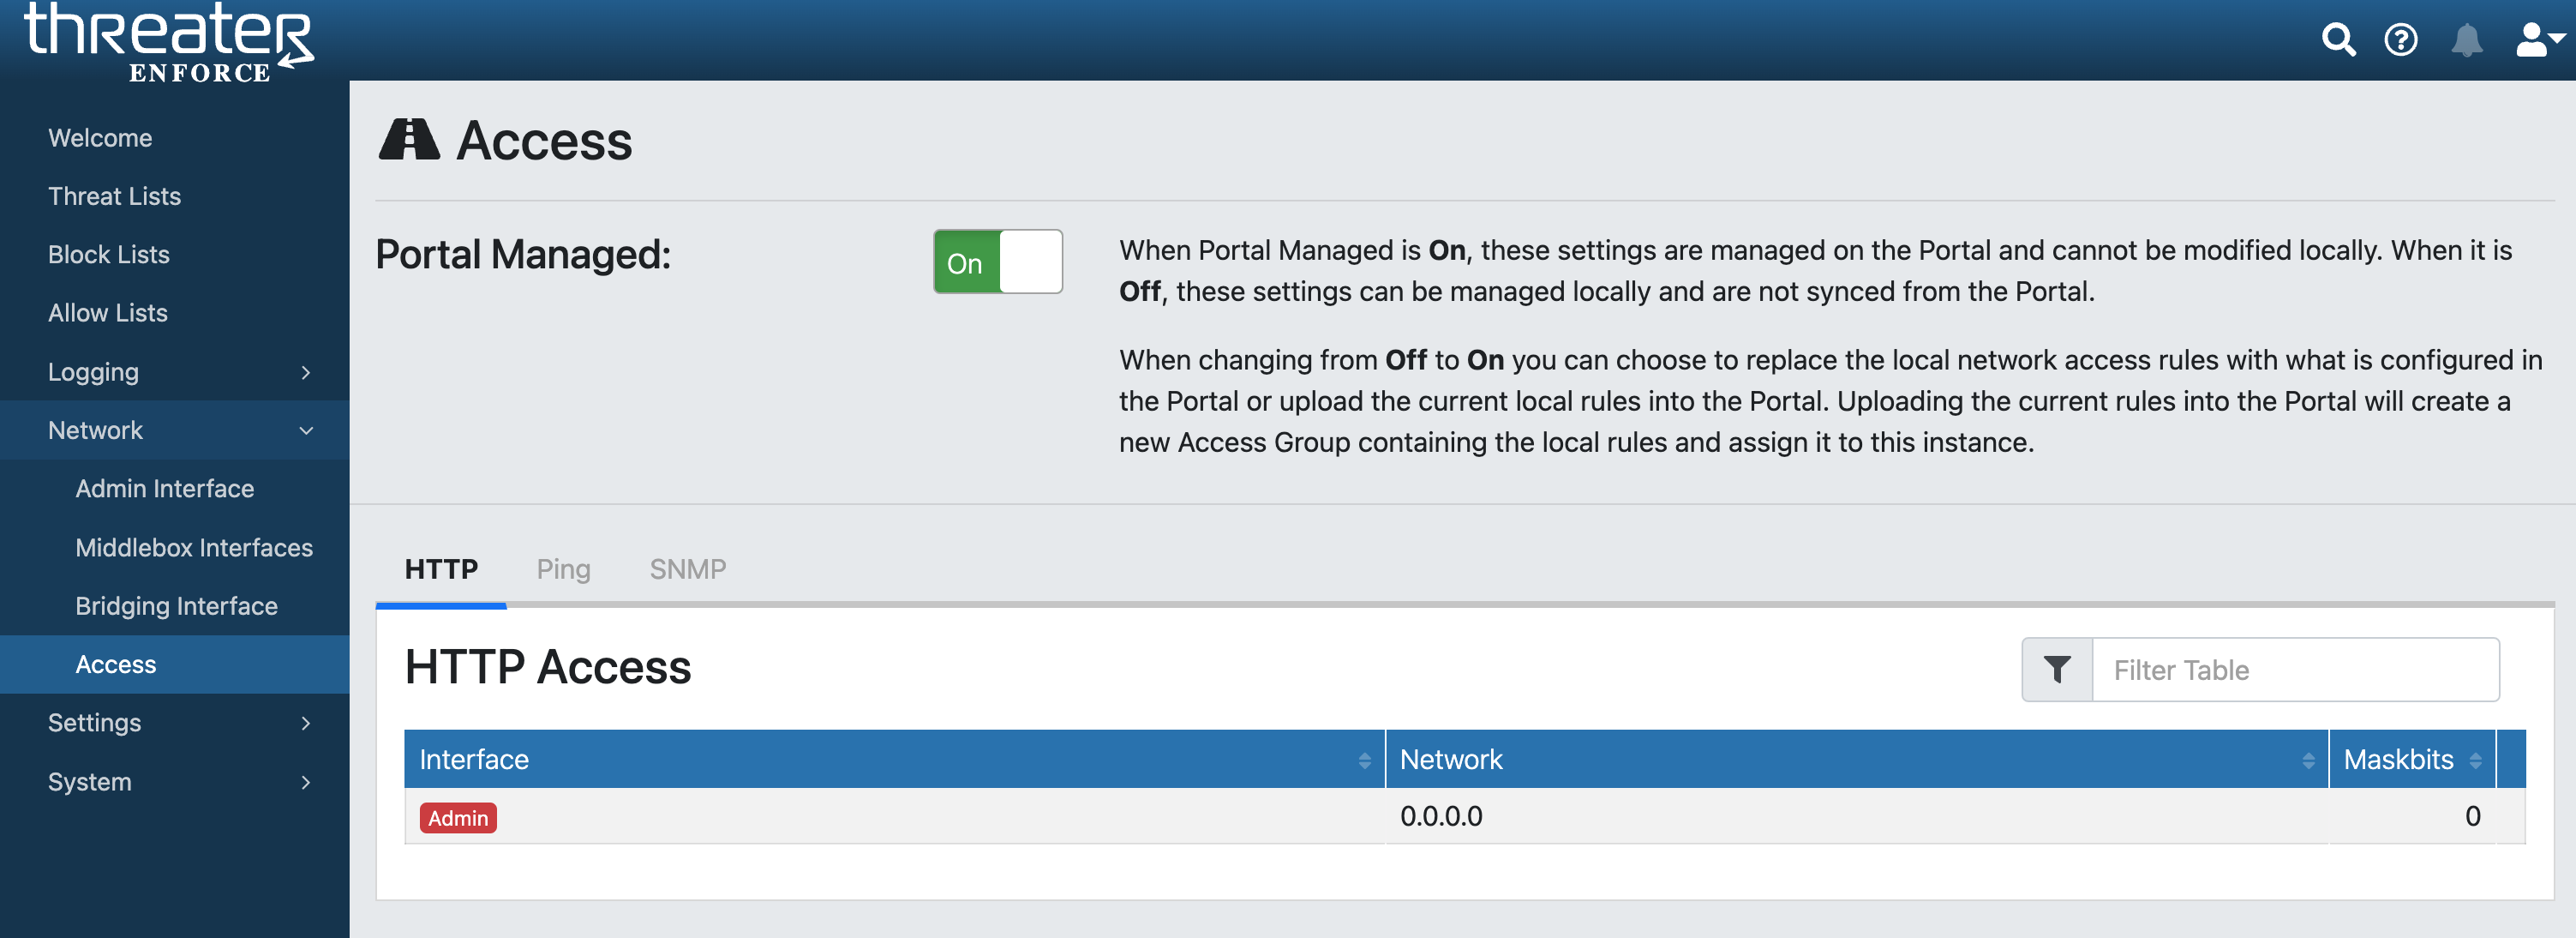
When Portal Managed is On, these settings are managed on the Portal and can't be modified locally.
When this setting is Off, these settings can be managed locally and are not synced from the Portal.
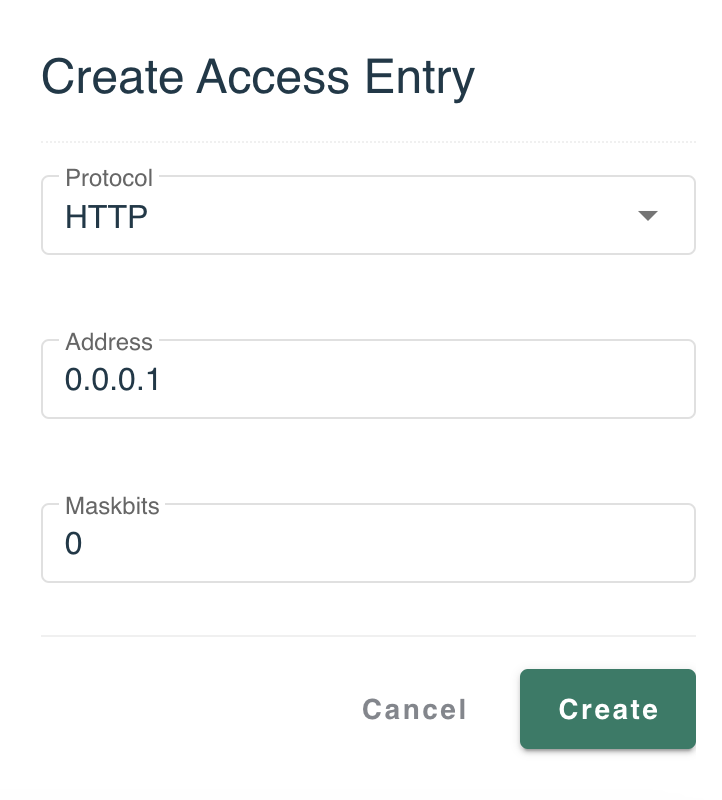
The Protocols available include:
-
HTTP
-
Ping
-
SSH
-
SNMP
Select New to add a new access setting. Add the Protocol, Address and Maskbit and then select Create.
Bridges
The Bridges tab shows you the bandwidth or maximum rate of data transfer between the two bridge Ethernet ports. The Bridging pair is configured within the Enforcer UI.
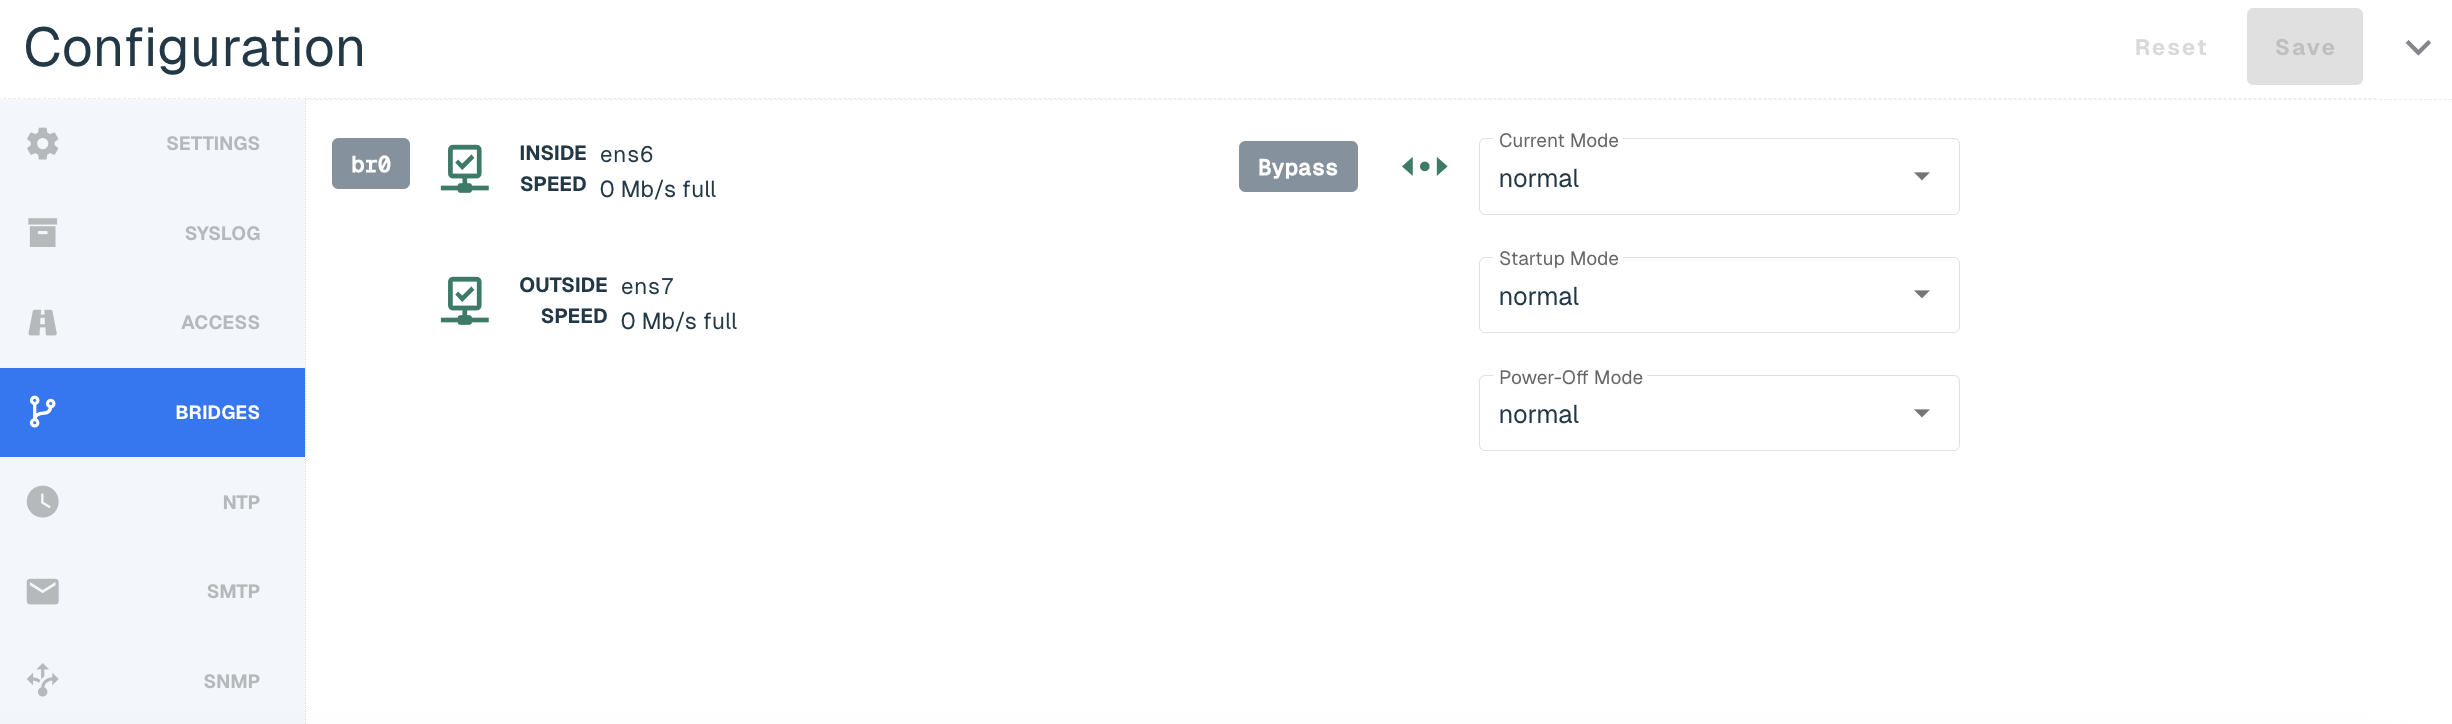
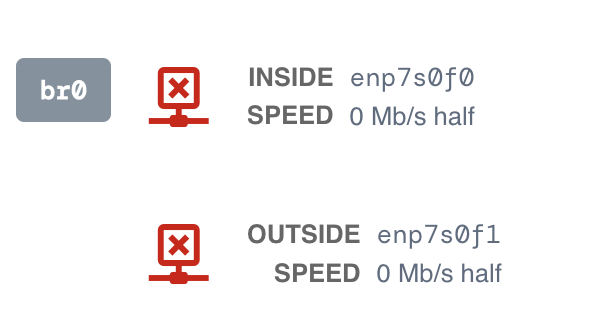
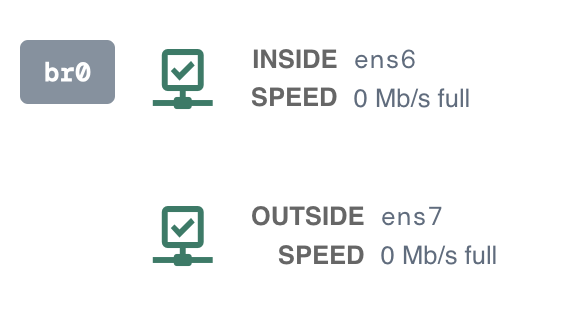
The link status will be displayed in Red when the Enforcer is disconnected. The Enforcer is indicated inline when the link status is green.
If Bypass is available, end users will be able to view the following sections:
|
Mode Name |
Description |
|
Bypass Mode |
The mode the device is currently in |
|
Startup Mode |
The mode the device will be upon Startup |
|
Power-Off Mode |
The Mode the device will go into upon getting a shutdown command |
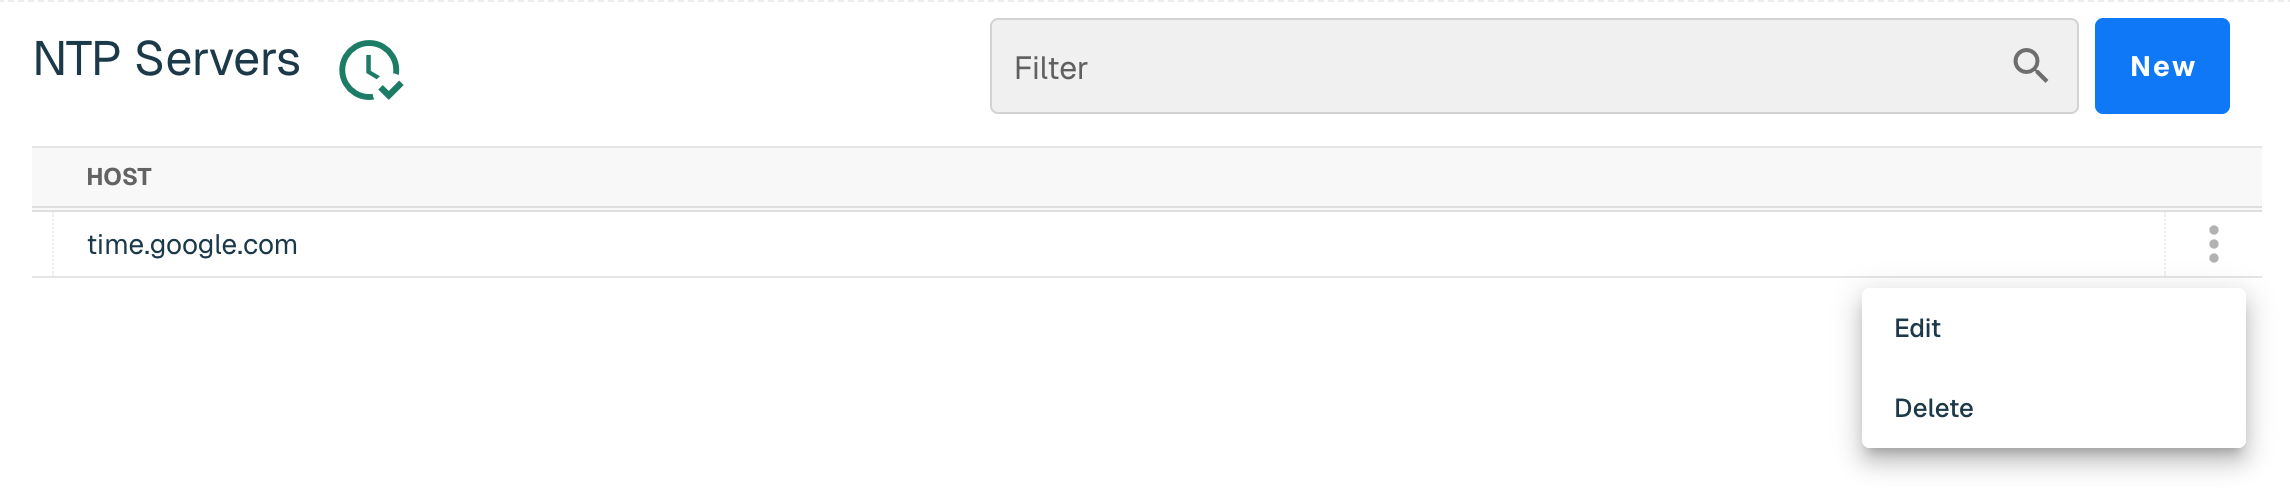
NTP
Enforce uses a NTP server so that the clock on the Enforcer is properly synchronized. The software leverages http://time.google.com NTP server by default.
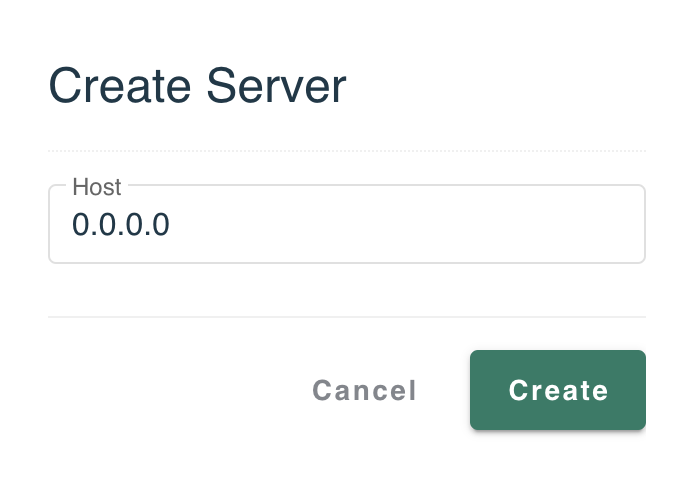
You also have the option to add your own NTP server by going to New, adding a valid IP or domain host and selecting Create.

Confirmation of the sync will be indicated by a green clock alert icon next to NTP Servers title. It might take a few minutes for the server to sync with the Enforcer.
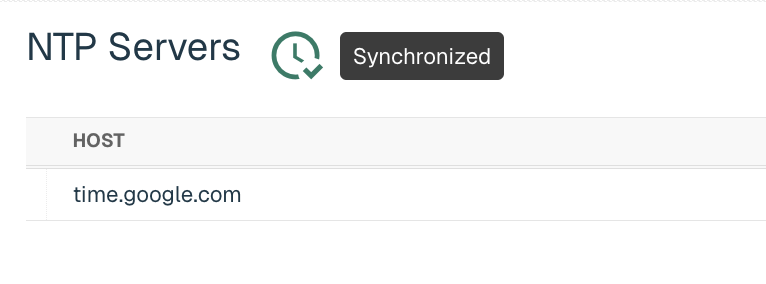
The NTP Server can be edited or deleted by selecting three vertical ellipses next to the host.
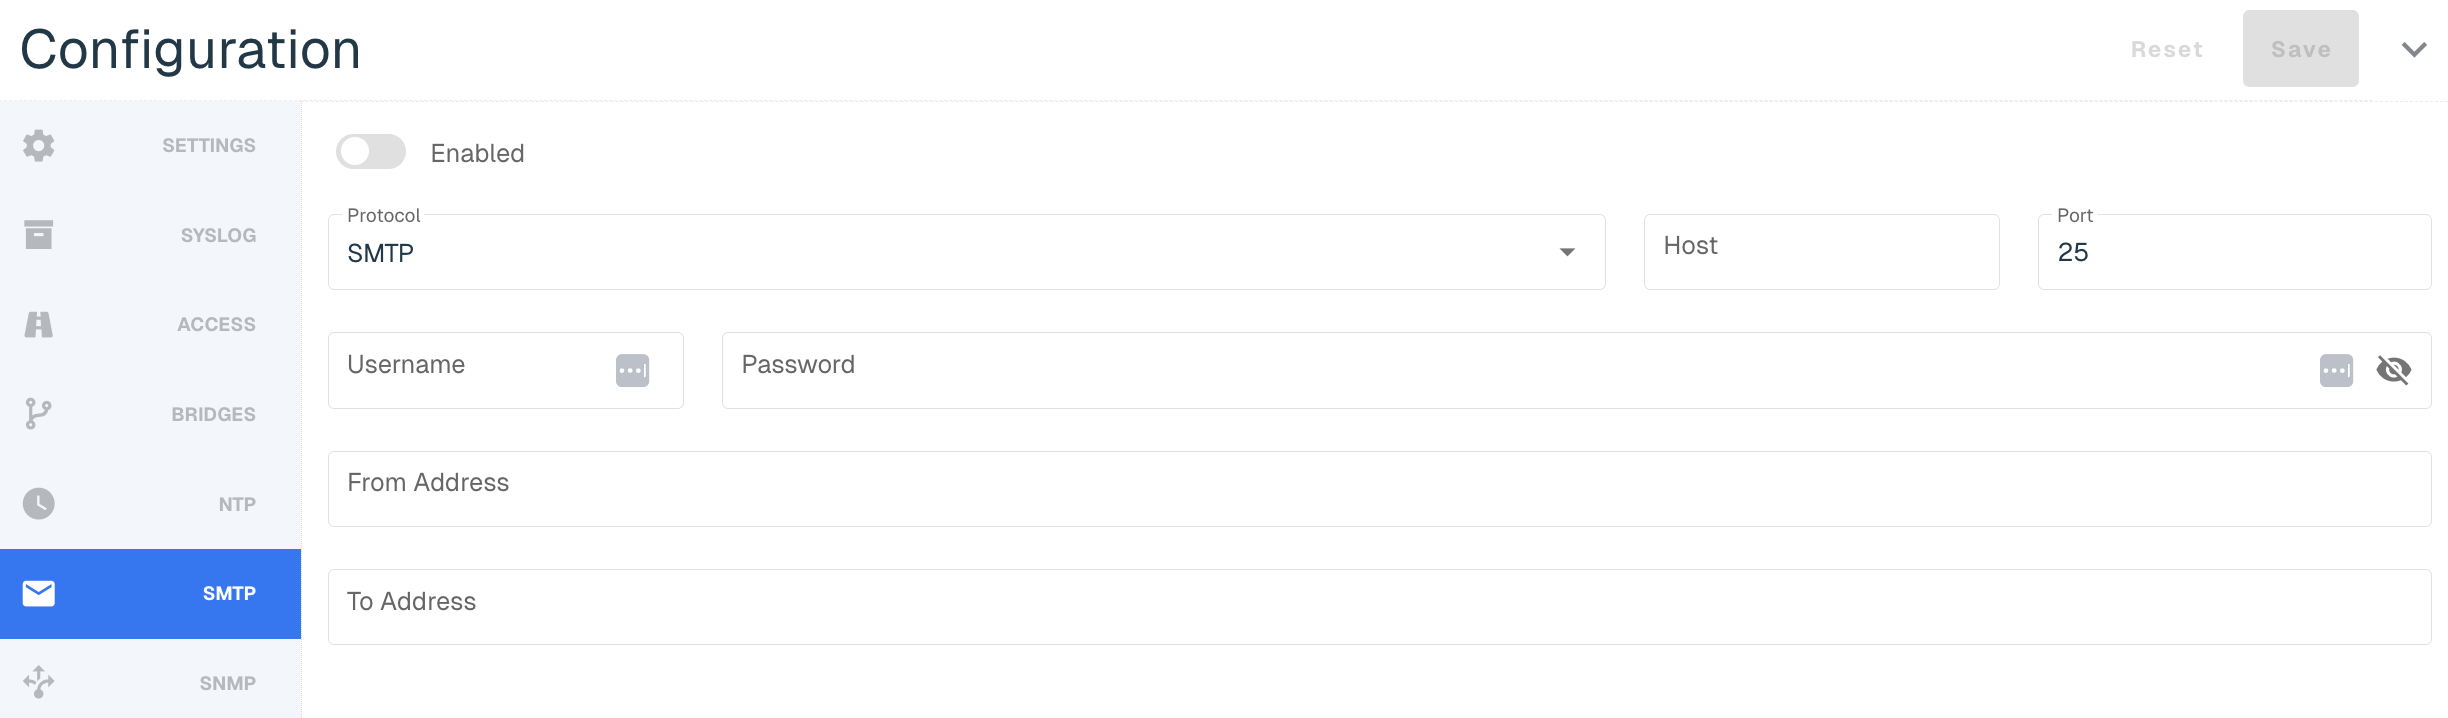
SMTP
SMTP messages are sent when an Alarm is raised (e.g. an update fails, entering bypass mode or an account gets locked out). The alerts can also be accessed within the Enforcer UI in the upper-right corner.
You can set the following parameters in SMTP:
|
Title |
Description |
|
Enabled |
Toggle on to enable the SMTP Alerts |
|
Protocol |
Options include SMTP or SMTPS |
|
Host |
The hostname or IP address of the mail server |
|
Port |
The port of the mail server, typically 25 or 587 for SMTP, or 465 for SMTPS |
|
Username |
Username if the server requires authentication |
|
Password |
Password if the server requires authentication |
|
From Address |
The email address that sends the alerts on threatER's behalf |
|
To Address |
The email address that will receive the alerts |
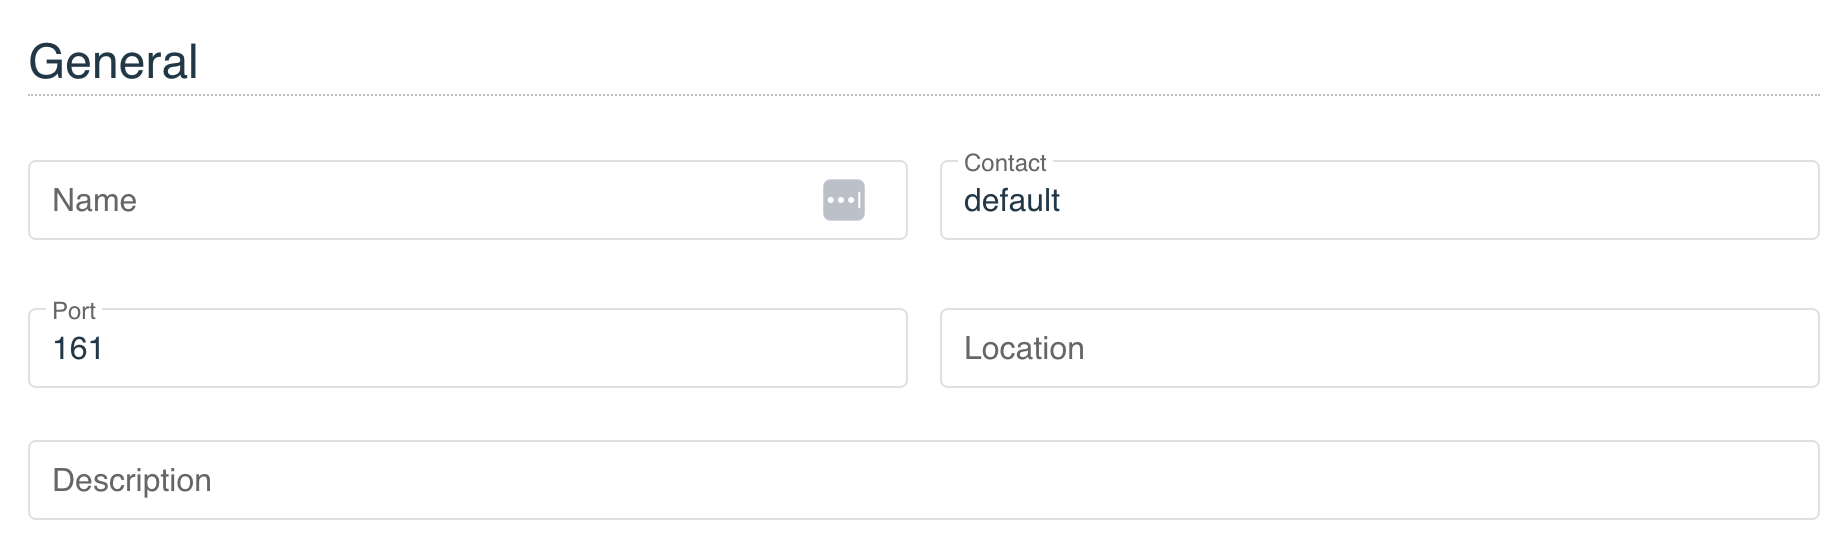
SNMP
The Enforcer Security Appliance supports the internet standard Simple Network Management Protocol (SNMP). Admins can remotely monitor Enforce by a network management system, such as IBM Tivoli Network Manager, CiscoWorks LAN Management Solution, and HP Network Node Manager.
Admins will need to set up SNMP access first before using the SNMP tab.
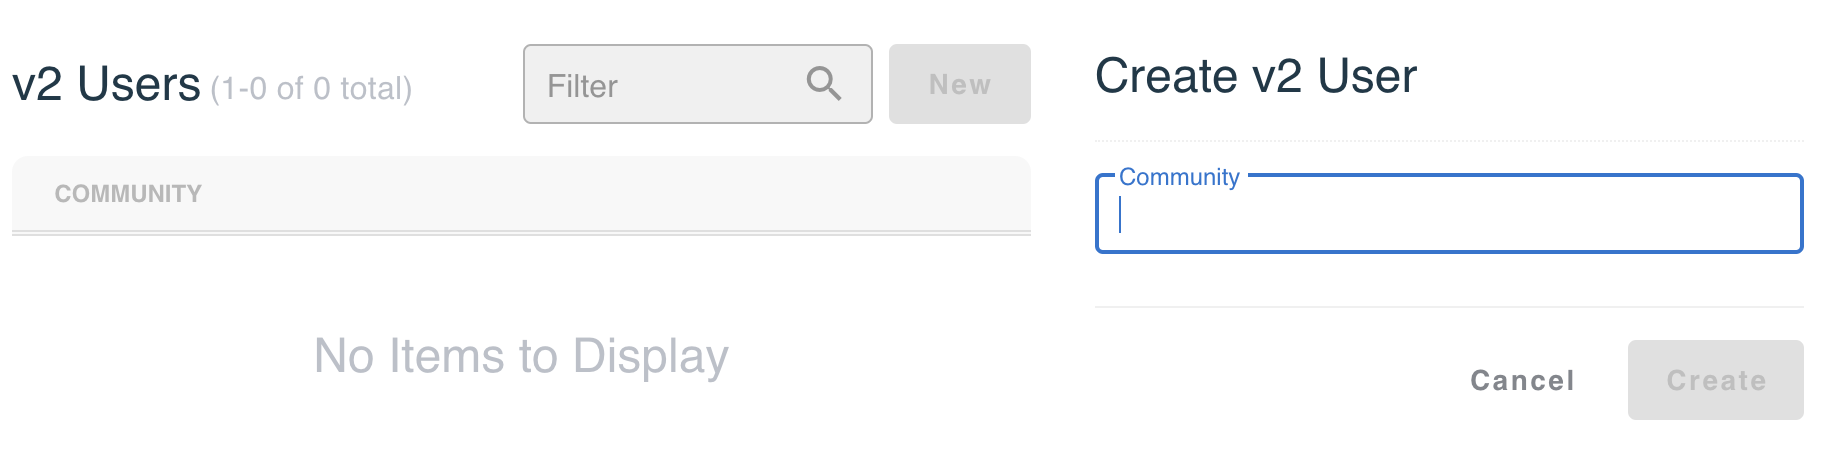
threatER supports two versions of SNMP:
-
the Community-based SNMPv2c
-
SNMPv3
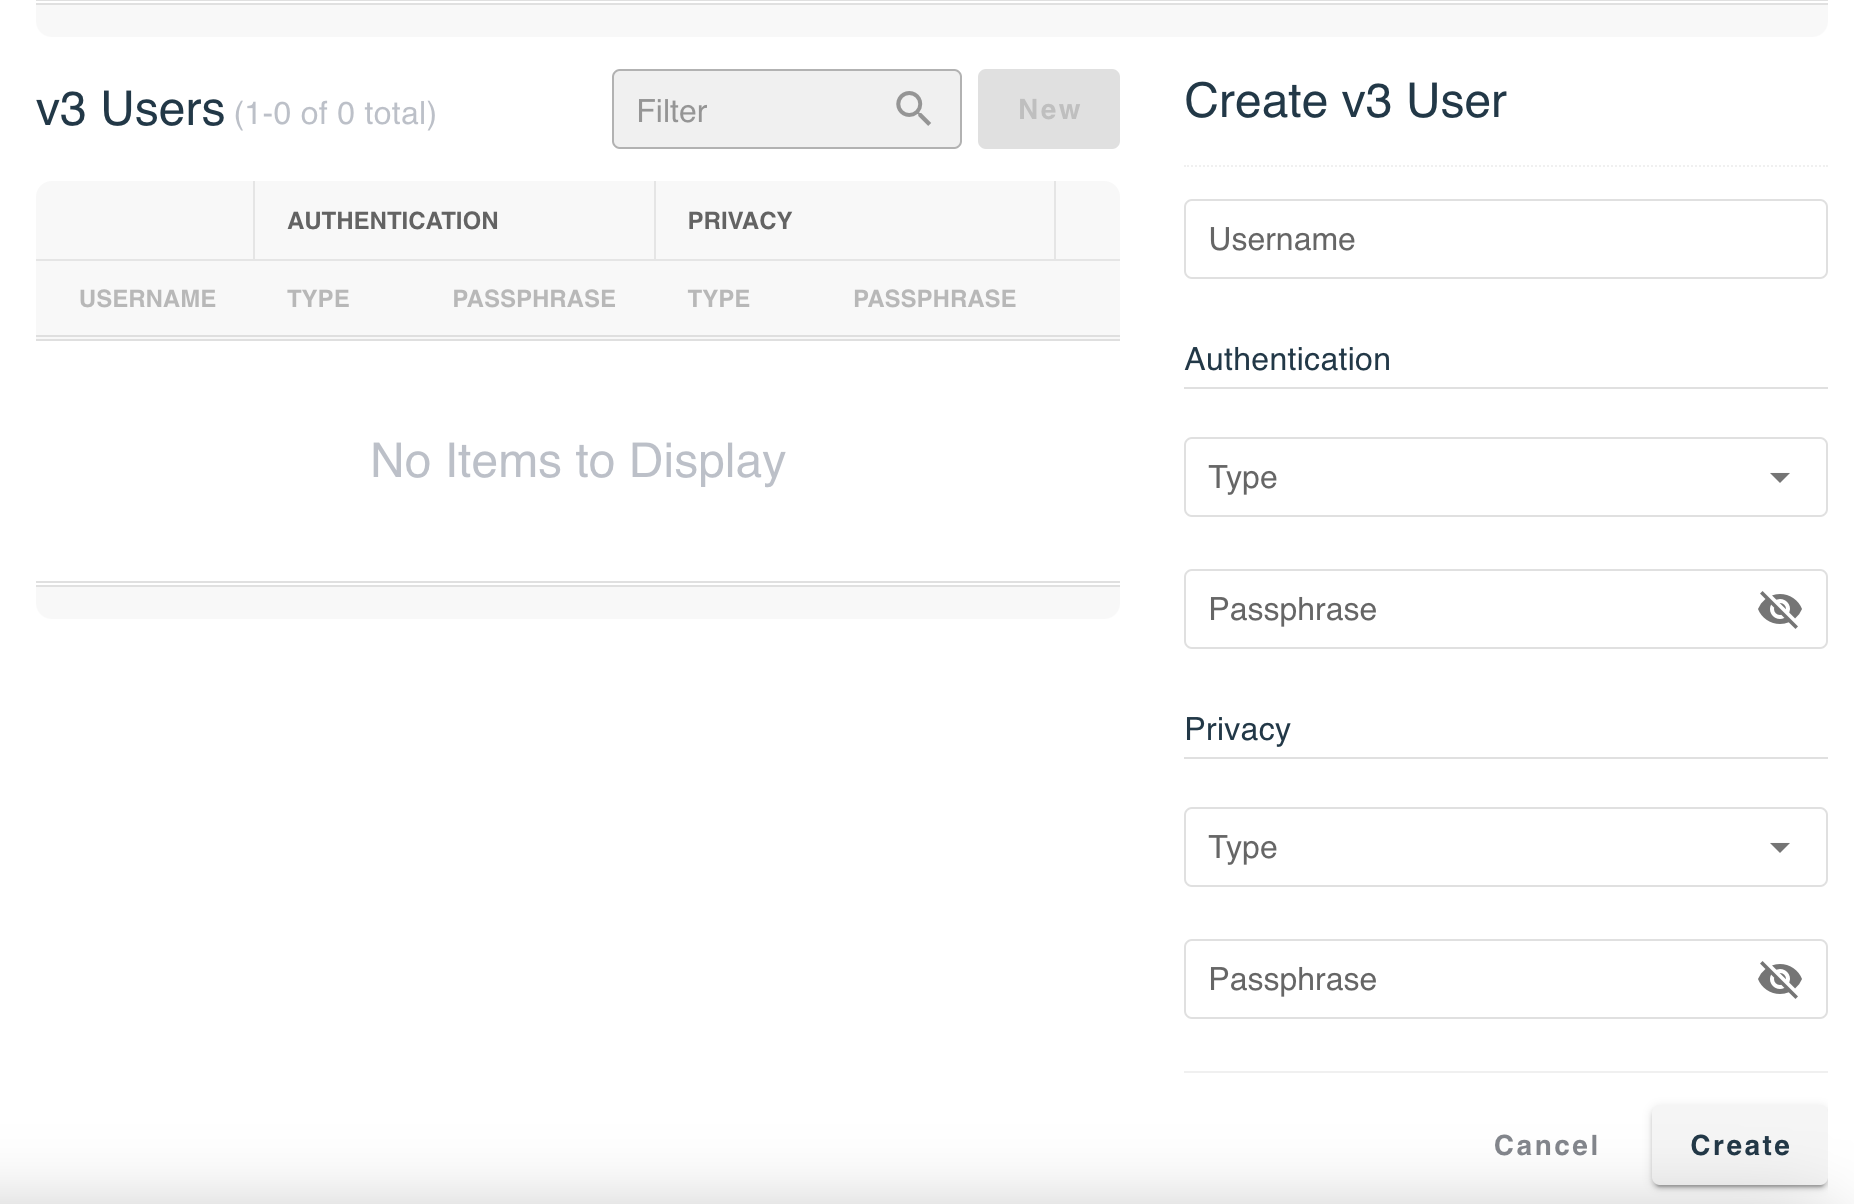
This includes the security features of device authentication, packet integrity, and data confidentiality. Under the preferred version, click New and input the required information. On this menu you can specify trusted IPv4 and IPv6 internet addresses, from which the Enforcer will accept data requests, as well as designate Internet addresses where Enforcer will send asynchronous SNMP traps.
|
Version |
Field Name |
Description |
|
SNMPv2c |
Community |
User ID or Password |
|
SNMPv3 |
Username |
User ID |
|
Authentication: Type |
Options include MD5 and SHA |
|
|
Authentication: Passphrase |
Key for authentication |
|
|
Privacy: Type |
Options include DES and AES |
|
|
Privacy: Passphrase |
Key for encryption |
Resolver
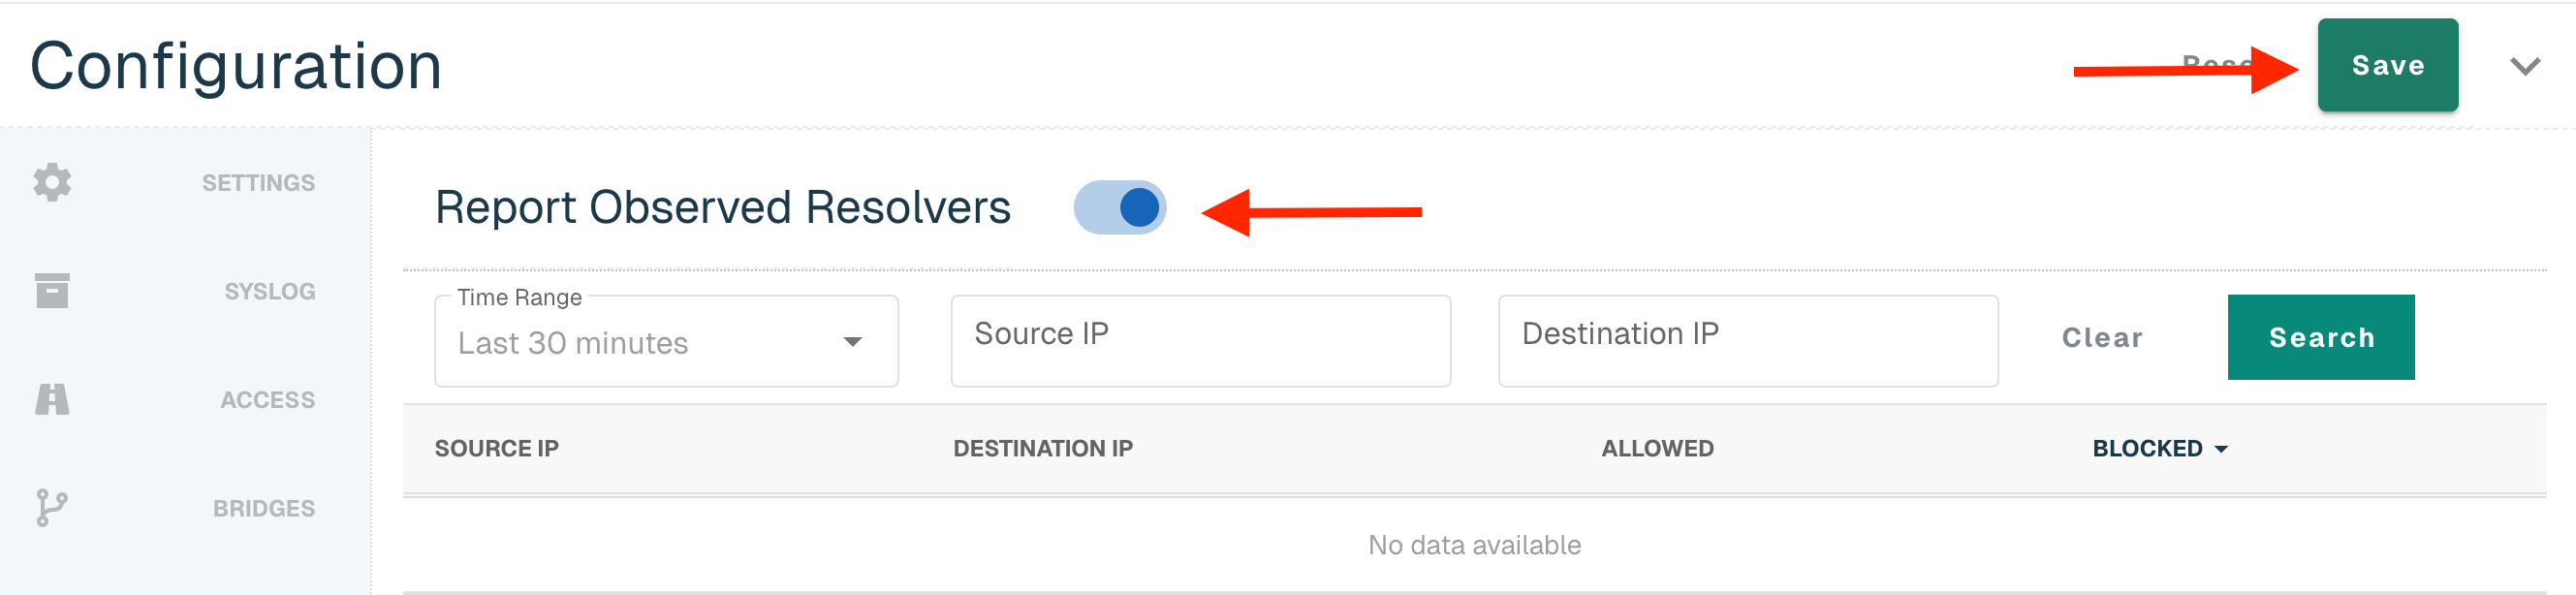
When this feature is enabled, Enforce will track all unique DNS connections and report them to Portal. This functionality is valuable to identify devices within the network that may have incorrect DNS settings due to misconfiguration or running malicious software that is making unauthorized DNS requests.
To enable this feature, flip on the Report Observed Resolvers toggle and select Save button in the right corner.

Once there is data to report back, it will display in the table:
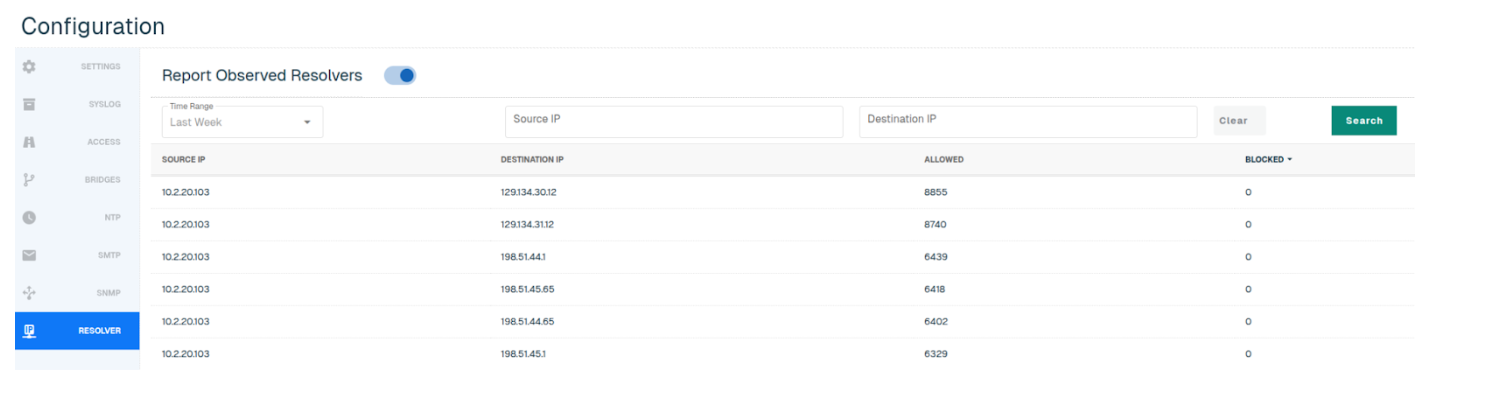
Users can search by Source IP and Destination IP, and select one of the following time ranges:
-
Last 30 minutes (default)
-
Last Hour
-
Yesterday
-
Last Week
Wifi Configuration
Navigate to Enforce in the left-hand navigation menu, click on the Enforcers tab and select the hyperlinked name of the applicable Enforcer. Customers on a build that is below 284 will not be able to configure Wifi or DHCP configurations but will still be able to manage Settings, Syslog and NTP in the Portal.
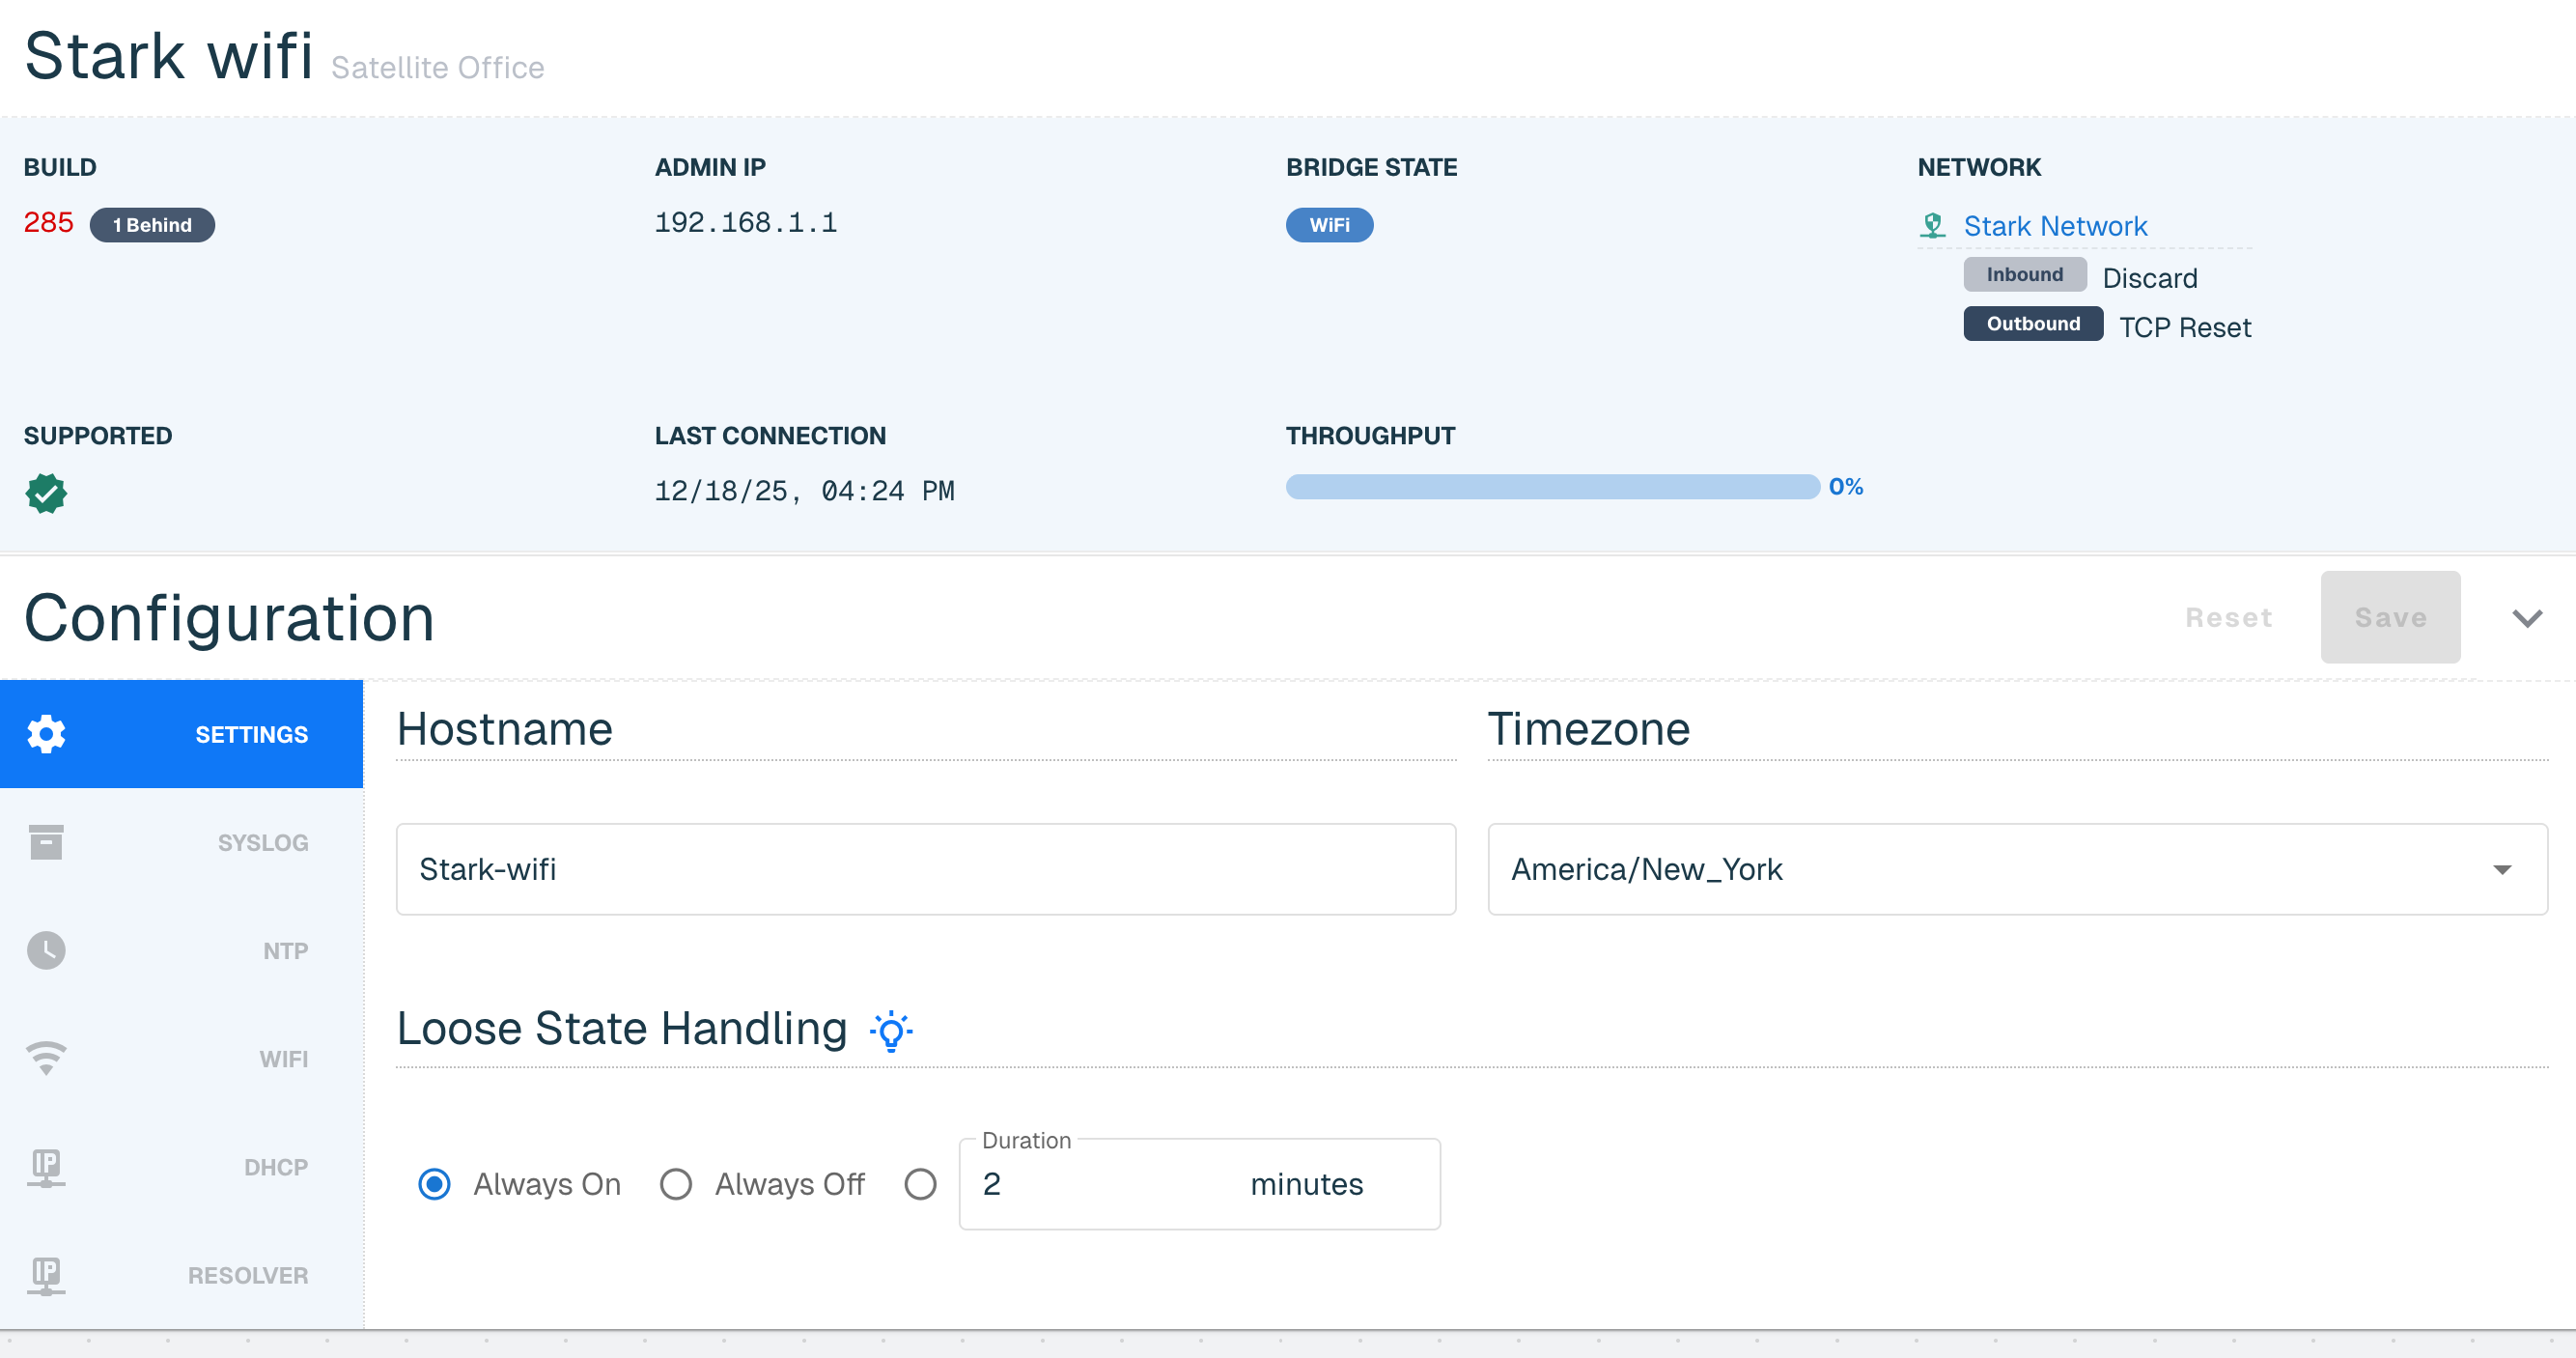
Select through the Configuration navigation bar to make updates. You can save once when complete or can choose to save at each individual tab.
Once updated to at least build 284, threatER Enforce Wifi configurations can be managed directly in the threatER Portal. This configuration section is for Wifi only. Enforce configurations including on premise, virtual (via KVM) and cloud (via AWS, Azure and GCP) can be found at this link below.
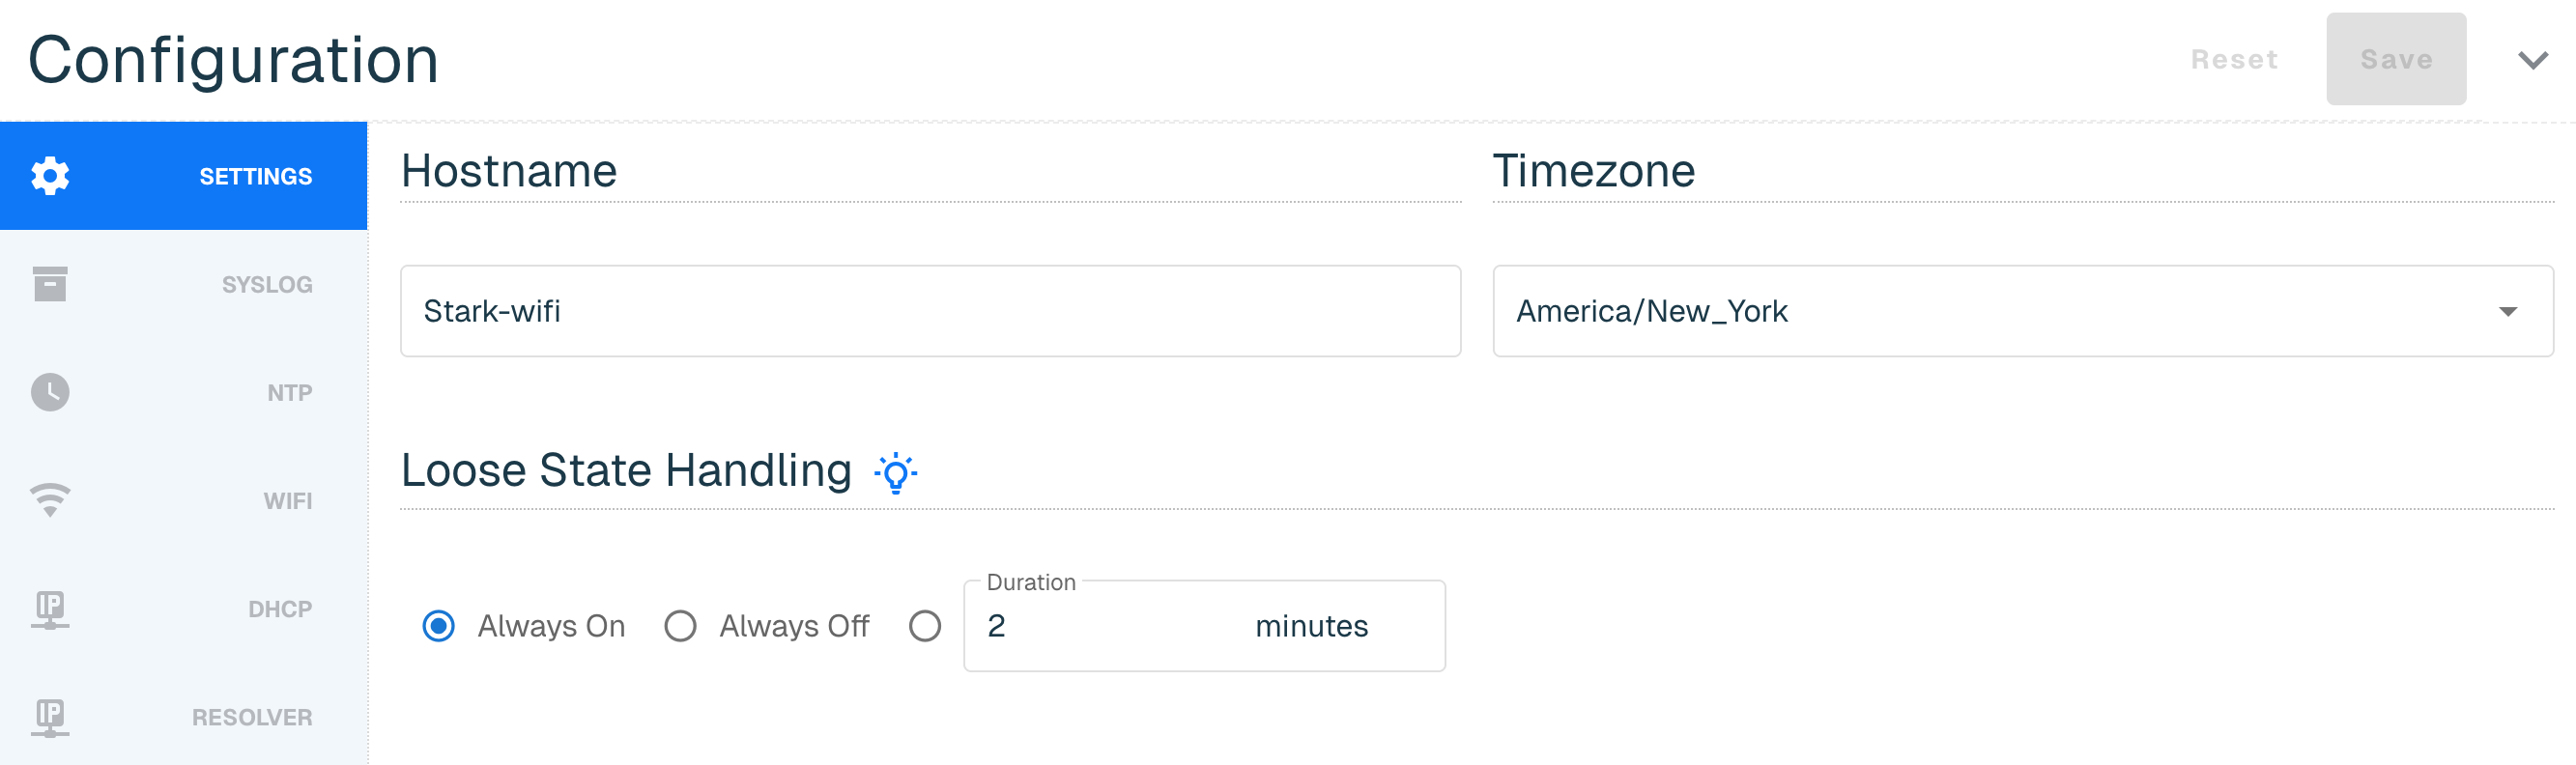
Wifi Settings
The Settings tab allows you to configure the following:
|
Section Name |
Field Name |
Description |
Default Setting |
|
Hostname |
Hostname |
A unique label identifying the Enforcer |
n/a |
|
Timezone |
Timezone |
Time zone for the location where the Enforcer will be deployed |
UTC |
|
Loose State Handling (LSH) |
Description |
Loose State Handling (LSH) is effectively trying to ascertain the direction of a conversation when you jump in the middle of it. This can happen in network security enforcement points when the Enforcer is deployed and operating as a layer 2 bump in the wire. This includes when an Enforcer is placed in-line, when it is shutdown and powered back up, when it reboots (software upgrade), and when it is taken in and out of bypass mode. When the Enforcer sees the packet that it can't attribute to a known conversation starter, the Enforce software uses some simple logic to attempt to make an educated guess as to the direction of the conversation. The LSH configuration setting provides the user a level of control over how LSH should be handled and supports the below modes: |
Always On |
|
Always On |
Always performs the LSH logic and is how the Enforcer software exclusively operated prior to this configuration being available in the Portal. |
||
|
Always Off |
Allows you to tell the Enforcer to completely disable the LSH logic and just use packet direction for those scenarios when it isn't sure. |
||
|
Duration |
Enables LSH for the specified time period after an "LSH event" occurs, where those events are things like power on, bypass toggling, adding bridge pairs, and so on. |

Syslog for Wifi
Syslog exports are an industry-standard way of exporting data in a concise, timely manner. Our syslog export format is compliant to RFC-5424 and ensures seamless integration alongside any number of external tools like:
-
Security information and event management (SIEM) tools, such as Splunk and IBM QRadar
-
Data analytics tools like Gravwell
-
Full open-source tools like syslog-ng
Our Syslog export is not designed with any particular SIEM tool in mind. We focus on the comprehensive data contained in our syslog exports, enabling you to parse are logs by any tool that can ingest RFC-compliant syslog exports.
More information on the Syslog requirements can be found at this link. Once you complete the provided steps, your syslog will display the following columns.
|
Subset |
Field Name |
Description |
|
Server |
Protocol |
UDP, TCP or TLS options. Must be on at least build 284 to access TCP or TLS options. |
|
Host |
Your Target System IP |
|
|
Port |
Input 514 for the UDP port, which is the typical listening port most systems use for syslog ingest. This can be changed if needed. |
|
|
Description |
Optional but useful for quick identification if you are sending logs to more than one system |
|
|
Log Types |
IP |
This column is checked if you are sending packet logs via Syslog Export |
|
Syslog |
This column is checked if you are sending system operating logs via Syslog Export |
|
|
Audit |
This column is checked if you are sending internal administration logs via Syslog Export |
|
|
DNS |
This column is checked if you are sending domain logs via Syslog Export |
|
|
DNS RESP |
This column is checked if you are sending DNS traffic logs via Syslog Export |

NTP for Wifi
Enforce uses a NTP server so that the clock on the Enforcer is properly synchronized. The software leverages http://time.google.com NTP server by default.
You also have the option to add your own NTP server by going to New, adding a valid IP or domain host and selecting Create.
Confirmation of the sync will be indicated by a green clock alert icon next to NTP Servers title. It might take a few minutes for the server to sync with the Enforcer.
The NTP Server can be edited or deleted by selecting three vertical ellipses next to the host.
WiFi
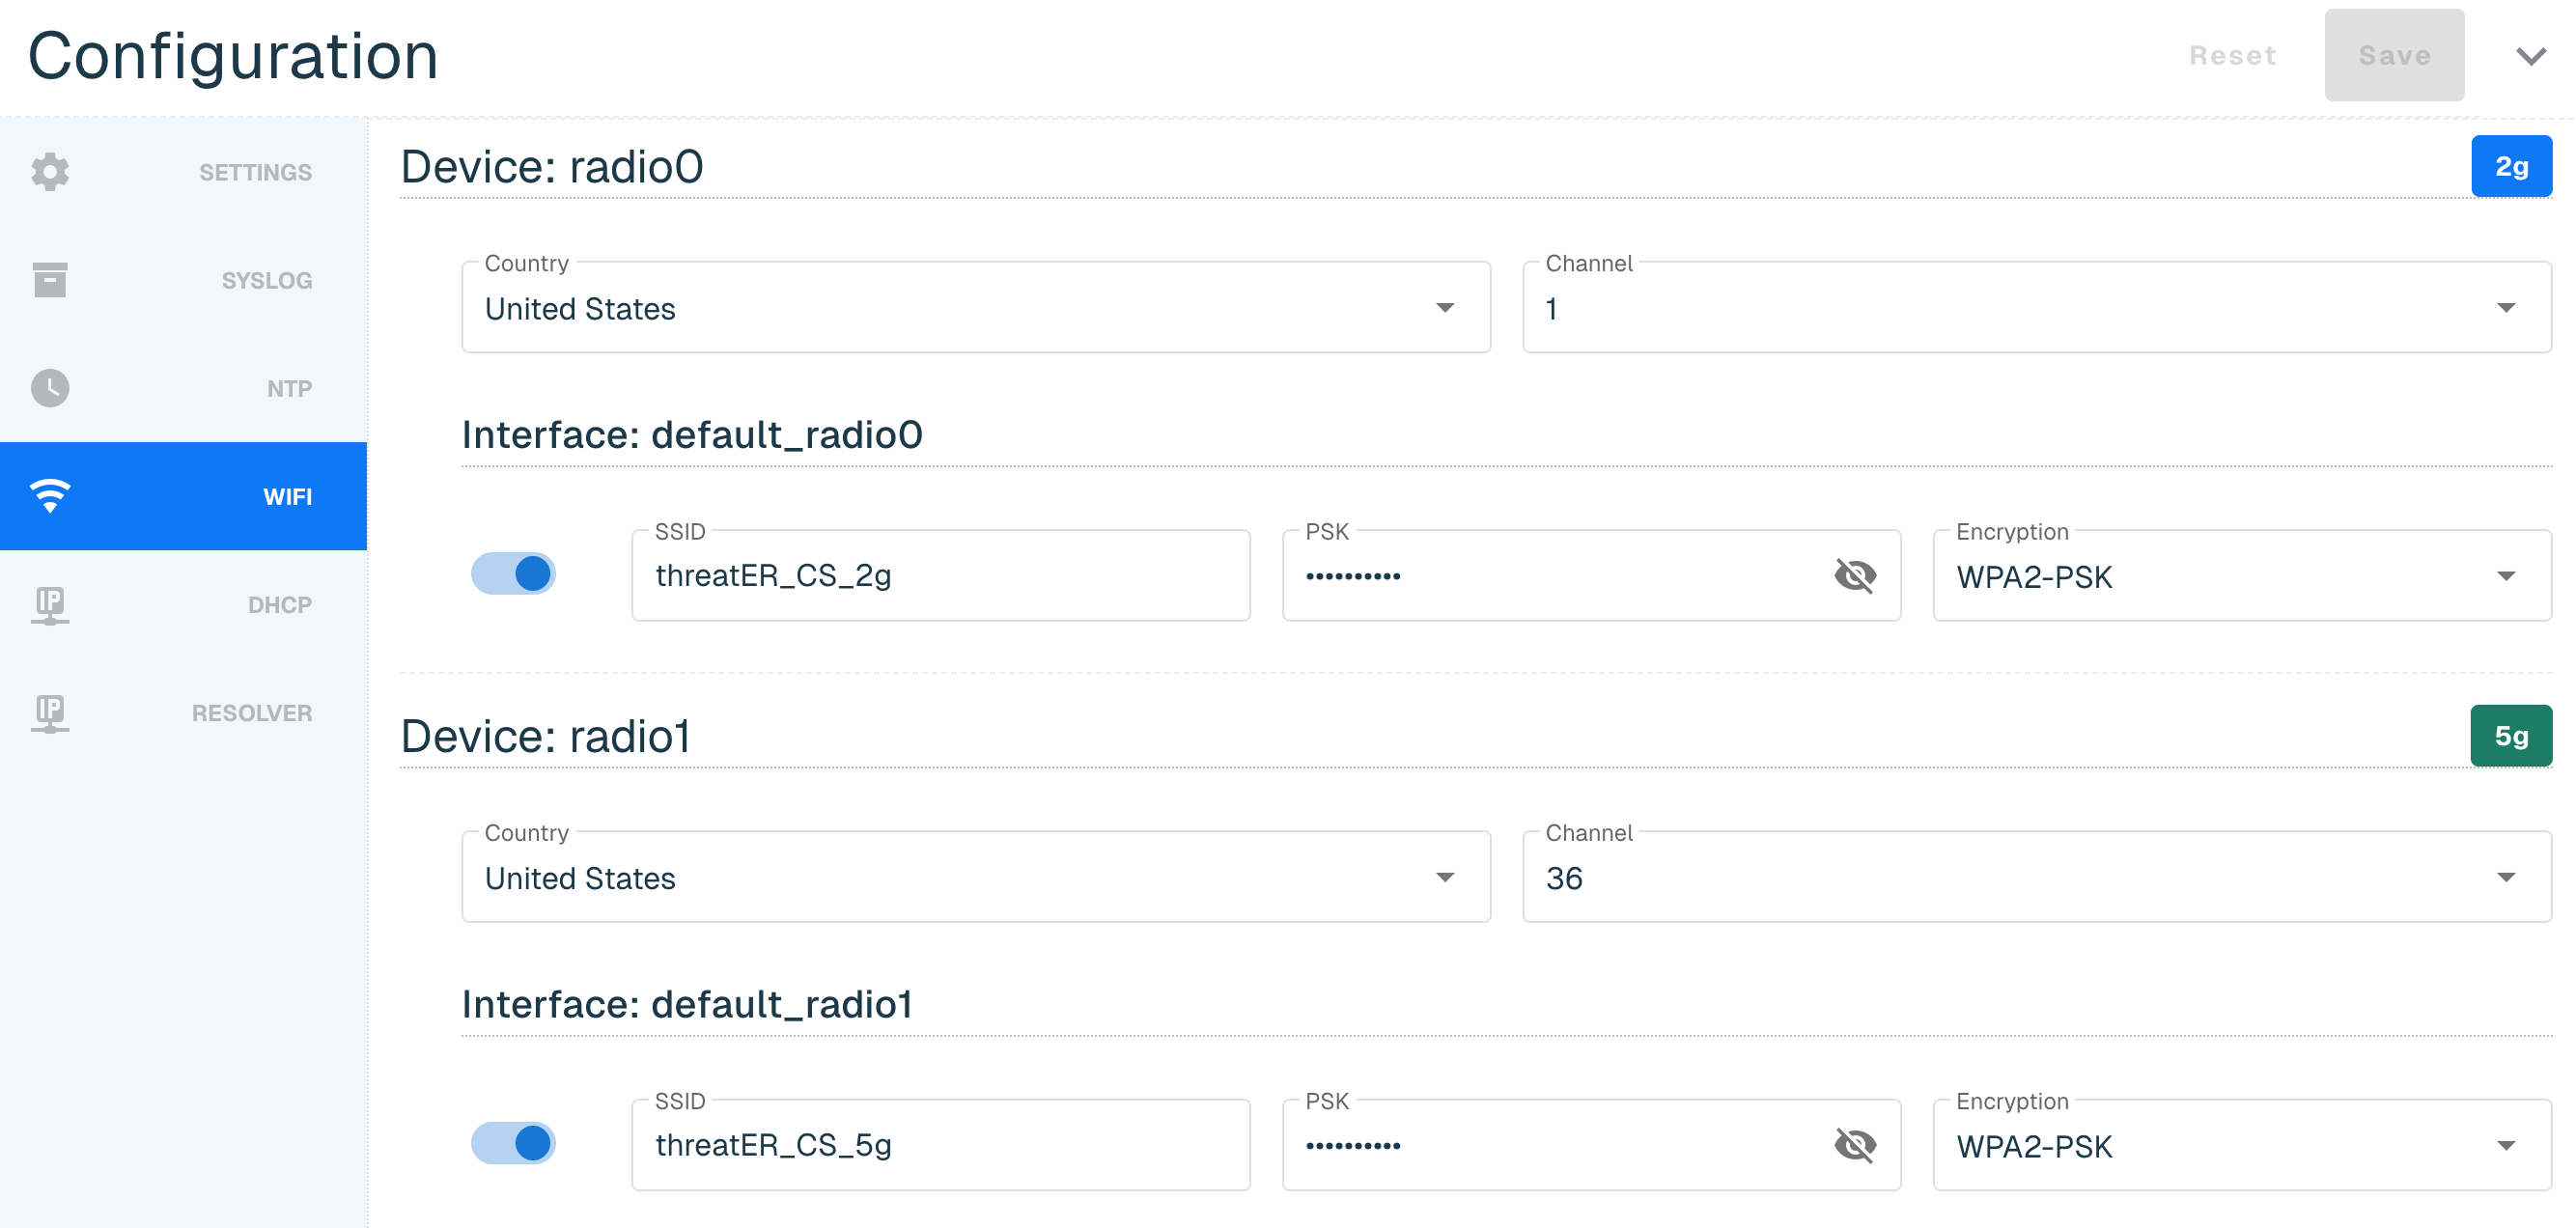
Enforce can have 0,1, or multiple wireless "devices" and devices correspond to the physical radio(s). Each device can have 0,1, or multiple "interfaces" and the interfaces are the wireless networks (SSID, PSK, etc). If Enforce has no wireless devices, the Wifi option property in the instance configuration panel will not display. Devices and interfaces can't be created or deleted in the Portal and can only happen on the device itself.
Below is an example of a Wifi router with radio0 and radio1 devices.

The WiFi tab allows you to configure the following:
|
Section Name |
Field Name |
Description |
|
Device |
Country |
Specifies its regulatory domain |
|
Channel |
Specific frequency band and channel number your router is currently using to transmit its wireless signal |
|
|
Interface |
SSID |
Stands for Service Set Identifier and it is the name of your wireless network. SSID must be between 1 and 32 characters. |
|
PSK |
Stands for Pre-Shared Key, which is the password for a wireless network. PSK must be between 8 and 63 characters. |
|
|
Encryption |
An authentication protocol that is available from the drop-down menu. threatER only supports configured WiFi with pre-shared keys in the Portal. It is possible that the user configured different wireless security on the device. If this happens, it will NOT be available in the drop-down. In the Portal, users can either keep the default encryption, or change it to one of the values in the Encryption drop-down but they can't change it to something that is not a value in the drop-down. |
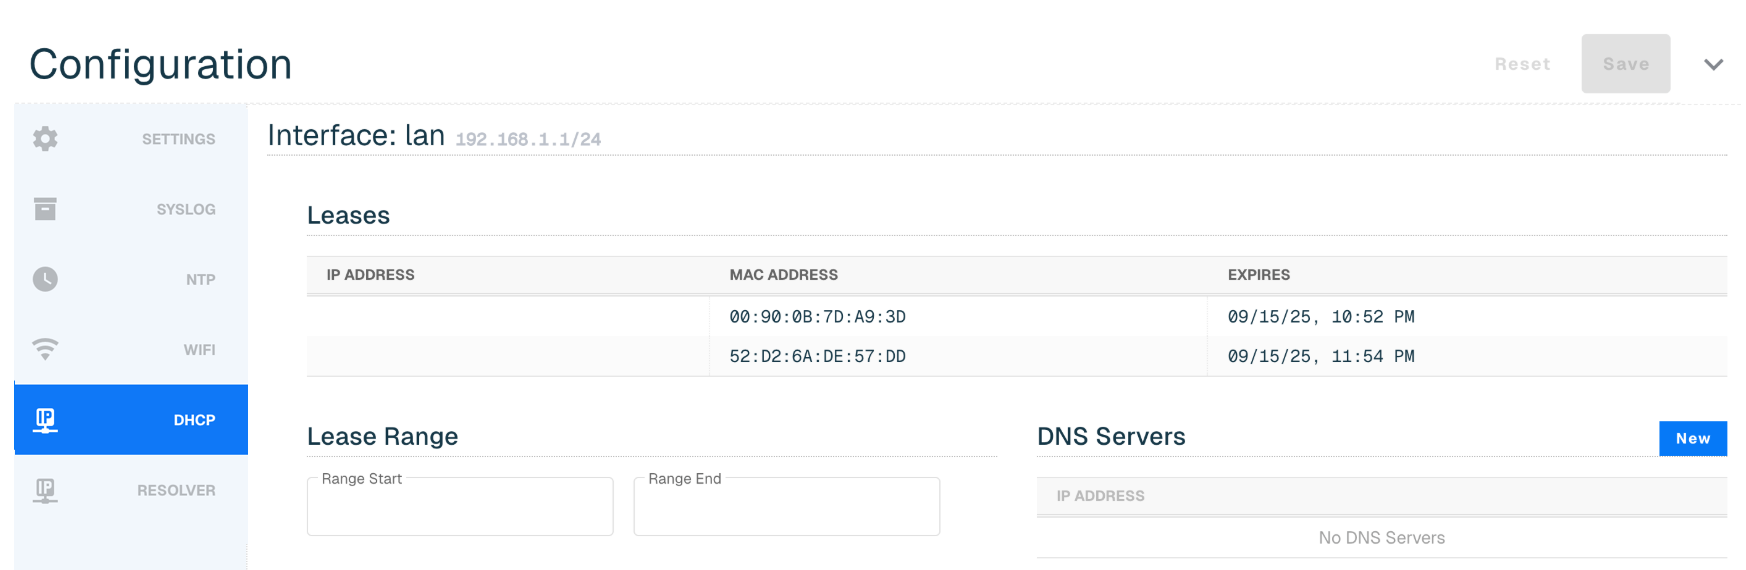
DHCP
The following DHCP settings can be configured in Portal:
|
Section |
Field Name |
Description |
|
Interface: lan |
Leases |
Temporary assignment of an IP address to a connected device. The Leases section is read-only and can't be edited in the Portal. |
|
Lease Range |
Range of IPs that the router's DHCP server can temporarily assign to devices on your network. The Range Start must be before Range End and both must be in the interface's network. |
|
|
DNS Severs |
A maximum of four entries can be provided |
Resolver for Wifi
When this feature is enabled, Enforce will track all unique DNS connections and report them to Portal. This functionality is valuable to identify devices within the network that may have incorrect DNS settings due to misconfiguration or running malicious software that is making unauthorized DNS requests.
To enable this feature, flip on the Report Observed Resolvers toggle and select Save button in the right corner.
Once there is data to report back, it will display in the table:

Users can search by Source IP and Destination IP, and select one of the following time ranges:
-
Last 30 minutes (default)
-
Last Hour
-
Yesterday
-
Last Week
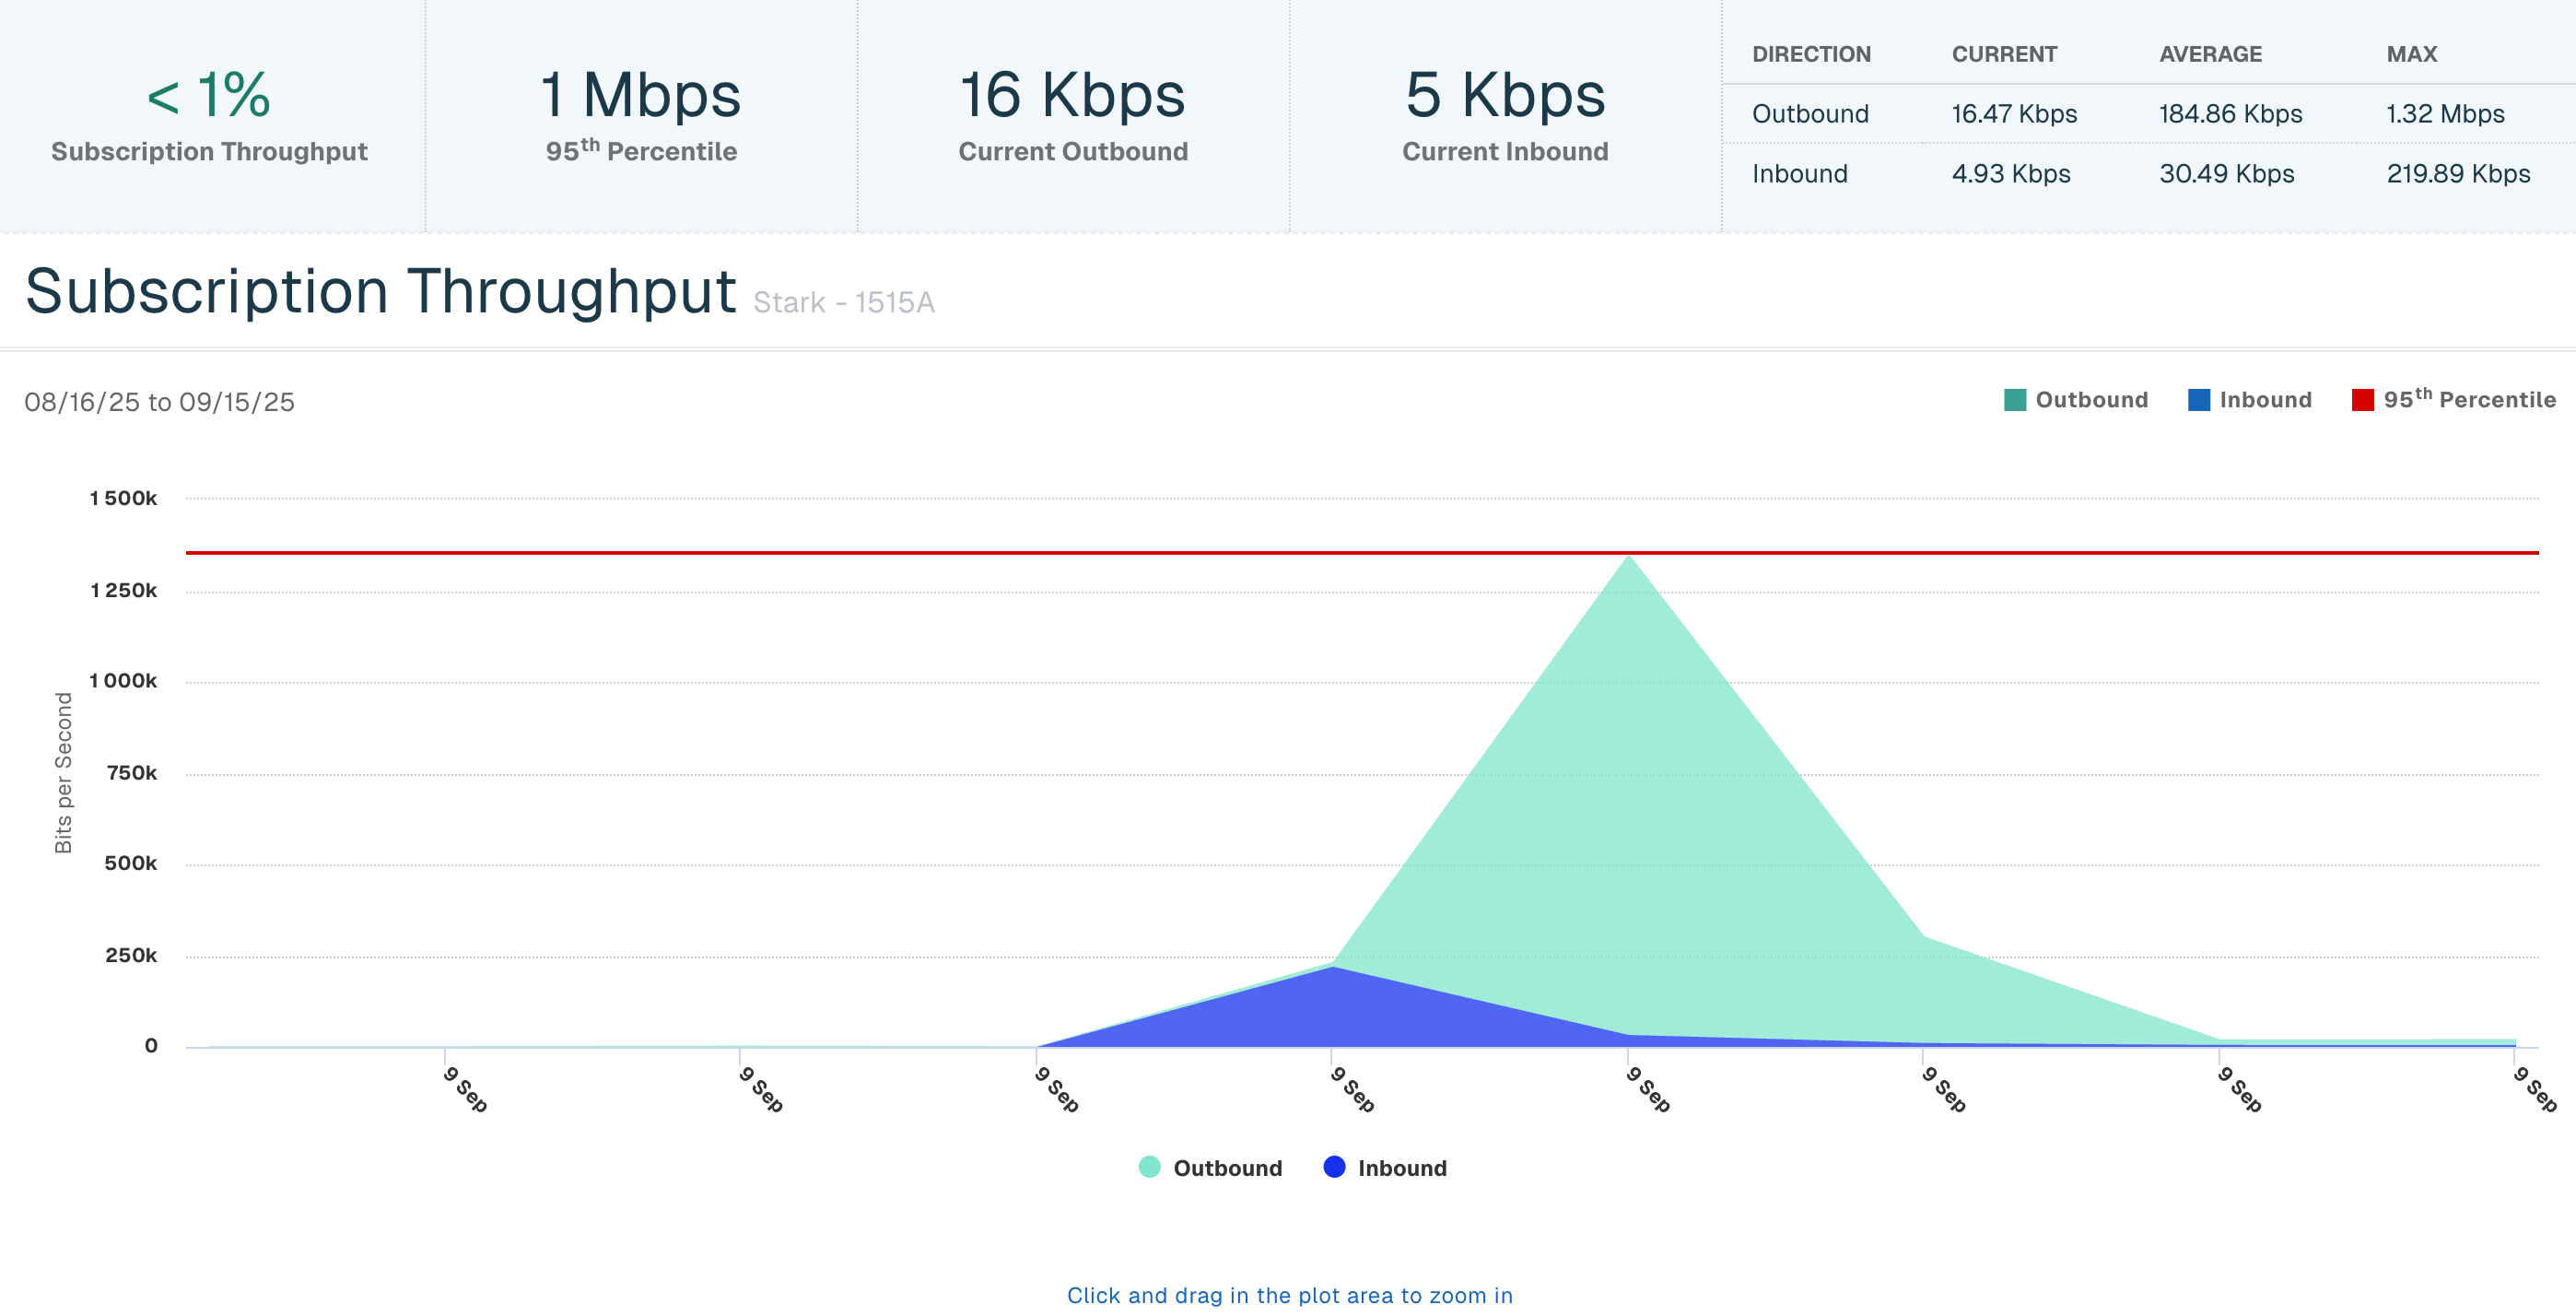
Subscription Throughput
The Subscription Throughput chart provides the past 30 days of an Enforcer's inbound and outbound throughput. Click on the hyperlinked Enforcer Name in the table and then select the Subscription Throughput Bar to view throughput data.
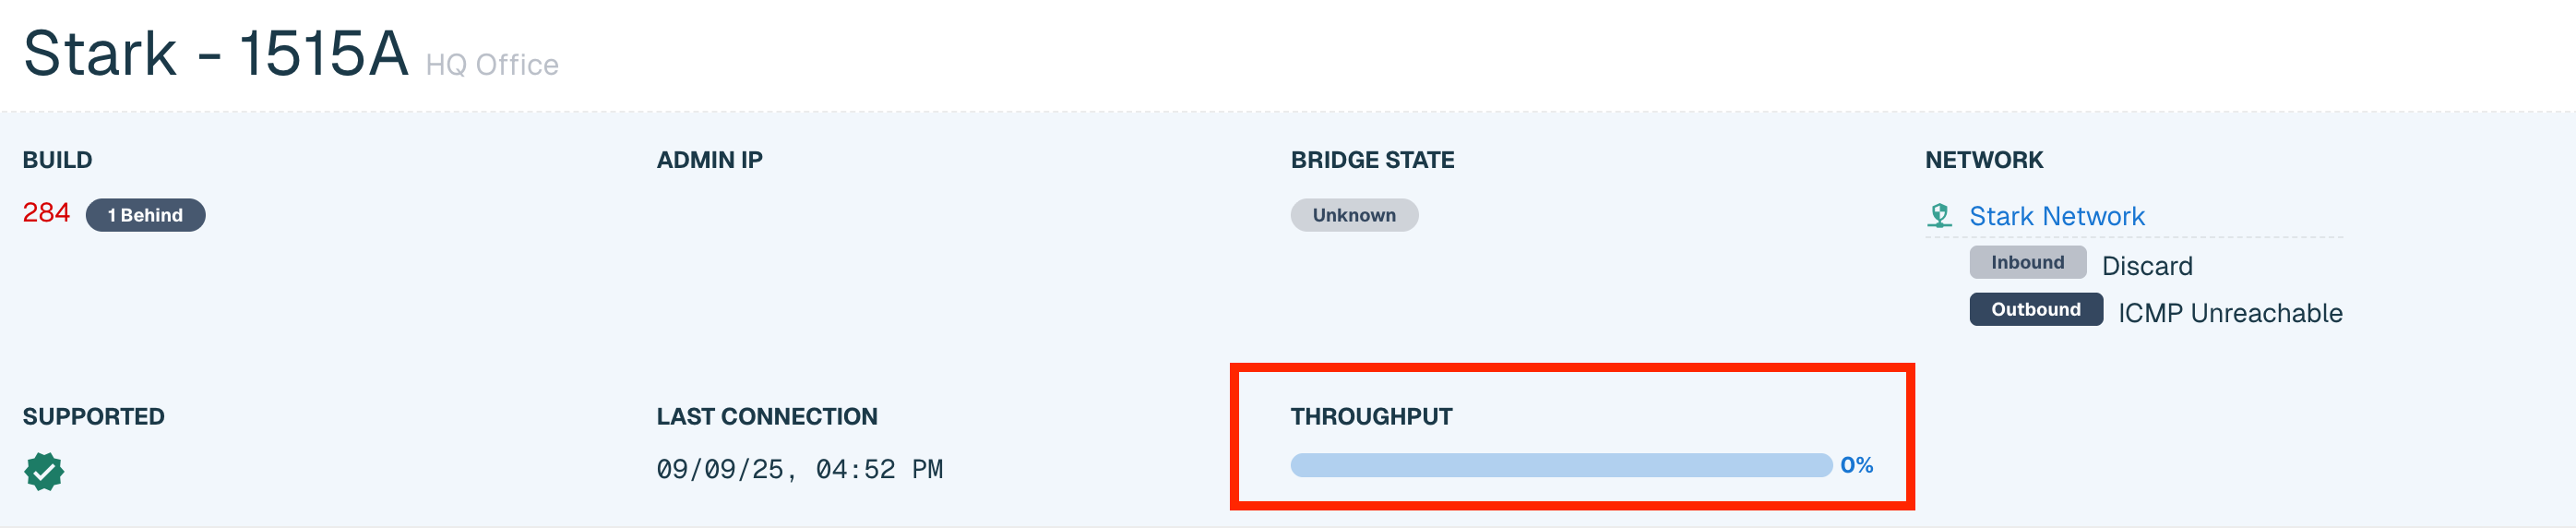
The following throughput details will display at the top:
-
% Subscription Throughput utilized for the past 30 days
-
95th Percentile for the past 30 days, via industry standard 95/5 measurements
-
Current Outbound throughput (in bits)
-
Current Inbound throughput (in bits)

The table in the top right corner shows the following inbound and outbound data:
-
Current throughput (in bits per second)
-
Average throughput (in bits per second)
-
Maximum throughput (in bits per second)
The chart displays a graphical representation of the inbound and outbound throughput and the 95th percentile for the past 30 days. Click and drag within the plot area to zoom for a specific date and time.