
The threatER Portal has numerous built-in integrations with 3rd party providers. Utilizing our plugin architecture and your membership credentials with these vendors, you can easily sync to their system and retrieve threat intelligence to block or allow traffic.
Abuse Feodo/Botnet C&C
Abuse.ch is a community driven threat intelligence initiative with the main goal of identifying and tracking cyber threats from malware and botnet Command&Control servers (C&Cs). The Feodo Tracker is a resource from abuse.ch that offers a blocklist of botnet C&C servers to protect your infrastructure from Dridex, TrickBot, Emotet, QakBot and BazarLoader. With this integration in place, threatER can automatically access and block IPs from Feodo Tracker's different formats.
IP List Details for Abuse Feodo/Botnet C&C
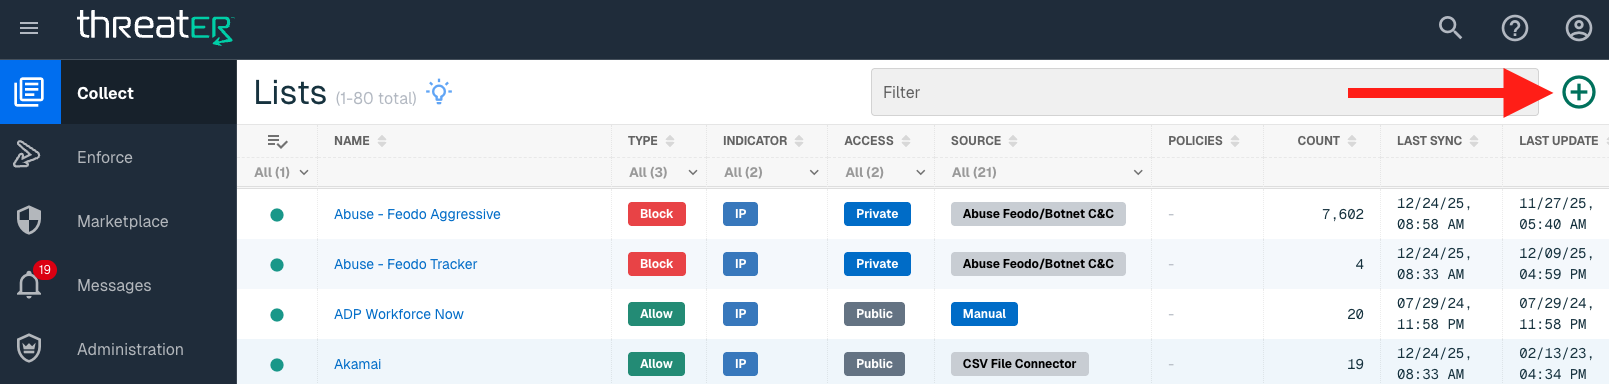
Navigate to Collect in the left-hand navigation menu and click the green ⊕ icon in the top right to get started.

The Abuse Feodo/Botnet C&C plugin is available for the following IP List Types:
-
Block
Provide the following information under List Details (* indicates required field):
|
Field Name |
Description |
|
Name* |
Unique list name required |
|
Source* |
Options include Manual or Plugin but for integrations, select Plugin |
|
List Type* |
Options include Block, Allow, Threat, but for this Plugin choose Block |
|
Indicator* |
Options include IP or Domain but in this example, select IP |
|
Description |
A brief summary of the list |

Select Next to proceed to the Set Up External List step once all required fields are complete.
Set Up External IP List for Abuse Feodo/Botnet C&C
Enter the following fields for the Abuse Feodo/Botnet C&C Plugin:
|
Field Name |
Description |
|
Plugin Name |
Select Abuse Feodo/Botnet C&C |
|
Interval |
Time between each pull in minutes |
|
HTTP URL |
Options include
|

Click Next to move on to the Applies to Policy step.
Apply Feodo list to Policies
Entries within an IP list are not blocked until the List is applied to a Policy. To apply this new list to a policy, select the applicable policies. Select the Finish button to create the List once all desired selections are made.

Admins also have the option to create a new policy within the Create List wizard. See this link for more information.
Select Create List to set up the IP list. It may take 15-60 minutes for lists to fully populate. If it is urgent that an IP be blocked immediately, create a manual list and add the IP for immediate effect.
AlienVaultOTX
AlienVault Open Threat Exchange (OTX) offers threat detection, incident response and compliance in a single open threat data platform. Indicators of Compromise (IOCs) include IP addresses and domains, which threatER can block as part of your existing list policy. Setting up an external list requires an admin to provide the AlienVault API Key.
IP List Details for AlienVault OTX
Navigate to Collect in the left-hand navigation menu and click the green ⊕ icon in the top right to get started.

The AlienVault plugin is available for the following IP List Types:
-
Block
Provide the following information under List Details (* indicates required field):
|
Field Name |
Description |
|
Name* |
Unique list name required |
|
Source* |
Options include Manual or Plugin but for integrations, select Plugin |
|
List Type* |
Options include Block, Allow, Threat, but for this Plugin choose Block |
|
Indicator* |
Options include IP or Domain but in this example, select IP |
|
Description |
A brief summary of the list |

Select Next to proceed to the Set Up External List step once all required fields are complete.
Set Up External IP List for AlienVault OTX
Enter the following fields for the AlienVault OTX Plugin:
|
Field Name |
Description |
|
Plugin Name |
Select AlienVault OTX |
|
Interval |
Time between each pull in minutes |
|
API Key |
The API to easily synchronize the Threat Intelligence available in OTX to threatER |

Click Next to move on to the Applies to Policy step.
Apply AlienVault list to Policies
Entries within an IP list are not blocked until the List is applied to a Policy. To apply this new list to a policy, select the applicable policies. Select the Finish button to create the List once all desired selections are made.

Admins also have the option to create a new policy within the Create List wizard. See this link for more information.
Select Create List to set up the IP list. It may take 15-60 minutes for lists to fully populate. If it is urgent that an IP be blocked immediately, create a manual list and add the IP for immediate effect.
Domain List Details for AlienVault OTX
Navigate to Collect in the left-hand navigation menu and click the green ⊕ icon in the top right to get started.

AlienVault is available for the following Domain List Types:
-
Block
Provide the following information under List Details (* indicates required field):
|
Field Name |
Description |
|
Name* |
Unique list name required |
|
Source* |
Options include Manual or Plugin but for integrations, select Plugin |
|
List Type* |
Options include Block, Allow, Threat, but for this Plugin choose Block |
|
Indicator* |
Options include IP or Domain but in this example, select Domain |
|
Description |
A brief summary of the list |
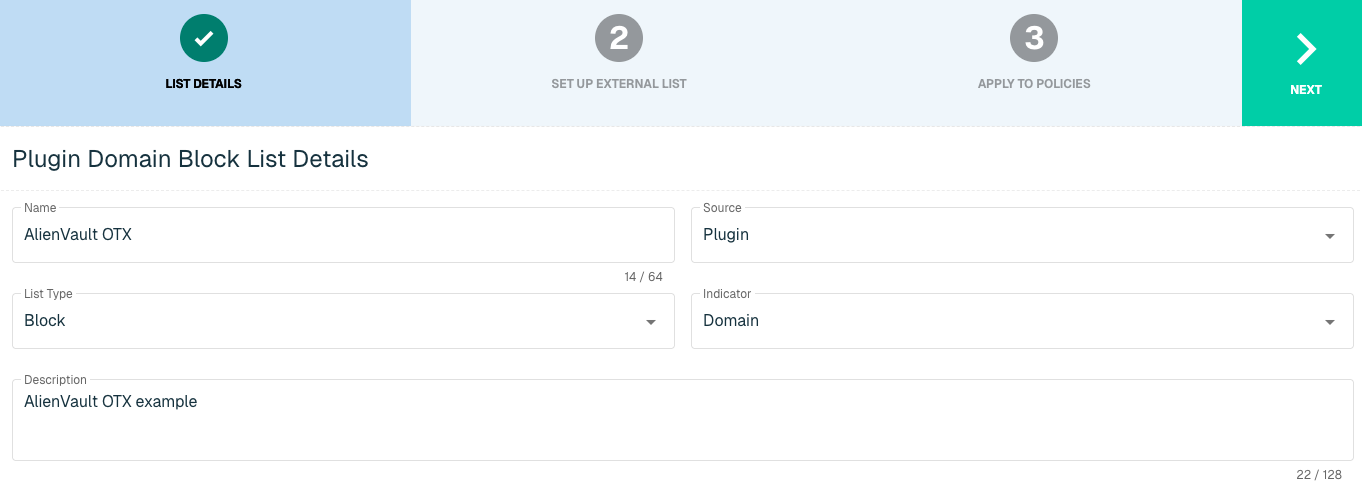
Select Next to proceed to the Set Up External List step once all required fields are complete.
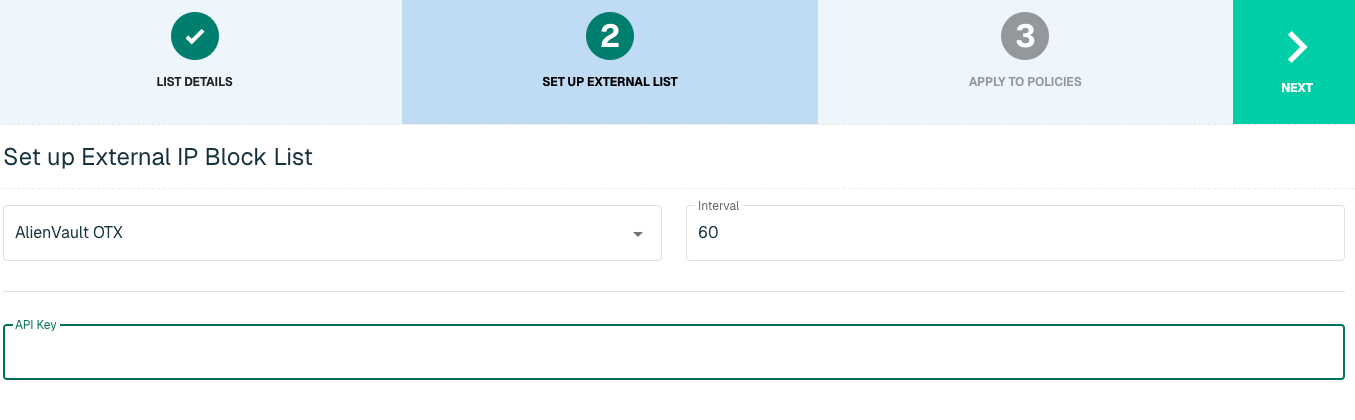
Set Up External Domain List for AlienVault OTX
Enter the following fields for the AlienVault OTX Plugin:
|
Field Name |
Description |
|
Plugin Name |
Select AlienVault OTX |
|
Interval |
Time between each pull in minutes |
|
API Key |
The API to easily synchronize the Threat Intelligence available in OTX to threatER |
Apply AlienVault list to Policies
Entries within a Domain list are not blocked until the List is applied to a Policy. To apply this new list to a policy, select the applicable policies. Select the Create List button to create the List once all desired selections are made.

Admins also have the option to create a new policy within the Create List wizard. See this link for more information.
It may take 15-60 minutes for lists to fully populate. If it is urgent that a Domain be blocked immediately, create a manual list and add the Domain for immediate effect.
Anomali
Anomali is a cybersecurity threat intelligence platform, specializing in automated attack pattern analysis. The platform allows executives to monitor trends against vulnerabilities to "predict" the next threat.
Setting up an external list requires an admin to provide the following information from Anomali:
-
User Name
-
API Key
-
Confidence Score
-
Threat Categories
IP List Details for Anomali
Navigate to Collect in the left-hand navigation menu and click the green ⊕ icon in the top right to get started.

The Anomali plugin is available for the following IP List Types:
-
Threat
Provide the following information under List Details (* indicates required field):
|
Field Name |
Description |
|
Name* |
Unique list name required |
|
Source* |
Options include Manual or Plugin but for integrations, select Plugin |
|
List Type* |
Options include Block, Allow, Threat, but for this Plugin choose Threat |
|
Indicator* |
Options include IP or Domain but in this example, select IP |
|
Description |
A brief summary of the list |

Select Next to proceed to the Set Up External List step once all required fields are complete.
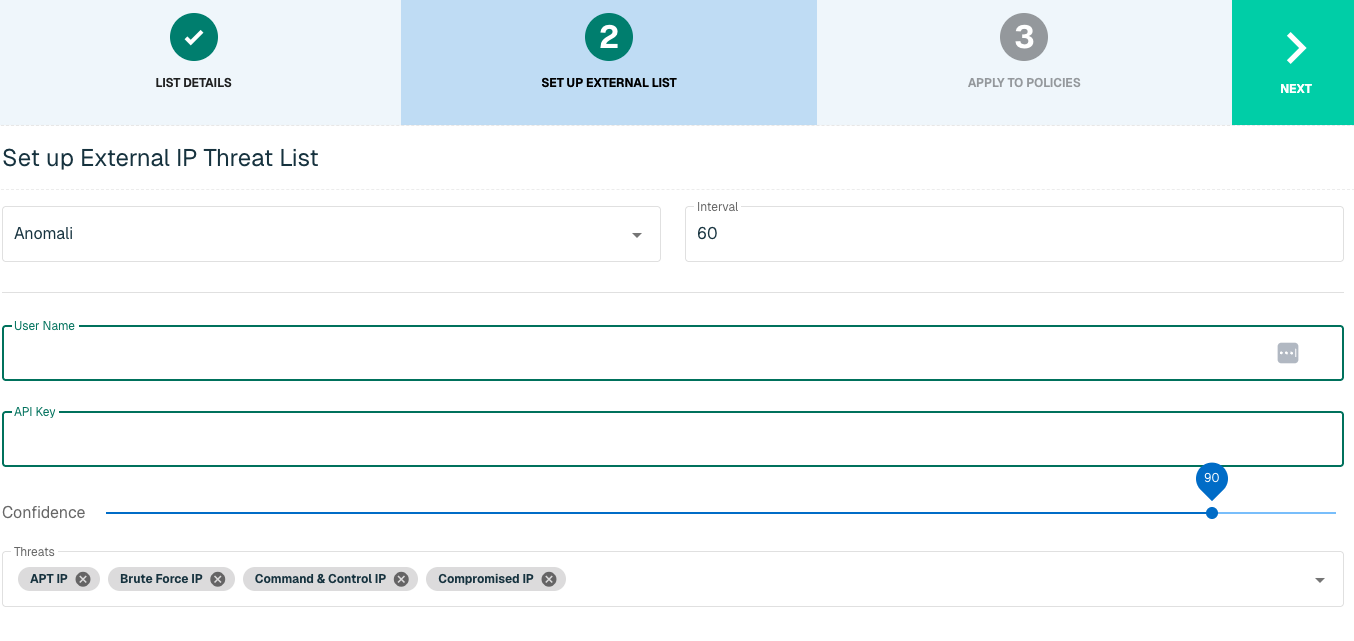
Set Up External IP List for Anomali
Enter the following fields for the Anomali Plugin:
|
Field Name |
Description |
|
Plugin Name |
Select Anomali |
|
Interval |
Time between each pull in minutes |
|
User Name |
Anomali User Name |
|
API Key |
Anomali API Key |
|
Confidence |
Threshold Specification (from a range of 0 to 100) |
|
Threats |
Category of Threats to pull into the Threat List |
Click Next to move on to the Applies to Policy step.
Apply Anomali list to Policies
Entries within the Anomali IP list are not considered for blocking until the List is applied to a Policy. To apply this new list to a policy, select the applicable policies. Select the Create List button to create the List once all desired selections are made.

Admins also have the option to create a new policy within the Create List wizard. See this link for more information.
It may take 15-60 minutes for lists to fully populate. If it is urgent that an IP be blocked immediately, create a manual list and add the IP for immediate effect.
Domain List Details for Anomali
Navigate to Collect in the left-hand navigation menu and click the green ⊕ icon in the top right to get started.

Anomali is available for the following Domain List Types:
-
Block
Provide the following information under List Details (* indicates required field):
|
Field Name |
Description |
|
Name* |
Unique list name required |
|
Source* |
Options include Manual or Plugin but for integrations, select Plugin |
|
List Type* |
Options include Block, Allow, Threat, but for this Plugin choose Block |
|
Indicator* |
Options include IP or Domain but in this example, select Domain |
|
Description |
A brief summary of the list |
|
Enabled* |
Position the Enabled toggle (above the Name field) to the right to enable this list globally for all policies. This means the toggle will turn blue when enabled. |

Select Next to proceed to the Set Up External List step once all required fields are complete.
Set Up External Domain List for Anomali
Enter the following fields for the Anomali Plugin:
|
Field Name |
Description |
|
Plugin Name |
Select Anomali |
|
Interval |
Time between each pull in minutes |
|
User Name |
Anomali User Name |
|
API Key |
Anomali API Key |
|
Confidence |
Threshold Specification (from a range of 0 to 100) |
|
Threats |
Category of Threats to pull into the Threat List |

Click Next to move on to the Applies to Policy step.
Apply Anomali list to Policies
Entries within the Anomali Domain list are not considered for blocking until the List is applied to a Policy. To apply this new list to a policy, select the applicable policies. Select the Create List button to create the List once all desired selections are made.

Admins also have the option to create a new policy within the Create List wizard. See this link for more information.
It may take 15-60 minutes for lists to fully populate. If it is urgent that a Domain be blocked immediately, create a manual list and add the Domain for immediate effect.
E-ISAC
The Electricity Information Sharing and Analysis Center (E-ISAC) provides collaborative security analysis to the electricity industry across North America. E-ISAC, in collaboration with the Department of Energy (DOE) and the Electricity Subsector Coordinating Council (ESCC), gathers and shares cyber and physical threat alerts, communicates mitigation strategies, and serves as central point of communication for its members.
With this integration in place, threatER can automatically access and block IPs from E-ISAC's list of threat indicators. Admins should prepare the following when setting up the external list:
-
Feed Name
-
TTL Hours
-
Authentication credentials if required
IP List Details for E-ISAC
Navigate to Collect in the left-hand navigation menu and click the green ⊕ icon in the top right to get started.
The E-ISAC integration is available for the following IP List Types:
-
Block
Provide the following information under List Details (* indicates required field):
|
Field Name |
Description |
|
Name* |
Unique list name required |
|
Source* |
Options include Manual or Plugin but for integrations, select Plugin |
|
List Type* |
Options include Block, Allow, Threat, but for this Plugin choose Block |
|
Indicator* |
Options include IP or Domain but in this example, select IP |
|
Description |
A brief summary of the list |

Select Next to proceed to the Set Up External List step once all required fields are complete.
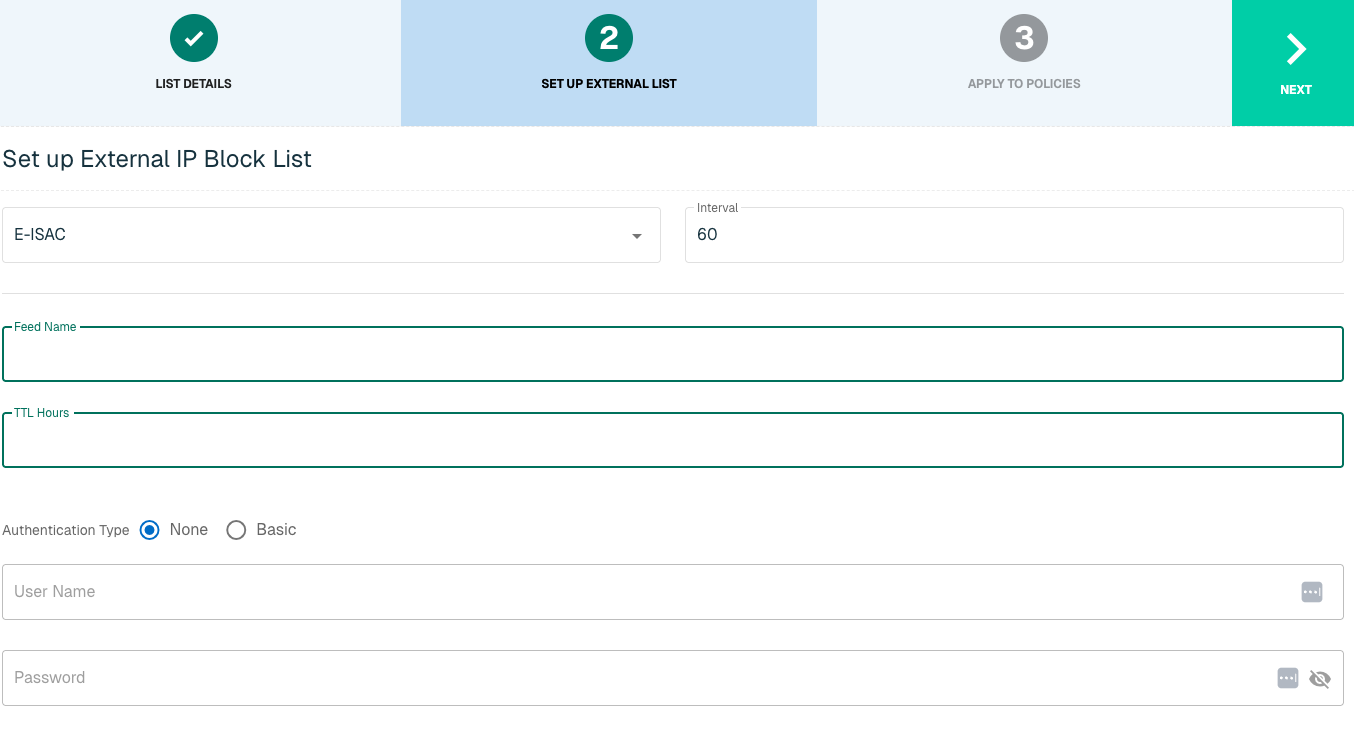
Set Up External IP List for E-ISAC Integration
Enter the following fields for the E-ISAC Integration:
|
Field Name |
Description |
|
Plugin Name |
Select E-ISAC |
|
Interval |
Time between each pull in minutes |
|
Feed Name |
The name of the feed associated with the E-ISAC page |
|
TTL Hours |
Time-to-live |
|
Authentication Type |
Option includes None or Basic. Some services require a membership, which will require inputting a user name and password in the next fields |
|
User Name |
Admin User Name to E-ISAC service |
|
Password |
Admin Password to E-ISAC service |
Click Next to move on to the Applies to Policy step.
Apply E-ISAC list to Policies
Entries within an IP list are not blocked until the List is applied to a Policy. To apply this new list to a policy, select the applicable policies.

Admins also have the option to create a new policy within the Create List wizard. See this link for more information.
Select Create List to set up the IP list. It may take 15-60 minutes for lists to fully populate. If it is urgent that an IP be blocked immediately, create a manual list and add the IP for immediate effect.
FS-ISAC
The Financial Services Information Sharing and Analysis Center (FS-ISAC) provides collaborative security analysis to the financial industry across ~70 countries. The organization offers an intelligence platform and peer-to-peer network of experts to anticipate, mitigate and respond to cyber threats.
Members to this organization can add FS-ISAC IP mitigation to threatER as an automatic block list. Admins should provide the following information when setting up the list:
-
Feed Name
-
TTL Hours
-
Authentication credentials if required
IP List Details for FS-ISAC
Navigate to Collect in the left-hand navigation menu and click the green ⊕ icon in the top right to get started.

The FS-ISAC integration is available for the following IP List Types:
-
Block
Provide the following information under List Details (* indicates required field):
|
Field Name |
Description |
|
Name* |
Unique list name required |
|
Source* |
Options include Manual or Plugin but for integrations, select Plugin
|
|
List Type* |
Options include Block, Allow, Threat, but for this Plugin choose Block |
|
Indicator* |
Options include IP or Domain but in this example, select IP |
|
Description |
A brief summary of the list |

Select Next to proceed to the Set Up External List step once all required fields are complete.
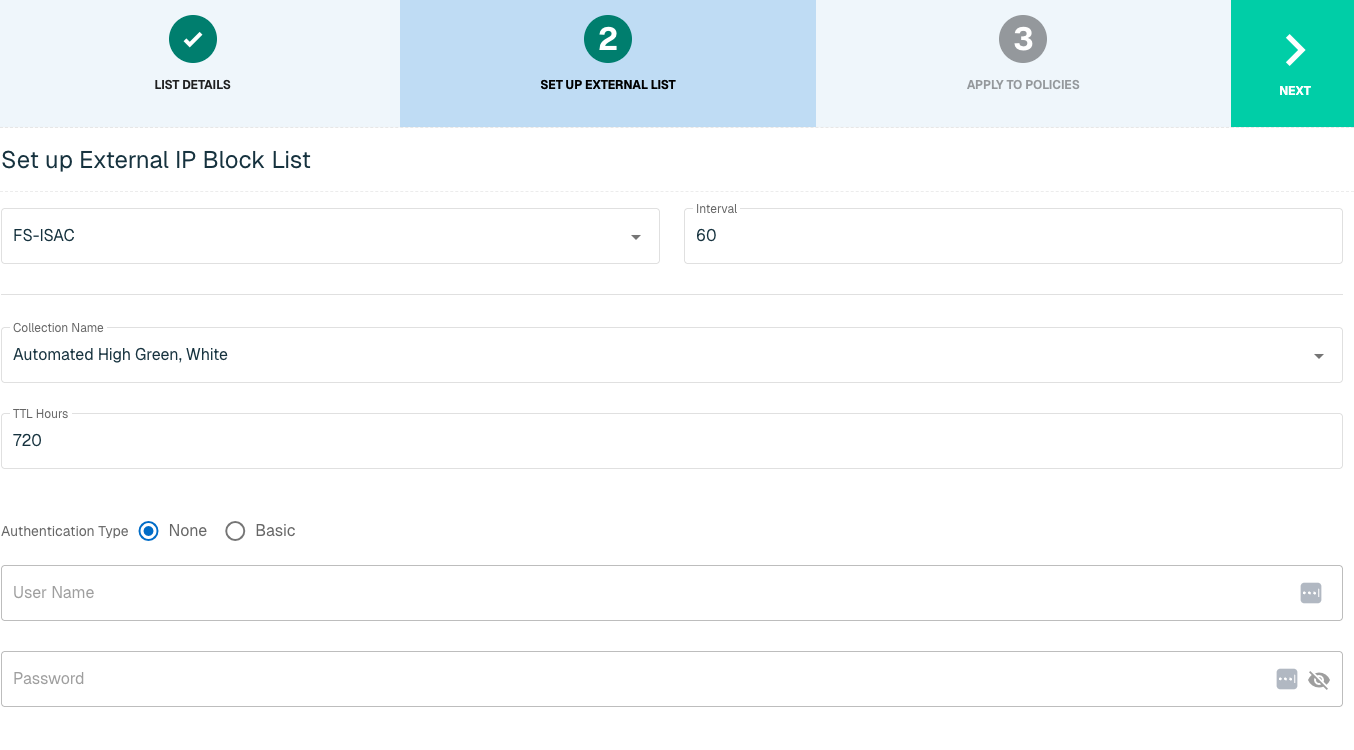
Set Up External IP List for FS-ISAC Integration
Enter the following fields for the FS-ISAC Integration:
|
Field Name |
Description |
|
Plugin Name |
Select FS-ISAC |
|
Interval |
Time between each pull in minutes |
|
Collection Name |
10 options for name of service |
|
TTL Hours |
Time-to-live |
|
Authentication Type |
Option includes None or Basic. Some services require a membership, which will require inputting a user name and password in the next fields |
|
User Name |
Admin User Name to FS-ISAC service |
|
Password |
Admin Password to FS-ISAC service |
Click Next to move on to the Applies to Policy step.
Apply FS-ISAC list to Policies
Entries within an IP list are not blocked until the List is applied to a Policy. To apply this new list to a policy, select the applicable policies.

Admins also have the option to create a new policy within the Create List wizard. See this link for more information.
Select Create List to set up the IP list. It may take 15-60 minutes for lists to fully populate. If it is urgent that an IP be blocked immediately, create a manual list and add the IP for immediate effect.
H-ISAC
The Health Information Sharing and Analysis Center (H-ISAC) is a global, non-profit, member-driven organization offering a trusted community and forum for sharing vital physical and cyber threat intelligence within the Health Care and Public Health sector (HPH). Data includes indicators of compromise, techniques and procedures of threat actors, best practices around mitigation strategies and other important information.
threatER provides an integration with H-ISAC to leverage threat intelligence allowing customers who are H-ISAC members to create block lists using IP and Domain indicators that will be used to block malicious traffic. Admins should be prepared to provide the following information when setting up the list:
-
Feed Name
-
Initial Pull Hours
-
Authentication credentials if required
IP List Details for H-ISAC
Navigate to Collect in the left-hand navigation menu and click the green ⊕ icon in the top right to get started.

The H-ISAC integration is available for the following IP List Types:
-
Block
Provide the following information under List Details (* indicates required field):
|
Field Name |
Description |
|
Name* |
Unique list name required |
|
Source* |
Options include Manual or Plugin but for integrations, select Plugin |
|
List Type* |
Options include Block, Allow, Threat, but for this Plugin choose Block |
|
Indicator* |
Options include IP or Domain but in this example, select IP |
|
Description |
A brief summary of the list |

Select Next to proceed to the Set Up External List step once all required fields are complete.
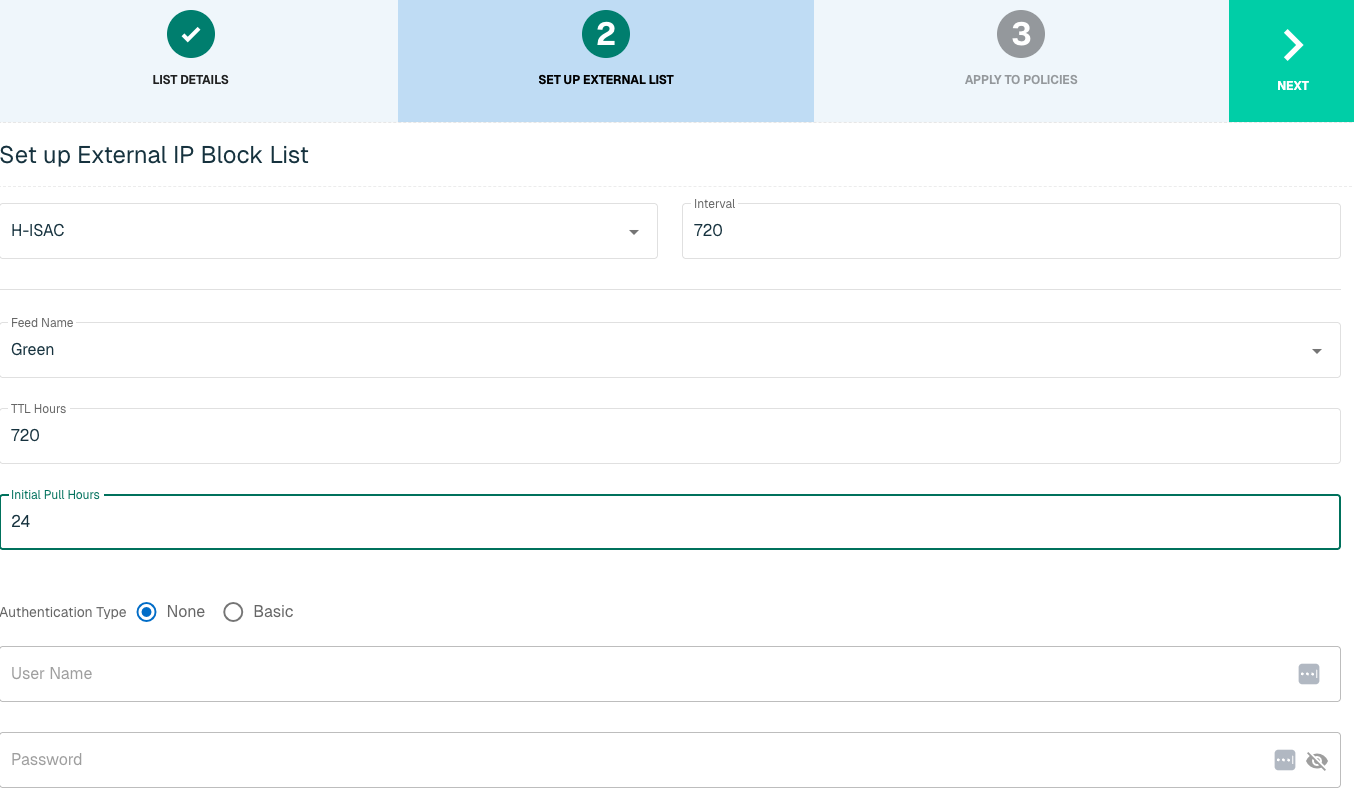
Set Up External IP List for H-ISAC Integration
Enter the following fields for the H-ISAC Plugin:
|
Field Name |
Description |
|
Plugin Name |
Select H-ISAC |
|
Interval |
Time between each pull in minutes |
|
Feed Name |
The name of the feed associated with the H-ISAC page |
|
TTL Hours |
Time-to-live |
|
Initial Pull Hours |
Time to pull |
|
Authentication Type |
Option includes None or Basic. Some services require a membership, which will require inputting a user name and password in the next fields |
|
User Name |
Admin User Name to H-ISAC service |
|
Password |
Admin Password to H-ISAC service |
Click Next to move on to the Applies to Policy step.
Apply H-ISAC list to Policies
Entries within an IP list are not blocked until the List is applied to a Policy. To apply this new list to a policy, select the applicable policies.

Admins also have the option to create a new policy within the Create List wizard. See this link for more information.
Select Create List to set up the IP list. It may take 15-60 minutes for lists to fully populate. If it is urgent that an IP be blocked immediately, create a manual list and add the IP for immediate effect.
Domain List Details for H-ISAC
Navigate to Collect in the left-hand navigation menu and click the green ⊕ icon in the top right to get started.

H-ISAC is available for the following Domain List Types:
-
Block
Provide the following information under List Details (* indicates required field):
|
Field Name |
Description |
|
Name* |
Unique list name required |
|
Source* |
Options include Manual or Plugin but for integrations, select Plugin |
|
List Type* |
Options include Block, Allow, Threat, but for this Plugin choose Block |
|
Indicator* |
Options include IP or Domain but in this example, select Domain |
|
Description |
A brief summary of the list |

Select Next to proceed to the Set Up External List step once all required fields are complete.
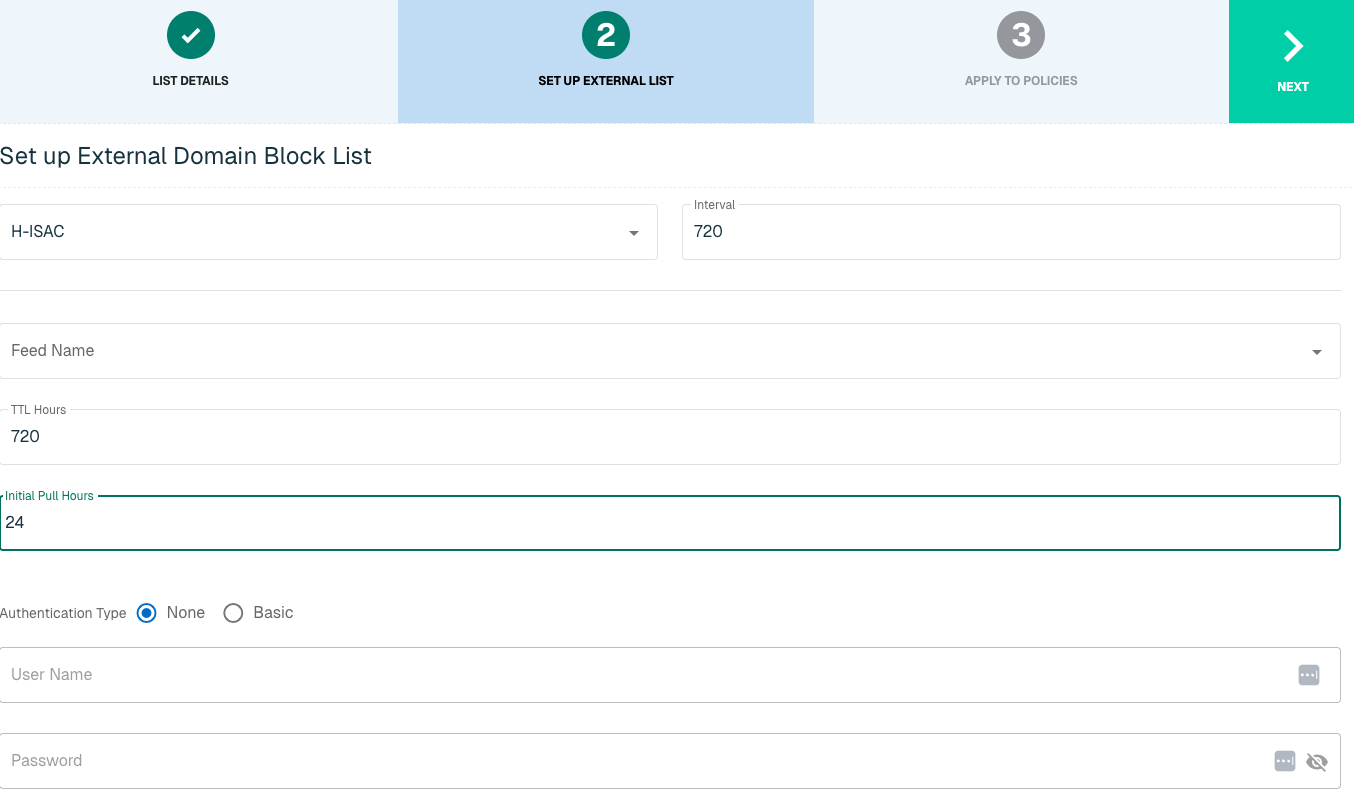
Set Up External Domain List for H-ISAC
Enter the following fields for the H-ISAC Plugin:
|
Field Name |
Description |
|
Plugin Name |
Select H-ISAC |
|
Interval |
Time between each pull in minutes |
|
Feed Name |
The name of the feed associated with the H-ISAC page |
|
TTL Hours |
Time-to-live |
|
Initial Pull Hours |
Time to pull |
|
Authentication Type |
Option includes None or Basic. Some services require a membership, which will require inputting a user name and password in the next fields |
|
User Name |
Admin User Name to H-ISAC service |
|
Password |
Admin Password to H-ISAC service |
Apply H-ISAC list to Policies
Entries within a Domain list are not blocked until the List is applied to a Policy. To apply this new list to a policy, select the applicable policies.

Admins also have the option to create a new policy within the Create List wizard. See this link for more information.
Select Create List to set up the IP list. It may take 15-60 minutes for lists to fully populate. If it is urgent that a Domain be blocked immediately, create a manual list and add the Domain for immediate effect.
IP2Proxy
IP2Proxy is a hosted Web Service that detects IP addresses being used as anonymous proxy, VPN, TOR exit nodes, search engine robots (SES) and residential proxies (RES) services by bad actors to exploit and perform malicious activity.
threatER provides an integration with IP2Proxy to leverage threat intelligence allowing customers to create block lists using IP indicators from IP2Proxy that will be used to block malicious traffic. Admins should be prepared to provide the following information when setting up the list:
-
Access Token
-
Database Version
IP List Details for IP2Proxy
Navigate to Collect in the left-hand navigation menu and click the green ⊕ icon in the top right to get started.

The IP2Proxy integration is available for the following IP List Types:
-
Block
Provide the following information under List Details (* indicates required field):
|
Field Name |
Description |
|
Name* |
Unique list name required |
|
Source* |
Options include Manual or Plugin but for integrations, select Plugin |
|
List Type* |
Options include Block, Allow, Threat, but for this Plugin choose Block |
|
Indicator* |
Options include IP or Domain but in this example, select IP |
|
Description |
A brief summary of the list |

Select Next to proceed to the Set Up External List step once all required fields are complete.
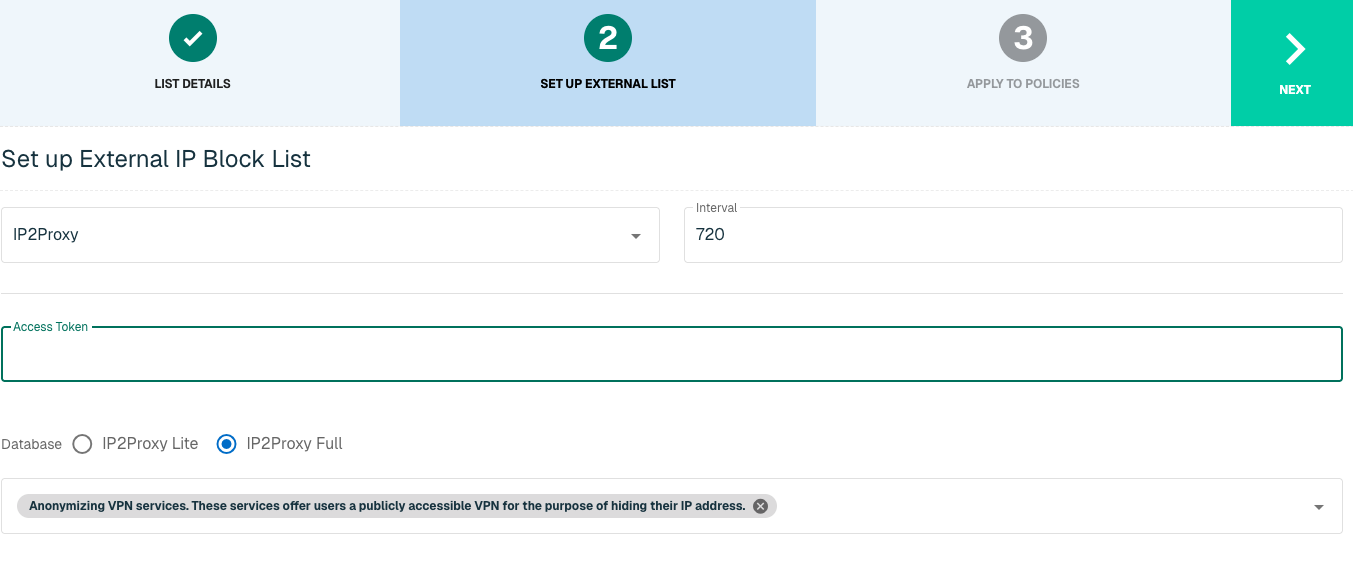
Set Up External IP List for IP2Proxy Integration
Enter the following fields for the IP2Proxy Plugin:
|
Field Name |
Description |
|
Plugin Name |
Select IP2Proxy |
|
Interval |
Time between each pull in minutes |
|
Access Token |
IP2Proxy credentials |
|
Database |
Option includes IP2Proxy Lite or IP2Proxy Full. Selecting IP2ProxyFull will provide four database options |
Click Next to move on to the Applies to Policy step.
Apply IP2Proxy list to Policies
Entries within an IP list are not blocked until the List is applied to a Policy. To apply this new list to a policy, select the applicable policies. Select the Finish button to create the List once all desired selections are made.

Admins also have the option to create a new policy within the Create List wizard. See this link for more information.
Select Create List to set up the IP list. It may take 15-60 minutes for lists to fully populate. If it is urgent that an IP be blocked immediately, create a manual list and add the IP for immediate effect.
IntSights
IntSights is a threat intelligence security provider that offers a subscription-based platform designed to identify and neutralize cyberattacks. Through their proprietary data mining algorithms and unique machine learning, IntSights provides customers with accurate cyber threat intelligence and incident mitigation in real-time.
threatER provides an integration with IntSights to leverage threat intelligence allowing customers who are subscribed to IntSights to create block lists using IP and Domain indicators that will be used to block malicious traffic. Admins should be prepared to provide the following information when setting up the list:
-
Account ID
-
API Key
-
Severity Level
-
Deployment Time
IP List Details for IntSights
Navigate to Collect in the left-hand navigation menu and click the green ⊕ icon in the top right to get started.

The IntSights integration is available for the following IP List Types:
-
Block
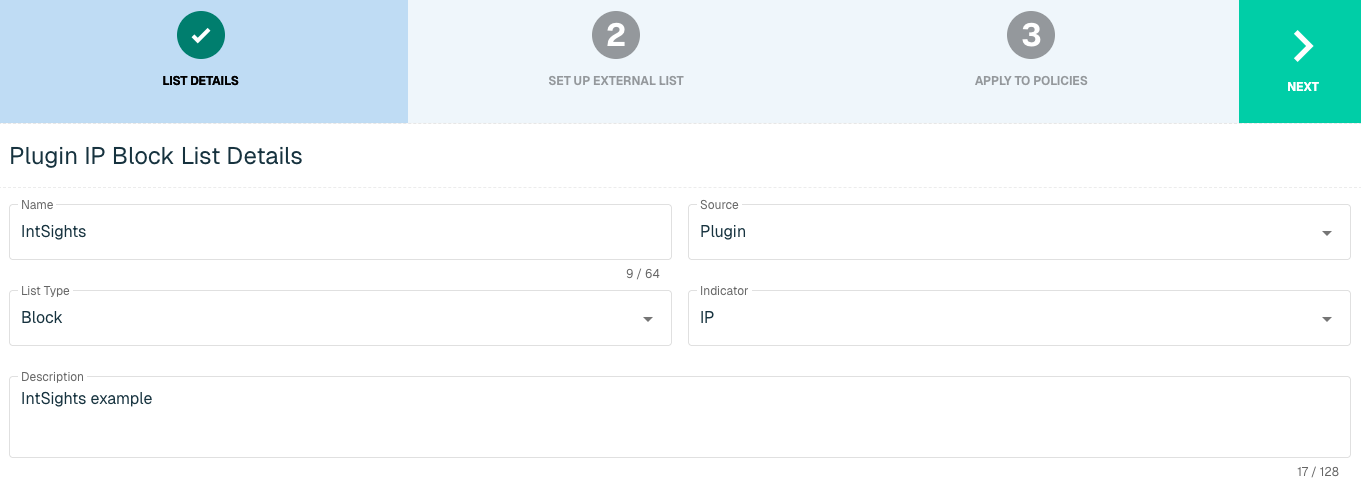
Provide the following information under List Details (* indicates required field):
|
Field Name |
Description |
|
Name* |
Unique list name required |
|
Source* |
Options include Manual or Plugin but for integrations, select Plugin
|
|
List Type* |
Options include Block, Allow, Threat, but for this Plugin choose Block |
|
Indicator* |
Options include IP or Domain but in this example, select IP |
|
Description |
A brief summary of the list |
Select Next to proceed to the Set Up External List step once all required fields are complete.
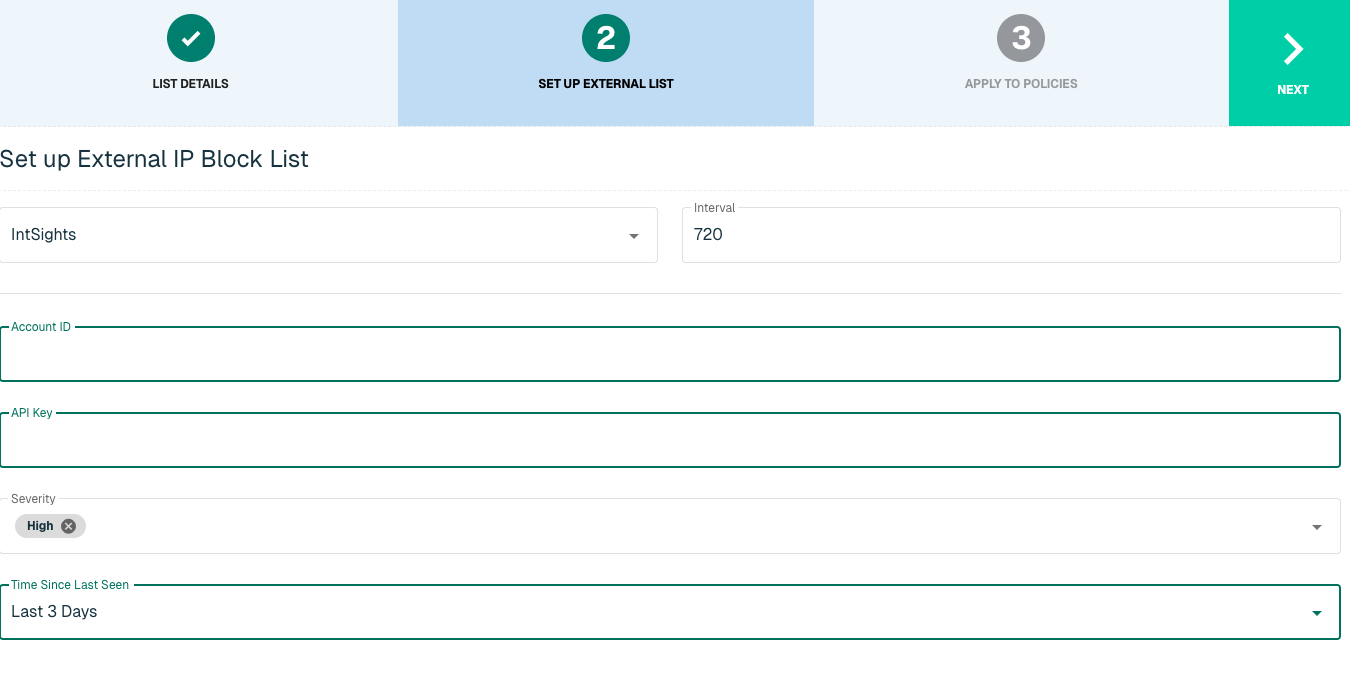
Set Up External IP List for IntSights Integration
Enter the following fields for the IntSights Plugin:
|
Field Name |
Description |
|
Plugin Name |
Select IntSights |
|
Interval |
Time between each pull in minutes |
|
Account ID |
IntSights Account ID |
|
API Key |
IntSights credentials |
|
Severity |
Options include High and/or Medium |
|
Time Since Last Seen |
Deployment Time |
Click Next to move on to the Applies to Policy step.
Apply IntSights list to Policies
Entries within an IP list are not blocked until the List is applied to a Policy. To apply this new list to a policy, select the applicable policies.

Admins also have the option to create a new policy within the Create List wizard. See this link for more information.
Select Create List to set up the IP list. It may take 15-60 minutes for lists to fully populate. If it is urgent that an IP be blocked immediately, create a manual list and add the IP for immediate effect.
Domain List Details for IntSights
Navigate to Collect in the left-hand navigation menu and click the green ⊕ icon in the top right to get started.

IntSights is available for the following Domain List Types:
-
Block
Provide the following information under List Details (* indicates required field):
|
Field Name |
Description |
|
Name* |
Unique list name required |
|
Source* |
Options include Manual or Plugin but for integrations select Plugin |
|
List Type* |
Options include Block, Allow, Threat, but for this Plugin choose Block |
|
Indicator* |
Options include IP or Domain but in this example, select Domain |
|
Description |
A brief summary of the list |

Select Next to proceed to the Set Up External List step once all required fields are complete.
Set Up External Domain List for IntSights
Enter the following fields for the IntSights Plugin:
|
Field Name |
Description |
|
Plugin Name |
Select IntSights |
|
Interval |
Time between each pull in minutes |
|
Account ID |
IntSights Account ID |
|
API Key |
IntSights credentials |
|
Severity |
Options include High and/or Medium |
|
Time Since Last Seen |
Deployment Time |

Click Next to move on to the Applies to Policy step.
Apply IntSights list to Policies
Entries within a domain list are not blocked until the List is applied to a Policy. To apply this new list to a policy, select the applicable policies.

Admins also have the option to create a new policy within the Create List wizard. See this link for more information.
Select Create List to set up the domain list. It may take 15-60 minutes for lists to fully populate. If it is urgent that an IP or domain be blocked immediately, create a manual list and add the IP or domain for immediate effect.
Microsoft
Microsoft's software and services are critical need to many businesses. Many of Microsoft's services now run in the cloud, and can be load balanced across servers in multiple data centers, potentially all over the world. On rare occasions, this can cause complications if a valid Microsoft IP address is misidentified by one of our threat intelligence partners, by an open source feed being used for block list management or if it shows up as belonging to a country that you've decided to block.
Microsoft supplies their known-good numeric IPs housing their services to the public. threatER pulls this public information from Microsoft and we use it to craft a curated allow list for Microsoft services, which are grouped into four Microsoft service areas:
-
Common (Microsoft 365)
-
Exchange (Email)
-
SharePoint
-
Skype (Microsoft Teams)
If your company uses one or more of these services and wants to ensure they are always enabled and never blocked, we recommend creating an allow list with our built-in Microsoft plugin.
IP List Details for Microsoft
Navigate to Collect in the left-hand navigation menu and click the green ⊕ icon in the top right to get started.

The Microsoft integration is available for the following IP List Types:
-
Allow
Provide the following information under List Details (* indicates required field):
|
Field Name |
Description |
|
Name* |
Unique list name required |
|
Source* |
Options include Manual or Plugin but for integrations, select Plugin |
|
List Type* |
Options include Block, Allow, Threat, but for this Plugin choose Allow |
|
Indicator* |
Options include IP or Domain but in this example, select IP |
|
Description |
A brief summary of the list |

Select Next to proceed to the Set Up External List step once all required fields are complete.
Set Up External IP List for Microsoft Integration
Enter the following fields for the Microsoft Plugin:
|
Field Name |
Description |
|
Plugin Name |
Select Microsoft |
|
Interval |
Time between each pull in minutes |
|
Service Areas |
Options include:
Multiple Service Areas can be selected. |

Click Next to move on to the Applies to Policy step.
Apply Microsoft list to Policies
Entries within an IP list are not allowed until the List is applied to a Policy. To apply this new list to a policy, select the applicable policies.

Admins also have the option to create a new policy within the Create List wizard. See this link for more information.
Select Create List to set up the IP list. It may take 15-60 minutes for lists to fully populate. If it is urgent that an IP be allowed immediately, create a manual list and add the IP for immediate effect.
MS-ISAC
The Multi-State Information Sharing and Analysis Center (E-ISAC) provides collaborative security analysis for U.S. State, Local, Tribal, and Territorial (SLTT) government organizations. MS-ISAC, in collaboration with the Center for Internet Security (CIS) and the Office of Cybersecurity and Communications within the U.S. Department of Homeland Security (DHS), gathers and shares cyber and physical threat alerts, communicates mitigation strategies, and serves as central point of communication for its members.
With this integration in place, threatER can automatically access and block IPs and Domains from MS-ISAC's list of threat indicators. Admins should prepare the API Key when setting up the external list.
IP List Details for MS-ISAC
Navigate to Collect in the left-hand navigation menu and click the green ⊕ icon in the top right to get started.

The MS-ISAC integration is available for the following IP List Types:
-
Block
Provide the following information under List Details (* indicates required field):
|
Field Name |
Description |
|
Name* |
Unique list name required |
|
Source* |
Options include Manual or Plugin but for integrations, select Plugin |
|
List Type* |
Options include Block, Allow, Threat, but for this Plugin choose Block |
|
Indicator* |
Options include IP or Domain but in this example, select IP |
|
Description |
A brief summary of the list |

Select Next to proceed to the Set Up External List step once all required fields are complete.
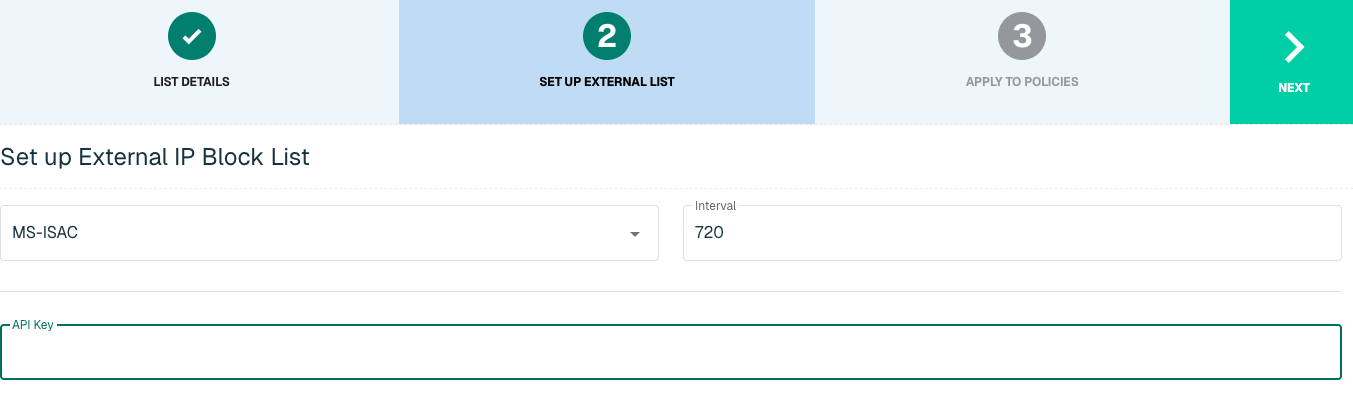
Set Up External IP List for MS-ISAC Integration
Enter the following fields for the MS-ISAC Plugin:
|
Field Name |
Description |
|
Plugin Name |
Select MS-ISAC |
|
Interval |
Time between each pull in minutes |
|
API Key |
The API to easily synchronize the Threat Intelligence available in MS-ISAC to ThreatBlockr |
Click Next to move on to the Applies to Policy step.
Apply MS-ISAC list to Policies
Entries within an IP list are not blocked until the List is applied to a Policy. To apply this new list to a policy, select the applicable policies.

Admins also have the option to create a new policy within the Create List wizard. See this link for more information.
Select Create List to set up the IP list. It may take 15-60 minutes for lists to fully populate. If it is urgent that an IP be blocked immediately, create a manual list and add the IP for immediate effect.
Domain List Details for MS-ISAC
Navigate to Collect in the left-hand navigation menu and click the green ⊕ icon in the top right to get started.

MS-ISAC is available for the following Domain List Types:
-
Block
Provide the following information under List Details (* indicates required field):
|
Field Name |
Description |
|
Name* |
Unique list name required |
|
Source* |
Options include Manual or Plugin but for integrations, select Plugin
|
|
List Type* |
Options include Block, Allow, Threat, but for this Plugin choose Block |
|
Indicator* |
Options include IP or Domain but in this example, select Domain |
|
Description |
A brief summary of the list |

Select Next to proceed to the Set Up External List step once all required fields are complete.
Set Up External Domain List for MS-ISAC
Enter the following fields for the MS-ISAC Plugin:
|
Field Name |
Description |
|
Plugin Name |
Select MS-ISAC |
|
Interval |
Time between each pull in minutes |
|
API Key |
The API to easily synchronize the Threat Intelligence available in MS-ISAC to threatER |

Apply MS-ISAC list to Policies
Entries within a Domain list are not blocked until the List is applied to a Policy. To apply this new list to a policy, select the applicable policies.

Admins also have the option to create a new policy within the Create List wizard. See this link for more information.
Select Create List to set up the IP list. It may take 15-60 minutes for lists to fully populate. If it is urgent that a domain be blocked immediately, create a manual list and add the domain for immediate effect.
Proofpoint
For customers purchasing a subscription for the Proofpoint premium threat intelligence feeds, the Proofpoint IPv4 feed is immediately activated and made available in your IPv4 Threat list. This feed leverages the Risk Thresholds configured in your existing policies.
Adding the Proofpoint Domain feed to your Domain Block List, however, requires action on your part. With this integration in place, threatER can automatically access and block Domains from Proofpoint's list of threat indicators. Admins should prepare the following when setting up the external list:
-
API Key
-
Thresholds
Domain List Details for Proofpoint
Navigate to Collect in the left-hand navigation menu and click the green ⊕ icon in the top right to get started.

Proofpoint is available for the following Domain List Types:
-
Block
Provide the following information under List Details (* indicates required field):
|
Field Name |
Description |
|
Name* |
Unique list name required |
|
Source* |
Options include Manual or Plugin but for integrations, select Plugin |
|
List Type* |
Options include Block, Allow, Threat, but for this Plugin choose Block |
|
Indicator* |
Options include IP or Domain but in this example, select Domain |
|
Description |
A brief summary of the list |

Select Next to proceed to the Set Up External List step once all required fields are complete.
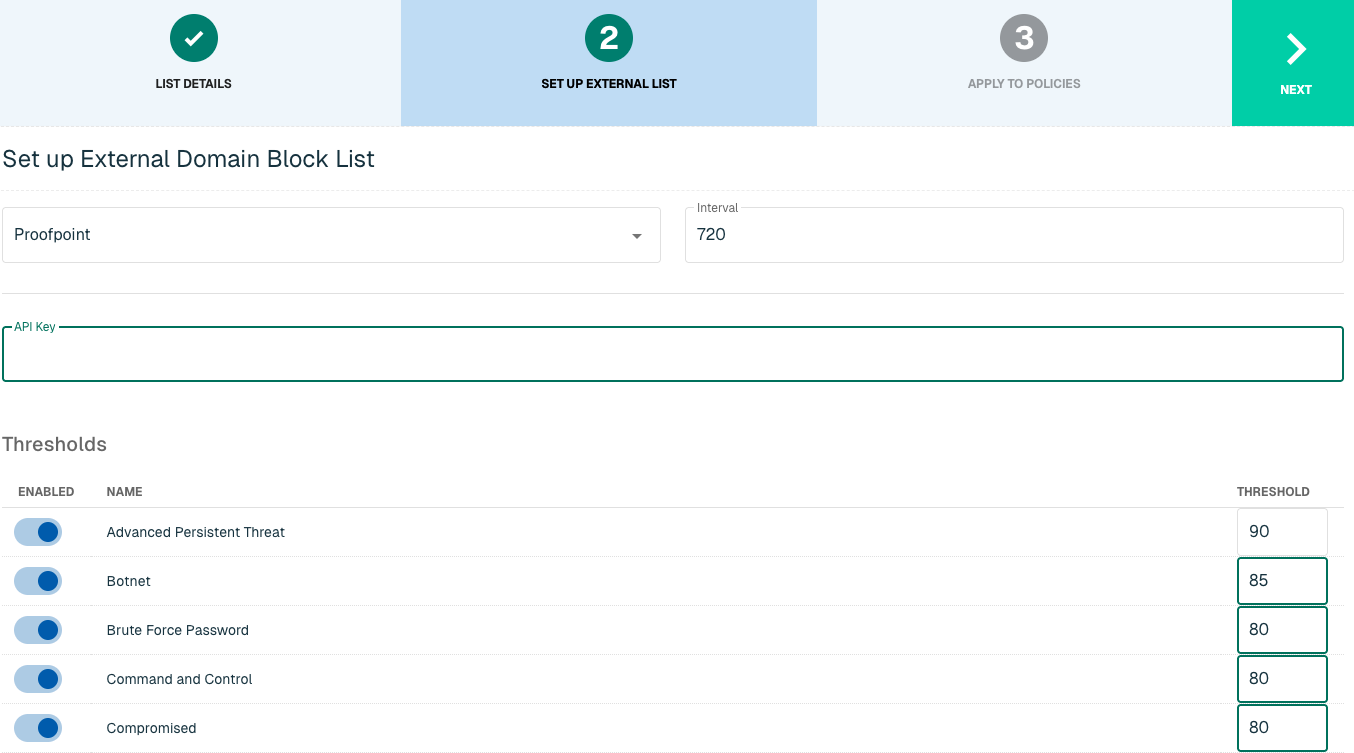
Set Up External Domain List for Proofpoint
Enter the following fields for the Proofpoint Plugin:
|
Field Name |
Description |
|
Plugin Name |
Select Proofpoint |
|
Interval |
Time between each pull in minutes |
|
API Key |
The API to easily synchronize the Threat Intelligence available in Recorded Future to ThreatBlockr |
|
Thresholds |
Toggle to the right to select the threat categories you wish to enable and provide a number for the desired threshold. Similar to Risk Thresholds on the Webroot Threat List, we recommend a score of 90 to be a best practice and strongly recommend enabling all categories. If the categories are not enabled, no indicators will be pulled by the feed. |
Apply Proofpoint list to Policies
Entries within a Domain list are not blocked until the List is applied to a Policy. To apply this new list to a policy, select the applicable policies.

Admins also have the option to create a new policy within the Create List wizard. See this link for more information.
Select Create List to set up the IP list. It may take 15-60 minutes for lists to fully populate. If it is urgent that a domain be blocked immediately, create a manual list and add the domain for immediate effect.
Recorded Future
Recorded Future is a privately held SaaS cybersecurity company that specializes in collecting, processing and analyzing threat intelligence. Through automation and patented machine learning, Recorded Future provides data collection at scale through different sources, including open, deep and dark web.
With this integration in place, threatER can automatically access and block IPs and Domains from Recorded Future's list of threat indicators. Admins should prepare the following when setting up the external list:
-
API Key
-
Risk Level
IP List Details for Recorded Future
Navigate to Collect in the left-hand navigation menu and click the green ⊕ icon in the top right to get started.

The Recorded Future integration is available for the following IP List Types:
-
Block
Provide the following information under List Details (* indicates required field):
|
Field Name |
Description |
|
Name* |
Unique list name required |
|
Source* |
Options include Manual or Plugin but for integrations, select Plugin |
|
List Type* |
Options include Block, Allow, Threat, but for this Plugin choose Block |
|
Indicator* |
Options include IP or Domain but in this example, select IP |
|
Description |
A brief summary of the list |

Select Next to proceed to the Set Up External List step once all required fields are complete.
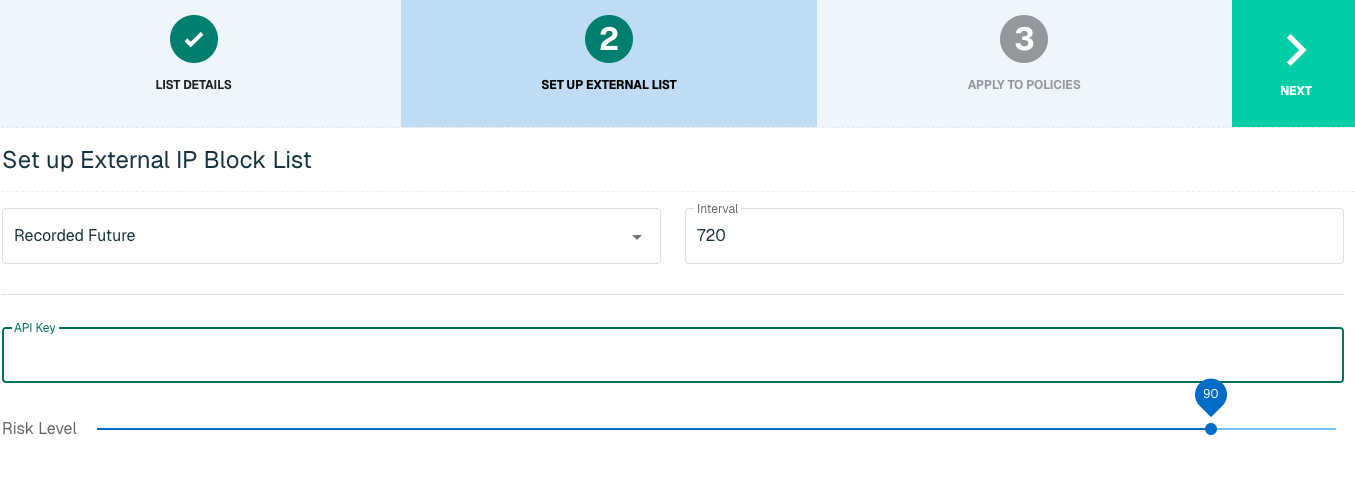
Set Up External IP List for Recorded Future Integration
Enter the following fields for the Recorded Future Plugin:
|
Field Name |
Description |
|
Plugin Name |
Select Recorded Future |
|
Interval |
Time between each pull in minutes |
|
API Key |
The API to easily synchronize the Threat Intelligence available in Recorded Future to threatER |
|
Risk Level |
A number scale between 1 to 100 that determines by which rules are currently triggered. The highest severity level associated with an indicator determines the base score:
|

Click Next to move on to the Applies to Policy step.
Apply Recorded Future list to Policies
Entries within an IP list are not blocked until the List is applied to a Policy. To apply this new list to a policy, select the applicable policies.

Admins also have the option to create a new policy within the Create List wizard. See this link for more information.
Select Create List to set up the IP list. It may take 15-60 minutes for lists to fully populate. If it is urgent that an IP be blocked immediately, create a manual list and add the IP for immediate effect.
Domain List Details for Recorded Future
Navigate to Collect in the left-hand navigation menu and click the green ⊕ icon in the top right to get started.

Recorded Future is available for the following Domain List Types:
-
Block
Provide the following information under List Details (* indicates required field):
|
Field Name |
Description |
|
Name* |
Unique list name required |
|
Source* |
Options include Manual or Plugin but for integrations, select Plugin |
|
List Type* |
Options include Block, Allow, Threat, but for this Plugin choose Block |
|
Indicator* |
Options include IP or Domain but in this example, select Domain |
|
Description |
A brief summary of the list |

Select Next to proceed to the Set Up External List step once all required fields are complete.
Set Up External Domain List for Recorded Future
Enter the following fields for the Recorded Future Plugin:
|
Field Name |
Description |
|
Plugin Name |
Select Recorded Future |
|
Interval |
Time between each pull in minutes |
|
API Key |
The API to easily synchronize the Threat Intelligence available in Recorded Future to ThreatBlockr |
|
Risk Level |
A number scale between 1 to 100 that determines by which rules are currently triggered. The highest severity level associated with an indicator determines the base score:
|
Click Next to move on to the Applies to Policy step.
Apply Recorded Future list to Policies
Entries within an IP list are not blocked until the List is applied to a Policy. To apply this new list to a policy, select the applicable policies.

Admins also have the option to create a new policy within the Create List wizard. See this link for more information.
Select Create List to set up the domain list. It may take 15-60 minutes for lists to fully populate. If it is urgent that a domain be blocked immediately, create a manual list and add the domain for immediate effect.
Recorded Future Security Control
Recorded Future Security Control feeds are "detect-and-block" IP and Domain indicators that are collected and verified by Recorded Future. These Control Feeds trigger new risk rules and create actionable risk lists that threatER can take to block before it hits your network.
With this integration in place, threatER can automatically access and block IPs and Domains from these feeds of threat indicators. Admins should prepare the following when setting up the external list:
-
API Key
-
Security Control Feeds
IP List Details for Recorded Future Security Control
Navigate to Collect in the left-hand navigation menu and click the green ⊕ icon in the top right to get started.

The Recorded Future Security Control integration is available for the following IP List Types:
-
Block
Provide the following information under List Details (* indicates required field):
|
Field Name |
Description |
|
Name* |
Unique list name required |
|
Source* |
Options include Manual or Plugin but for integrations, select Plugin
|
|
List Type* |
Options include Block, Allow, Threat, but for this Plugin choose Block |
|
Indicator* |
Options include IP or Domain but in this example, select IP |
|
Description |
A brief summary of the list |

Select Next to proceed to the Set Up External List step once all required fields are complete.
Set Up External IP List for Recorded Future Security Control Integration
Enter the following fields for the Recorded Future Security Control Plugin:
|
Field Name |
Description |
|
Plugin Name |
Select Recorded Future Security Control |
|
Interval |
Time between each pull in minutes |
|
API Key |
The API to easily synchronize the Threat Intelligence available in Recorded Future to threatER |
|
Security Control Feeds |
Detect-and-block indicators that are collected, curated, and certified by Record Future. There are currently 6 options to select in threatER:
|

Click Next to move on to the Applies to Policy step.
Apply Recorded Future list to Policies
Entries within an IP list are not blocked until the List is applied to a Policy. To apply this new list to a policy, select the applicable policies.

Admins also have the option to create a new policy within the Create List wizard. See this link for more information.
Select Create List to set up the IP list. It may take 15-60 minutes for lists to fully populate. If it is urgent that an IP be blocked immediately, create a manual list and add the IP for immediate effect.
Domain List Details for Recorded Future Security Control
Navigate to Collect in the left-hand navigation menu and click the green ⊕ icon in the top right to get started.

Recorded Future Security Control is available for the following Domain List Types:
-
Block
Provide the following information under List Details (* indicates required field):
|
Field Name |
Description |
|
Name* |
Unique list name required |
|
Source* |
Options include Manual or Plugin but for integrations, select Plugin |
|
List Type* |
Options include Block, Allow, Threat, but for this Plugin choose Block |
|
Indicator* |
Options include IP or Domain but in this example, select Domain |
|
Description |
A brief summary of the list |
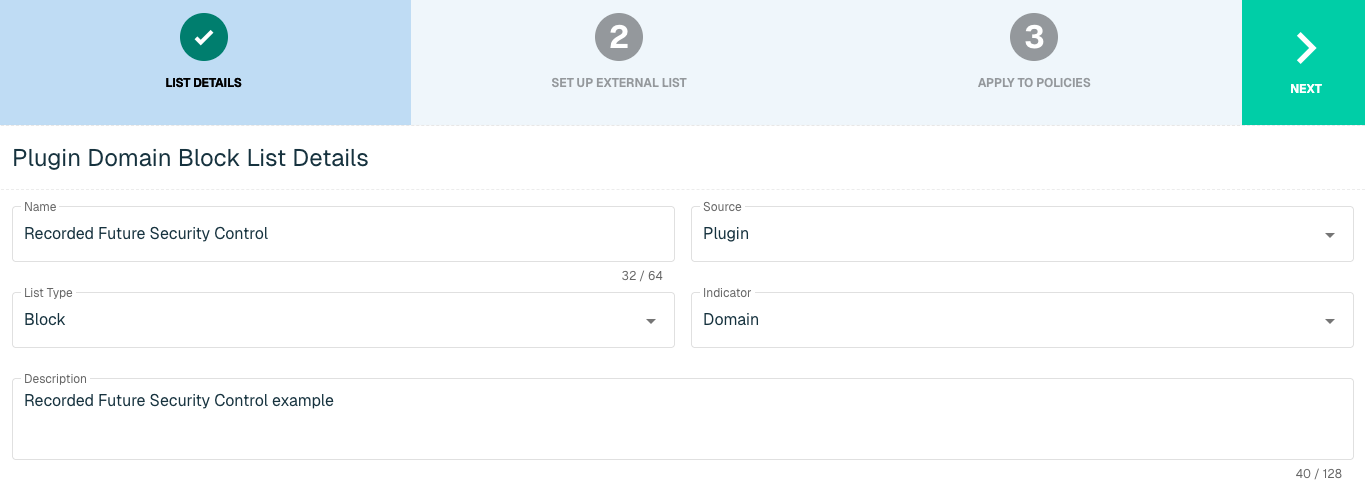
Select Next to proceed to the Set Up External List step once all required fields are complete.
Set Up External Domain List for Recorded Future Security Control
Enter the following fields for the Recorded Future Security Control Plugin:
|
Field Name |
Description |
|
Plugin Name |
Select Recorded Future Security Control |
|
Interval |
Time between each pull in minutes |
|
API Key |
The API to easily synchronize the Threat Intelligence available in Recorded Future to threatER |
|
Security Control Feeds |
Detect-and-block indicators that are collected, curated, and certified by Record Future. There are currently 2 options to select in threatER:
|

Click Next to move on to the Applies to Policy step.
Apply Recorded Future list to Policies
Entries within a domain list are not blocked until the List is applied to a Policy. To apply this new list to a policy, select the applicable policies.
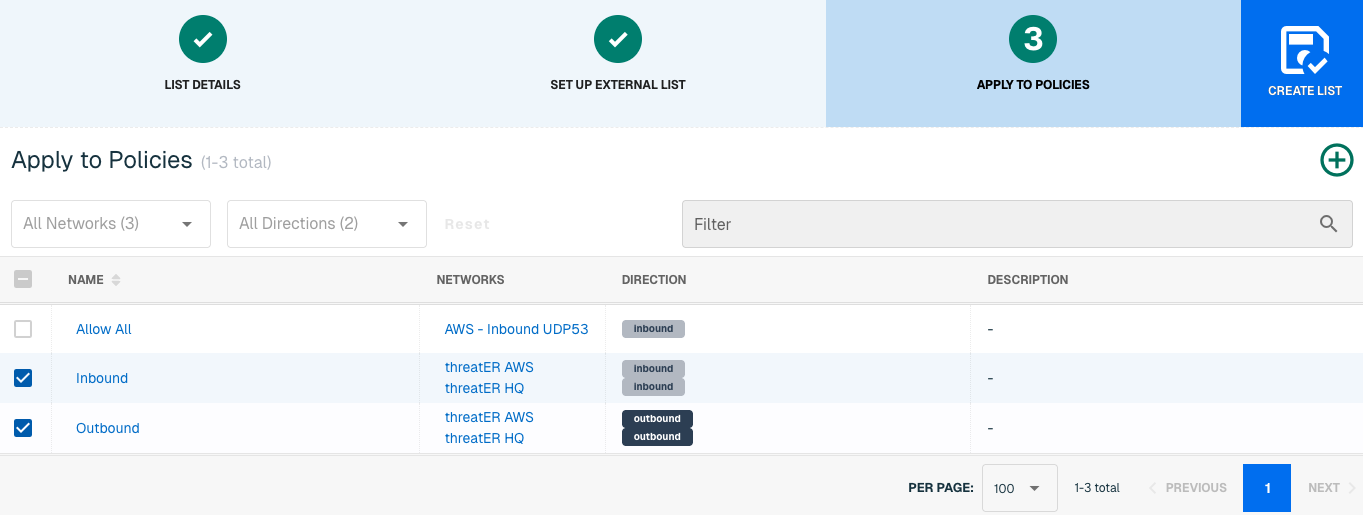
Admins also have the option to create a new policy within the Create List wizard. See this link for more information.
Select Create List to set up the domain list. It may take 15-60 minutes for lists to fully populate. If it is urgent that a domain be blocked immediately, create a manual list and add the domain for immediate effect.
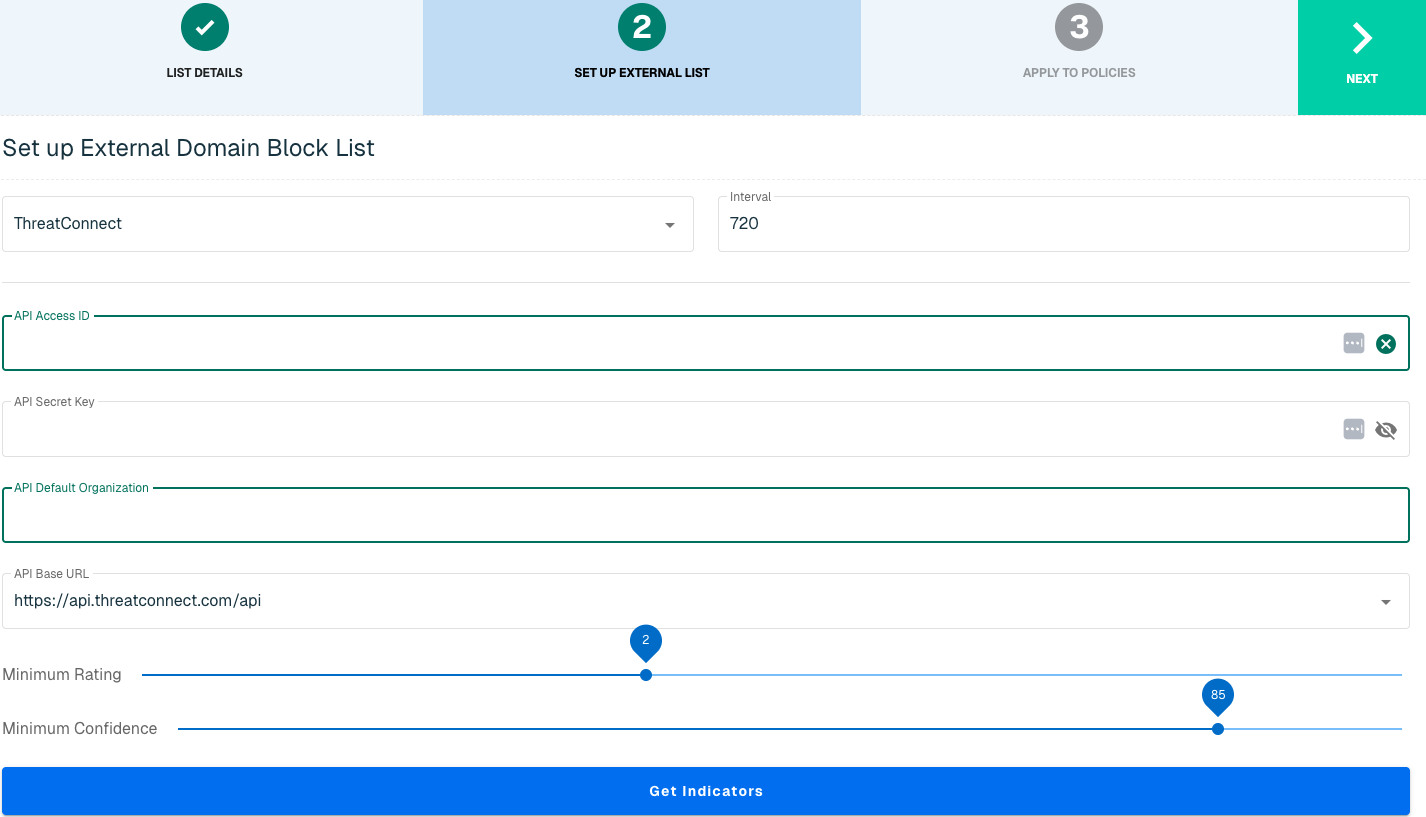
ThreatConnect
ThreatConnect provides a suite of threat intelligence and automation capabilities for security operations and incident response teams. The goal of ThreatConnect's threat intelligence platform is to provide organizations with a proactive and efficient system on handling and responding to threats.
With this integration in place, threatER can automatically access and block IPs and Domains from these feeds of threat indicators. Admins should prepare the following when setting up the external list:
-
API Access ID
-
API Secret Key
-
API Default Organization
-
API Base URL
-
Minimum Rating Rubric
-
Minimum Confidence Score
IP List Details for ThreatConnect
Navigate to Collect in the left-hand navigation menu and click the green ⊕ icon in the top right to get started.

The ThreatConnect integration is available for the following IP List Types:
-
Block
Provide the following information under List Details (* indicates required field):
|
Field Name |
Description |
|
Name* |
Unique list name required |
|
Source* |
Options include Manual or Plugin but for integrations, select Plugin
|
|
List Type* |
Options include Block, Allow, Threat, but for this Plugin choose Block |
|
Indicator* |
Options include IP or Domain but in this example, select IP |
|
Description |
A brief summary of the list |

Select Next to proceed to the Set Up External List step once all required fields are complete.
Set Up External IP List for ThreatConnect Integration
Enter the following fields for the ThreatConnect Plugin:
|
Field Name |
Description |
|
Plugin Name |
Select ThreatConnect |
|
Interval |
Time between each pull in minutes |
|
API Access ID |
ThreatConnect Access ID |
|
API Secret Key |
The API to easily synchronize the Threat Intelligence available in Recorded Future to ThreatBlockr |
|
API Default Organization |
User account's default organization |
|
API Base URL |
Account's URL for API |
|
Minimum Rating |
The minimum rating label of a threat based on capability, determination and progression of incident |
|
Minimum Confidence |
The minimum confidence percentage of a threat based on independent confirmation, plausibility and consistency |
|
Get Indicators |
An atomic piece of information that has intelligence value |

Click Next to move on to the Applies to Policy step.
Apply ThreatConnect list to Policies
Entries within an IP list are not blocked until the List is applied to a Policy. To apply this new list to a policy, select the applicable policies.

Admins also have the option to create a new policy within the Create List wizard. See this link for more information.
Select Create List to set up the IP list. It may take 15-60 minutes for lists to fully populate. If it is urgent that an IP be blocked immediately, create a manual list and add the IP for immediate effect.
Domain List Details for ThreatConnect
Navigate to Collect in the left-hand navigation menu and click the green ⊕ icon in the top right to get started.

ThreatConnect is available for the following Domain List Types:
-
Block
Provide the following information under List Details (* indicates required field):
|
Field Name |
Description |
|
Name* |
Unique list name required |
|
Source* |
Options include Manual or Plugin but for integrations, select Plugin
|
|
List Type* |
Options include Block, Allow, Threat, but for this Plugin choose Block |
|
Indicator* |
Options include IP or Domain but in this example, select Domain |
|
Description |
A brief summary of the list |

Select Next to proceed to the Set Up External List step once all required fields are complete.
Set Up External Domain List for ThreatConnect
Enter the following fields for the ThreatConnect Plugin:
|
Field Name |
Description |
|
Plugin Name |
Select ThreatConnect |
|
Interval |
Time between each pull in minutes |
|
API Access ID |
ThreatConnect Access ID |
|
API Secret Key |
The API to easily synchronize the Threat Intelligence available in Recorded Future to ThreatBlockr |
|
API Default Organization |
User account's default organization |
|
API Base URL |
Account's URL for API |
|
Minimum Rating |
The minimum rating label of a threat based on capability, determination and progression of incident |
|
Minimum Confidence |
The minimum confidence percentage of a threat based on independent confirmation, plausibility and consistency |
|
Get Indicators |
An atomic piece of information that has intelligence value |
Click Next to move on to the Applies to Policy step.
Apply ThreatConnect list to Policies
Entries within a domain list are not blocked until the List is applied to a Policy. To apply this new list to a policy, select the applicable policies.

Admins also have the option to create a new policy within the Create List wizard. See this link for more information.
Select Create List to set up the domain list. It may take 15-60 minutes for lists to fully populate. If it is urgent that a domain be blocked immediately, create a manual list and add the domain for immediate effect.
ThreatStop
ThreatSTOP is a cloud-based automated threat intelligence platform that converts threat intelligence data into enforcement policies. ThreatSTOP leverages the company’s comprehensive and authoritative database of IP addresses, domains, and the network infrastructure used in cyberattacks to develop best-in-class threat intelligence.
The ThreatSTOP-threatER integration enables mutual customers to easily integrate threat intelligence and enforcement policies from the ThreatSTOP platform into the threatER platform. The ThreatSTOP plugin enables the simple and automated creation of IP and domain-based block lists based on ThreatSTOP threat intel and enforcement policies. The integration enables mutual customers to leverage the threatER platform to use to detect and block IP and domain-based threats using threat intelligence at a scale that far exceeds the capabilities of existing network security controls.
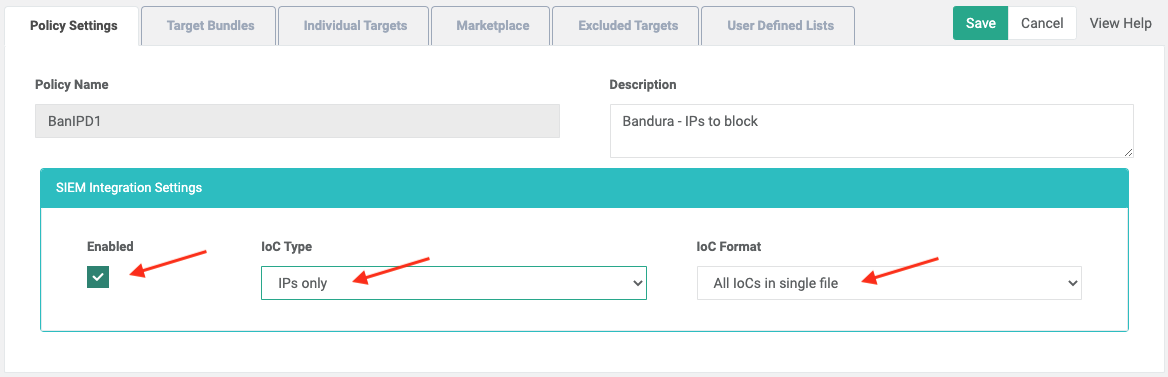
ThreatSTOP Requirements
When creating a policy with ThreatSTOP, you will need to ensure the policy is enabled under SIEM Integration Settings. You will also want to ensure “All IoCs in single file” is chosen as the IoC format and note the IoC Type selected (IPs only, Domains only, or All IoCs).
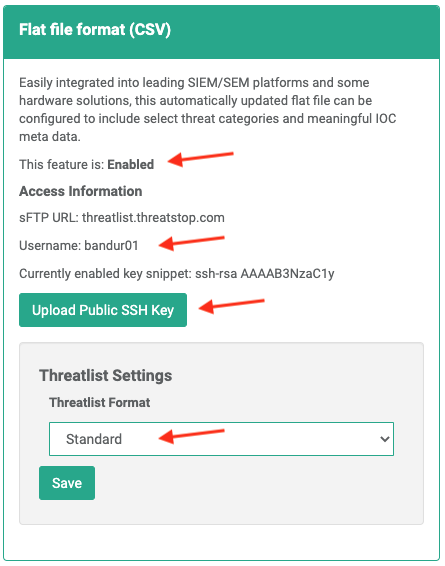
The final step is to create an SSH Key (using either RSA or OpenSSH). The Public SSH Key must be uploaded in the “Flat file format (CSV)” block. The Private SSH Key will be entered later when setting up the Allow list in threatER.
Admins should prepare the following when setting up the external list in ThreatBlockr:
-
User Name
-
SSH Key
-
SSH Passphase
-
Policy
-
Indicator of Compromise
IP List Details for ThreatSTOP
Navigate to Collect in the left-hand navigation menu and click the green ⊕ icon in the top right to get started.

The ThreatSTOP integration is available for the following IP List Types:
-
Allow
-
Block
Provide the following information under List Details (* indicates required field):
|
Field Name |
Description |
|
Name* |
Unique list name required |
|
Source* |
Options include Manual or Plugin but for integrations, select Plugin |
|
List Type* |
Options include Block, Allow, Threat, but for this Plugin choose Block or Allow |
|
Indicator* |
Options include IP or Domain but in this example, select IP |
|
Description |
A brief summary of the list |

Select Next to proceed to the Set Up External List step once all required fields are complete.
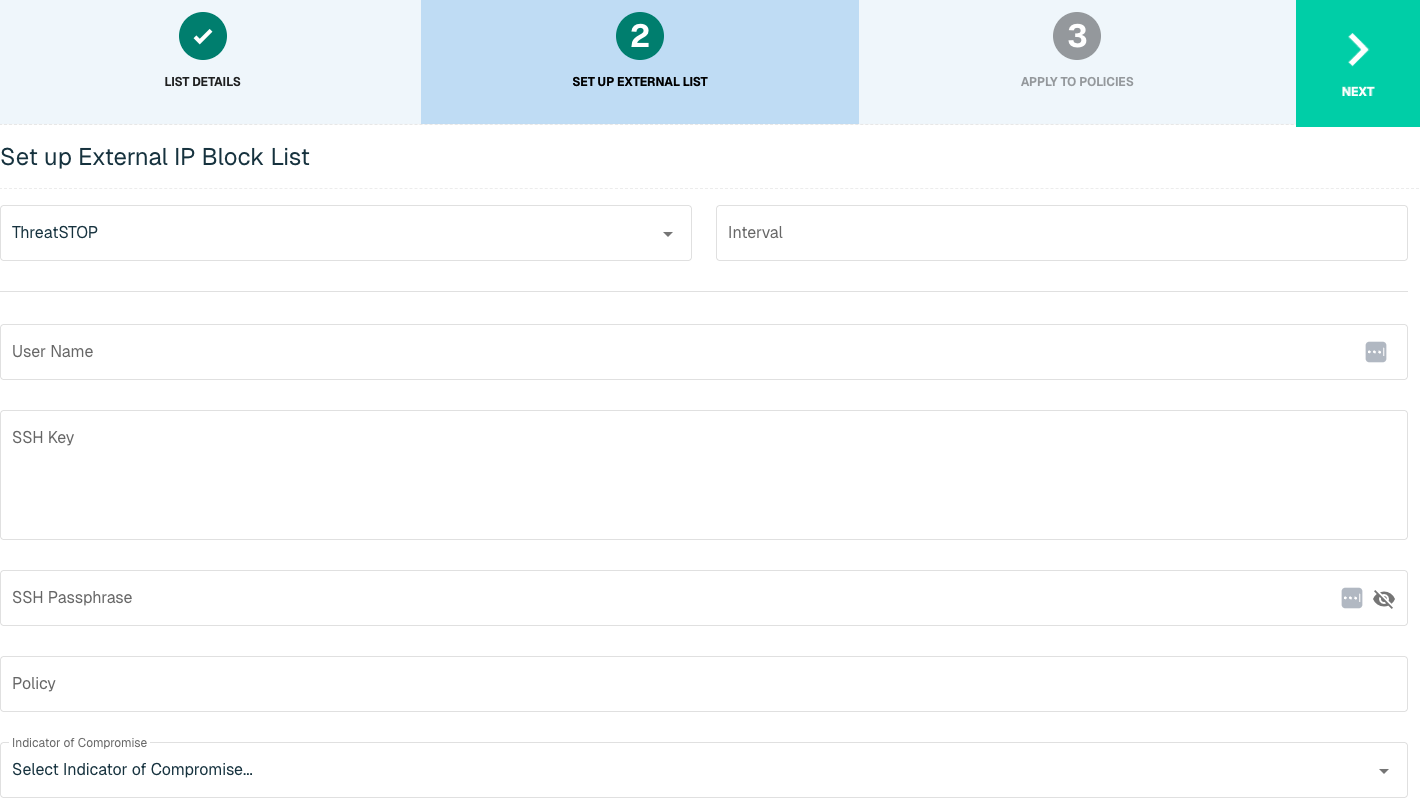
Set Up External IP List for ThreatSTOP Integration
Enter the following fields for the ThreatSTOP Plugin:
|
Field Name |
Description |
|
Plugin Name |
Select ThreatSTOP |
|
Interval |
Time between each pull in minutes |
|
User Name |
Found in the "Flat file format (CSV)" block on the SIEM Integration page on ThreatSTOP |
|
SSH Key |
The Private SSH Key that pairs with your Public SSH Key that was uploaded with ThreatSTOP |
|
SSH Passphrase |
It is highly recommended that your SSH Key is encrypted. If encryption of Key is complete, a password to accompany the SSH Private Key is required |
|
Policy |
The exact name of the Policy to be used in the creation of the list |
|
Indicator of Compromise |
The IoC Type as established for the Policy in ThreatSTOP. Options include:
|
Click Next to move on to the Applies to Policy step.
Apply ThreatSTOP list to Policies
Entries within an IP list are not allowed or blocked until the List is applied to a Policy. To apply this new list to a policy, select the applicable policies.

Admins also have the option to create a new policy within the Create List wizard. See this link for more information.
Select Create List to set up the IP list. It may take 15-60 minutes for lists to fully populate. If it is urgent that an IP be allowed or blocked immediately, create a manual list and add the IP for immediate effect.
Domain List Details for ThreatSTOP
Navigate to Collect in the left-hand navigation menu and click the green ⊕ icon in the top right to get started.

ThreatSTOP is available for the following Domain List Types:
-
Allow
-
Block
Provide the following information under List Details (* indicates required field):
|
Field Name |
Description |
|
Name* |
Unique list name required |
|
Source* |
Options include Manual or Plugin but for integrations, select Plugin |
|
List Type* |
Options include Block, Allow, Threat, but for this Plugin choose Block or Allow
|
|
Indicator* |
Options include IP or Domain but in this example, select Domain |
|
Description |
A brief summary of the list |
Select Next to proceed to the Set Up External List step once all required fields are complete.
Set Up External Domain List for ThreatSTOP
Enter the following fields for the ThreatSTOP Plugin:
|
Field Name |
Description |
|
Plugin Name |
Select ThreatSTOP |
|
Interval |
Time between each pull in minutes |
|
User Name |
Found in the "Flat file format (CSV)" block on the SIEM Integration page on ThreatSTOP |
|
SSH Key |
The Private SSH Key that pairs with your Public SSH Key that was uploaded with ThreatSTOP |
|
SSH Passphrase |
It is highly recommended that your SSH Key is encrypted. If encryption of Key is complete, a password to accompany the SSH Private Key is required |
|
Policy |
The exact name of the Policy to be used in the creation of the list |
|
Indicator of Compromise |
The IoC Type as established for the Policy in ThreatSTOP. Options include:
|

Click Next to move on to the Applies to Policy step.
Apply ThreatSTOP list to Policies
Entries within an IP list are not allowed or blocked until the List is applied to a Policy. To apply this new list to a policy, select the applicable policies.

Admins also have the option to create a new policy within the Create List wizard. See this link for more information.
Select Create List to set up the domain list. It may take 15-60 minutes for lists to fully populate. If it is urgent that a domain be allowed or blocked immediately, create a manual list and add the domain for immediate effect.
TruSTAR
TruSTAR is a SaaS platform that enables anonymous cyber intelligence sharing and provides real-time insight into the security space by collecting internal and third-party threat intelligence sources.
With this integration in place, threatER can automatically access and block IPs and Domains from these feeds of threat indicators. Admins should prepare the following when setting up the external list:
-
Enclave IP
-
API Key
-
API Secret
IP List Details for TruSTAR
Navigate to Collect in the left-hand navigation menu and click the green ⊕ icon in the top right to get started.

The TruSTAR integration is available for the following IP List Types:
-
Block
Provide the following information under List Details (* indicates required field):
|
Field Name |
Description |
|
Name* |
Unique list name required |
|
Source* |
Options include Manual or Plugin but for integrations, select Plugin
|
|
List Type* |
Options include Block, Allow, Threat, but for this Plugin choose Block |
|
Indicator* |
Options include IP or Domain but in this example, select IP |
|
Description |
A brief summary of the list |

Select Next to proceed to the Set Up External List step once all required fields are complete.
Set Up External IP List for TruSTAR Integration
Enter the following fields for the TruSTAR Plugin:
|
Field Name |
Description |
|
Plugin Name |
Select TruSTAR |
|
Interval |
Time between each pull in minutes |
|
Enclave ID |
TruSTAR Access ID. Click Add to add more Enclave IDs as necessary. |
|
API Key |
The API to easily synchronize the Threat Intelligence available in TruSTAR to threatER |
|
API Secret |
Additional account credentials |
|
Time Since Last Seen |
Deployment Time |
Click Next to move on to the Applies to Policy step.
Apply TruSTAR list to Policies
Entries within an IP list are not blocked until the List is applied to a Policy. To apply this new list to a policy, select the applicable policies.

Admins also have the option to create a new policy within the Create List wizard. See this link for more information.
Select Create List to set up the IP list. It may take 15-60 minutes for lists to fully populate. If it is urgent that an IP be blocked immediately, create a manual list and add the IP for immediate effect.
Domain List Details for TruSTAR
Navigate to Collect in the left-hand navigation menu and click the green ⊕ icon in the top right to get started.

TruSTAR is available for the following Domain List Types:
-
Block
Provide the following information under List Details (* indicates required field):
|
Field Name |
Description |
|
Name* |
Unique list name required |
|
Source* |
Options include Manual or Plugin but for integrations, select Plugin. |
|
List Type* |
Options include Block, Allow, Threat, but for this Plugin choose Block |
|
Indicator* |
Options include IP or Domain but in this example, select Domain. |
|
Description |
A brief summary of the list |

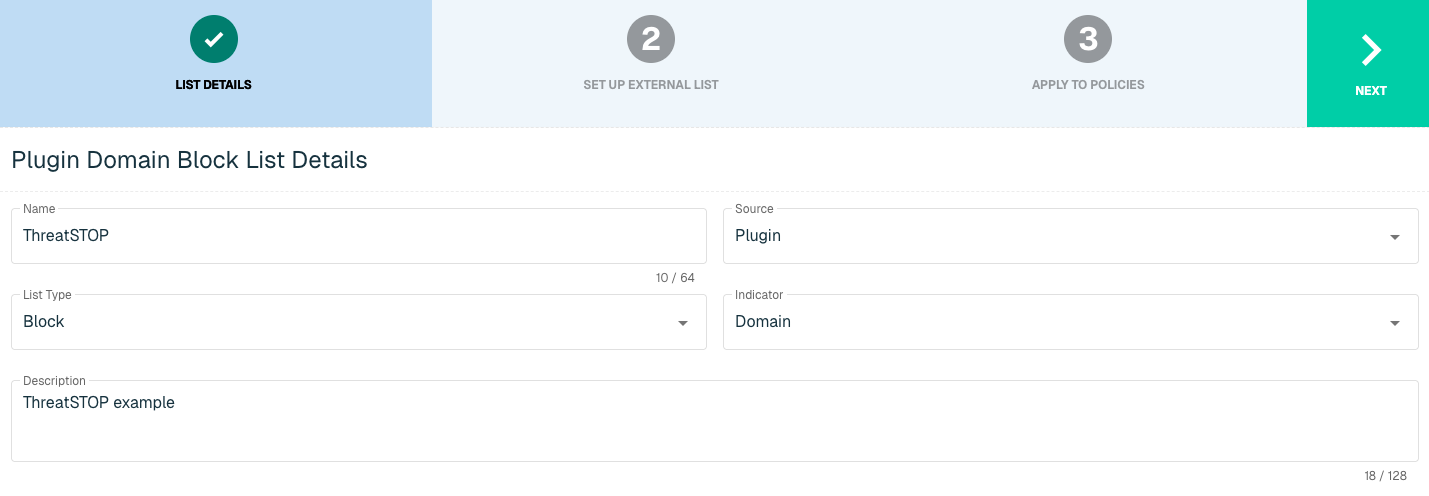
Select Next to proceed to the Set Up External List step once all required fields are complete.
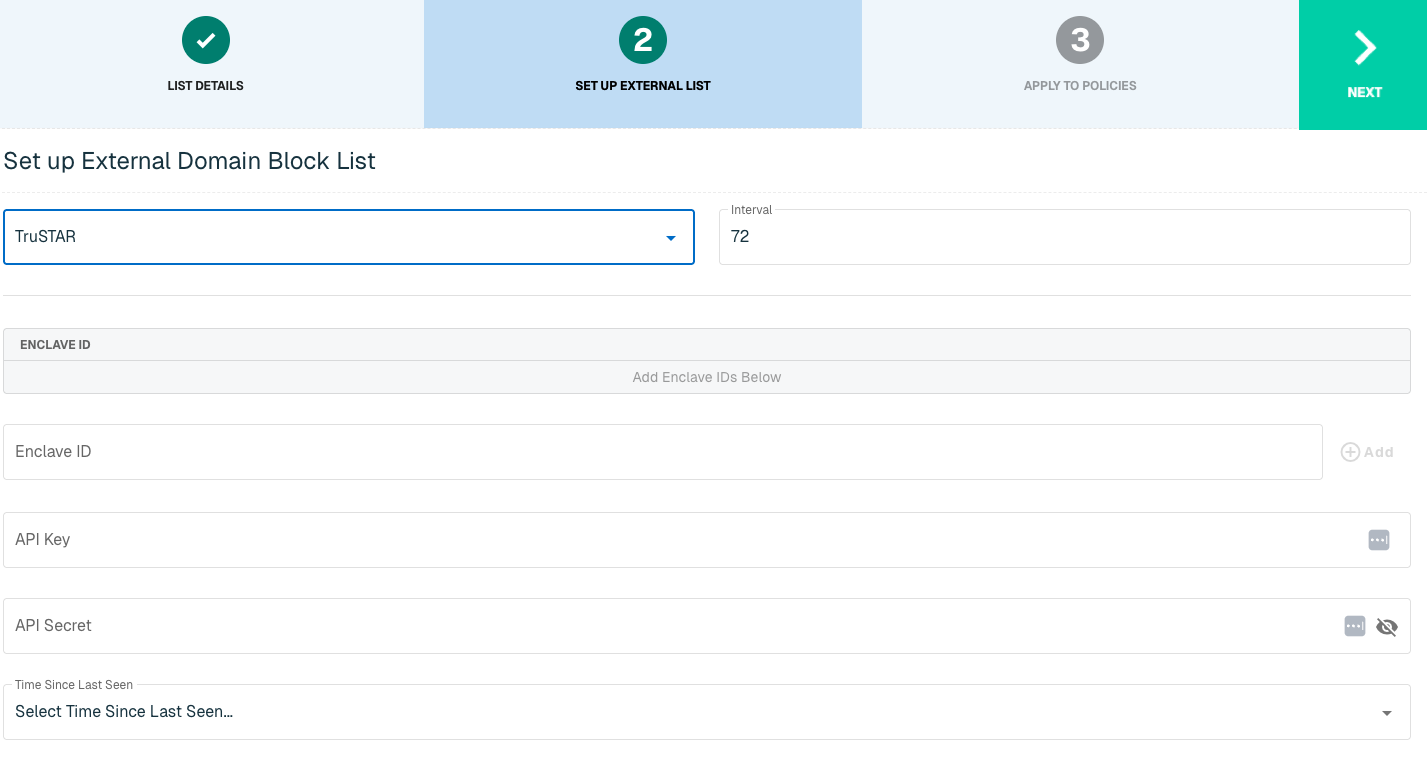
Set Up External Domain List for TruSTAR
Enter the following fields for the TruSTAR Plugin:
|
Field Name |
Description |
|
Plugin Name |
Select TruSTAR |
|
Interval |
Time between each pull in minutes |
|
Enclave ID |
TruSTAR Access ID. Click Add to add more Enclave IDs as necessary. |
|
API Key |
The API to easily synchronize the Threat Intelligence available in TruSTAR to threatER |
|
API Secret |
Additional account credentials |
|
Time Since Last Seen |
Deployment Time |

Click Next to move on to the Applies to Policy step.
Apply TruSTAR list to Policies
Entries within an IP list are not blocked until the List is applied to a Policy. To apply this new list to a policy, select the applicable policies.

Admins also have the option to create a new policy within the Create List wizard. See this link for more information.
Select Create List to set up the domain list. It may take 15-60 minutes for lists to fully populate. If it is urgent that a domain be blocked immediately, create a manual list and add the domain for immediate effect.