
The threatER Portal has built-in data connectors that can be leveraged to connect to and retrieve threat intelligence from an external data source to block or allow traffic. Our product team shares an overview of our connectors in this handy video, which is followed by detailed instructions on how to set up and use the connectors.
CSV File Connector
IP CSV File Requirements
The CSV File for the IP CSV File Connector must use the following format:
-
The file must use a comma as the delimiter.
-
The file must have a header row.
-
The header must include a column with the title "ip/maskbit".
-
The header may include a column with the title "expiredate"
-
-
The file must have a column for the IP indicator.
-
The value for each row must contain the IP and Maskbit in the following format: [IP]/[Maskbit]
-
Example of value format: "194.58.73.109/32"
-
-
If the maskbit is not included in this value it will be automatically set to 32.
-
-
The file may have a column for an expiration date.
-
In order to include an expiration date, the value for each row must contain the Expire Date for the indicator and must be specified in UTC: YYYY-MM-DDTHH:MM:SSZ
-
The value will be converted to and stored as an integer timestamp upon the import of indicators.
-
-
-
If the file does not contain a second column, there are no values in the second column, or the value in the second column is "0", an expiration date shall not be set for the associated indicator.
List Details for IP CSV File Connector
Navigate to Collect in the left-hand navigation menu and click the green ⊕ icon in the top right to get started.

CSV File Connector is available for the following IP List Types:
-
Allow
-
Block
-
Threat
Provide the following information under List Details (* indicates required field):
|
Field Name |
Description |
|
Name* |
Unique list name required |
|
Source* |
Options include Manual or Plugin but for connectors, select Plugin. |
|
List Type* |
Options include Allow, Block or Threat. |
|
Indicator* |
Options include IP or Domain but in this example, select IP |
|
Description |
A brief summary of the list |

Select Next to proceed to the Set Up External List step once all required fields are complete.
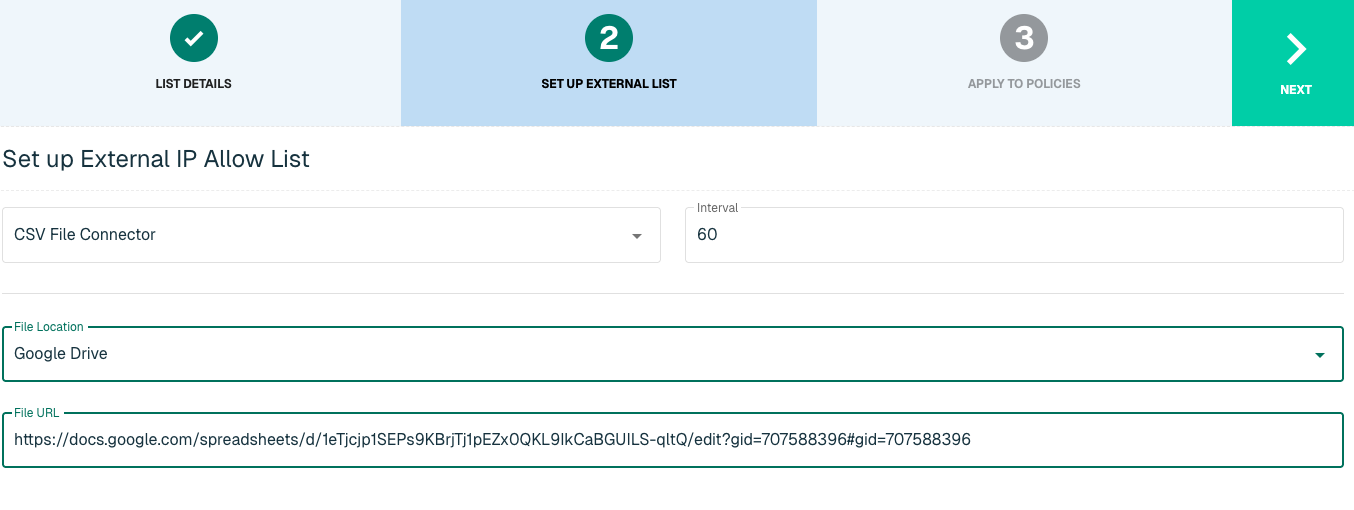
Set Up External IP List via CSV File Connector
Enter the following fields for the CSV File Connector Plugin:
|
Field Name |
Description |
|
Plugin Name |
Select CSV File Connector |
|
Interval |
Time between each pull in minutes |
|
File Location |
Options include Google Drive, OneDrive, AWS, Github, Public Server |
|
File URL |
The URL that syncs with threatER |
Sharing Permissions per File Location:
|
File Location |
Sharing Permissions |
|
Google Drive |
Must be set to Anyone on the internet can view this file |
|
OneDrive |
Must be set to Anyone with the link under Who would you like this link to work for. View Permission is fine but when inserting the link into the plugin in the Admin Console, admins must append "&download=1" to the end of the URL (without the quotes). |
|
AWS |
Must be publicly accessible without requiring credentials |
|
Github |
Must be publicly accessible without requiring credentials |
|
Public Server |
Must be publicly accessible without requiring credentials |
Click Next to move on to the Applies to Policy step.
Apply CSV File List to Policies
Entries within an IP list are not allowed or blocked until the List is applied to a Policy. To apply this new list to a policy, select the applicable policies. Select the Create List button to create the List once all desired selections are made.

Admins also have the option to create a new policy within the Create List wizard. See this link for more information.
Click Create List to set up the IP list. It may take 15-60 minutes for lists to fully populate. If it is urgent that an IP be allowed or blocked immediately, create a manual list and add the IP for immediate effect.
Domain CSV File Requirements
To utilize the Domain CSV file connector, you'll need to create the CSV file using the following format:
-
The file must use a comma as the delimiter.
-
The file must have a header row.
-
The header must include a column with the title "domain".
-
The header may include a column with the title "expiredate"
-
-
The file must have a column for the Domain indicator.
-
The value for each row must contain the domain in the following format: [domain name].[Top-level Domain].
-
Example of value format: "xyz123.com".
-
-
-
The file may have a column for an expiration date.
-
In order to include an expiration date, the value for each row must contain the Expire Date for the indicator and must be specified in UTC: YYYY-MM-DDTHH:MM:SSZ
-
The value will be converted to and stored as an integer timestamp upon import of indicators.
-
-
-
If the file does not contain a second column, or there are no values in the second column, or the value in the second column is "0", an expiration date shall not be set for the associated indicator
List Details for Domain CSV File Connector
Navigate to Collect in the left-hand navigation menu and click the green ⊕ icon in the top right to get started.

CSV File Connector is available for the following Domain List Types:
-
Allow
-
Block
Provide the following information under List Details (* indicates required field):
|
Field Name |
Description |
|
Name* |
Unique list name required |
|
Source* |
Options include Manual or Plugin but for connectors, select Plugin. |
|
List Type* |
Options include Allow or Block |
|
Indicator* |
Options include IP or Domain but in this example, select Domain |
|
Description |
A brief summary of the list |
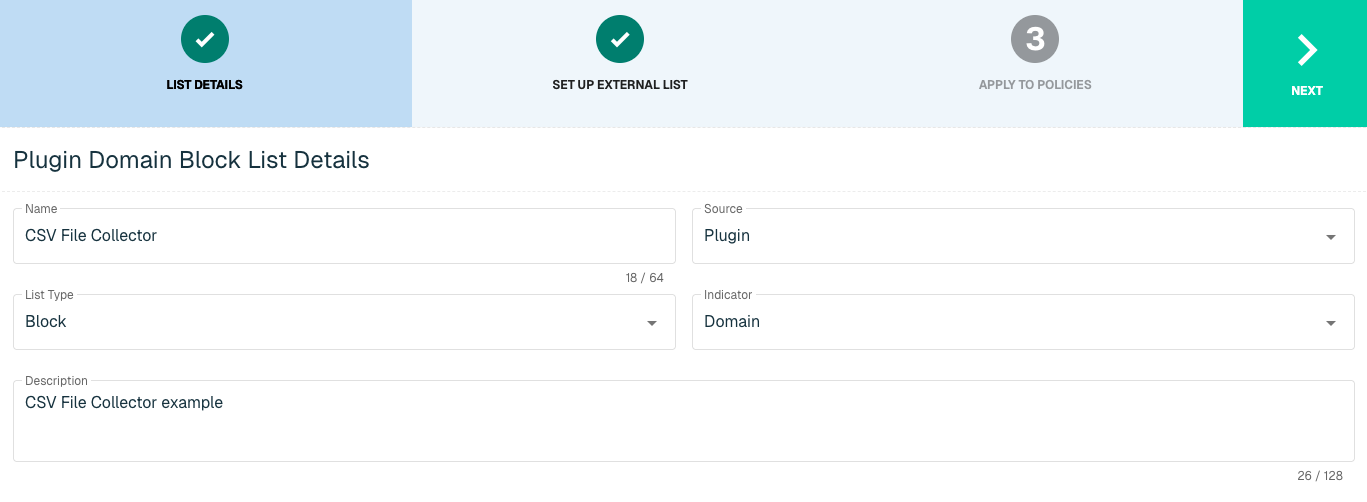
Select Next to proceed to the Set Up External List step once all required fields are complete.
Set Up External Domain List via CSV File Connector
Enter the following fields for the CSV File Connector Plugin:
|
Field Name |
Description |
|
Plugin Name |
Select CSV File Connector |
|
Interval |
Time between each pull in minutes |
|
File Location |
Options include Google Drive, OneDrive, AWS, Github, Public Server |
|
File URL |
The URL that syncs with ThreatBlockr |

Sharing Permissions per File Location:
|
File Location |
Sharing Permissions |
|
Google Drive |
Must be set to Anyone on the internet can view this file |
|
OneDrive |
Must be set to Anyone with the link under Who would you like this link to work for. View Permission is fine but when inserting the link into the plugin in the Admin Console, admins must append "&download=1" to the end of the URL (without the quotes). |
|
AWS |
Must be publicly accessible without requiring credentials |
|
Github |
Must be publicly accessible without requiring credentials |
|
Public Server |
Must be publicly accessible without requiring credentials |
Apply CSV File List to Policies
Entries within a Domain list are not allowed or blocked until the List is applied to a Policy. To apply this new list to a policy, select the applicable policies. Select the Create List button to create the List once all desired selections are made.

It may take 15-60 minutes for lists to fully populate. If it is urgent that a domain be allowed or blocked immediately, create a manual list and add the domain there for immediate effect.
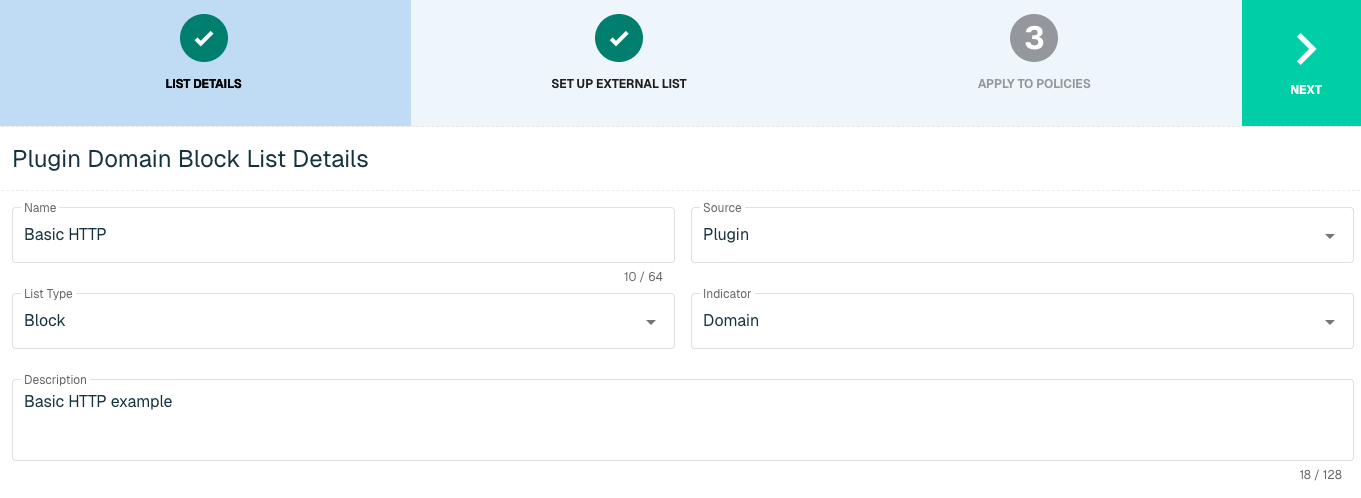
Basic HTTP
Basic HTTP is an authentication mechanism where the server requests a username and password from the web client. The client passes the authentication information to the server in an authorized header, authenticates the user and returns the requested resource.
With this connection, admins can set up threatER to access the Authorization header, decode the provided credentials and look up list information in a secure format.
IP Basic HTTP Requirements
Setting up an external list requires the following information for authentication purposes:
-
HTTP URL
-
Authentication Type
-
If Authentication is required:
-
User Name
-
Password
-
IP List Details for Basic HTTP
Navigate to Collect in the left-hand navigation menu and click the green ⊕ icon in the top right to get started.

Basic HTTP is available for the following IP List Types:
-
Allow
-
Block
Provide the following information under List Details (* indicates required field):
|
Field Name |
Description |
|
Name* |
Unique list name required |
|
Source* |
Options include Manual or Plugin but for connectors, select Plugin. |
|
List Type* |
Options include Allow or Block. |
|
Indicator* |
Options include IP or Domain but in this example, select IP |
|
Description |
A brief summary of the list |
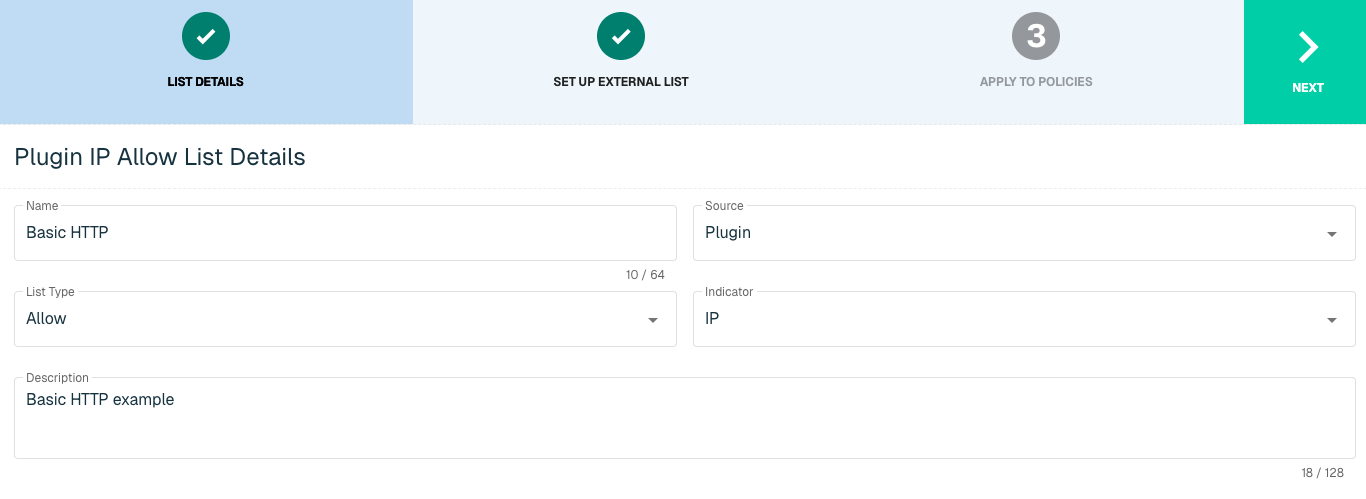
Select Next to proceed to the Set Up External List step once all required fields are complete.
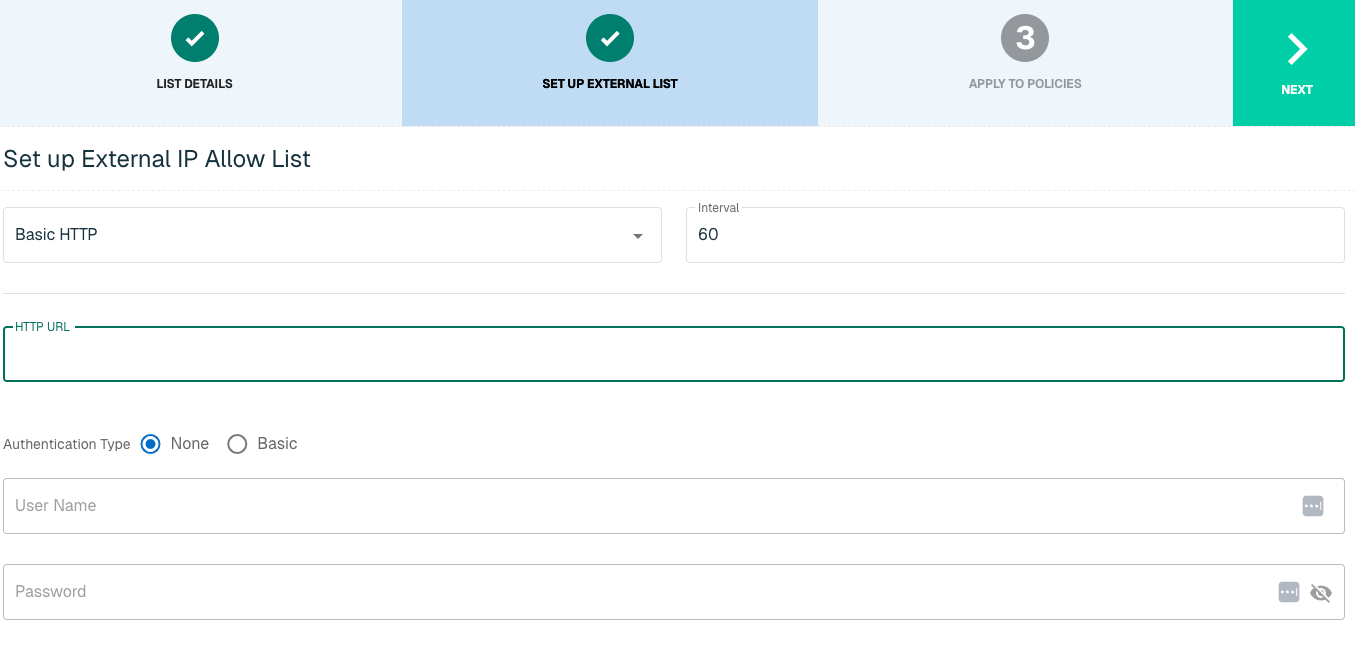
Set Up External IP List for Basic HTTP
Enter the following fields for the Basic HTTP Plugin:
|
Field Name |
Description |
|
Plugin Name |
Select Basic HTTP |
|
Interval |
Time between each pull in minutes |
|
HTTP URL |
Service URL that syncs to threatER |
|
Authentication Type |
Option includes None or Basic. Some services require a membership, which will require inputting a user name and password in the next fields |
|
User Name |
Admin User Name to HTTP service |
|
Password |
Admin Password to HTTP service |
Apply Basic HTTP IP List to Policies
Entries within an IP list are not allowed or blocked until the List is applied to a Policy. To apply this new list to a policy, select the applicable policies. Select the Create List button to create the List once all desired selections are made.

Admins also have the option to create a new policy within the Create List wizard. See this link for more information.
It may take 15-60 minutes for lists to fully populate. If it is urgent that an IP be allowed or blocked immediately, create a manual list and add the IP for immediate effect.
Domain Basic HTTP Requirements
Setting up an external list requires the following information for authentication purposes:
-
HTTP URL
-
Authentication Type
-
If authentication is required:
-
User Name
-
Password
-
Domain List Details for Basic HTTP
Navigate to Collect in the left-hand navigation menu and click the green ⊕ icon in the top right to get started.

Basic HTTP is available for the following Domain List Types:
-
Allow
-
Block
Provide the following information under List Details (* indicates required field):
|
Field Name |
Description |
|
Name* |
Unique list name required |
|
Source* |
Options include Manual or Plugin but for connectors, select Plugin. |
|
List Type* |
Options include Allow or Block. |
|
Indicator* |
Options include IP or Domain but in this example, select Domain. |
|
Description |
A brief summary of the list |
Select Next to proceed to the Set Up External List step once all required fields are complete.
Set Up External Domain List for Basic HTTP
Enter the following fields for the Basic HTTP Plugin:
|
Field Name |
Description |
|
Plugin Name |
Select Basic HTTP |
|
Interval |
Time between each pull in minutes |
|
HTTP URL |
Service URL that syncs to threatER |
|
Authentication Type |
Option includes None or Basic. Some services require a membership, which will require inputting a user name and password in the next fields |
|
User Name |
Admin User Name to HTTP service |
|
Password |
Admin Password to HTTP service |

Apply Basic HTTP Domain List to Policies
Entries within an Domain list are not allowed or blocked until the List is applied to a Policy. To apply this new list to a policy, select the applicable policies. Select the Create List button to create the List once all desired selections are made.

Admins also have the option to create a new policy within the Create List wizard. See this link for more information.
It may take 15-60 minutes for lists to fully populate. If it is urgent that an IP be allowed or blocked immediately, create a manual list and add the IP for immediate effect.
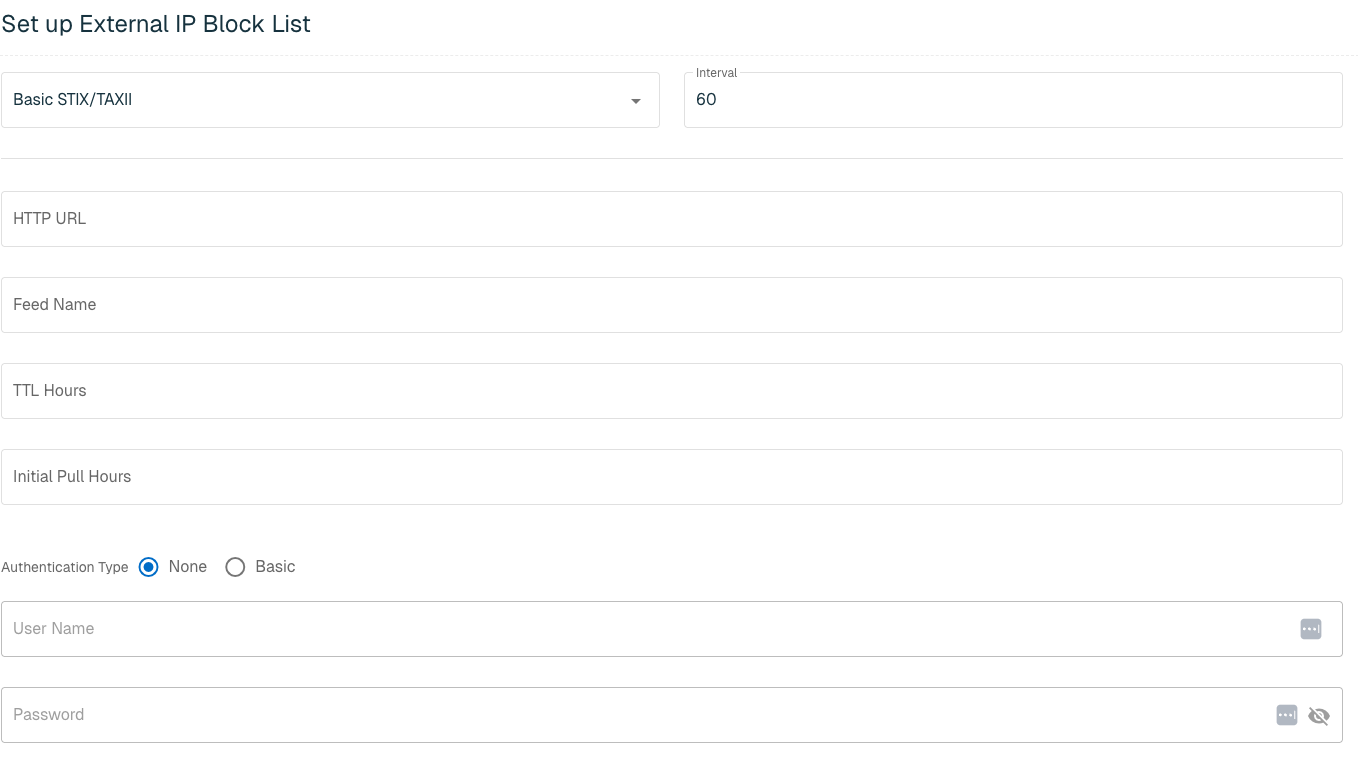
Basic STIX/TAXII
Structured Threat Information Expression (STIX) and Trusted Automated Exchange of Indicator Information (TAXII) are community standards developed by the U.S. Department of Homeland Security in an effort to improve the detection and mitigation of cyber threats. STIX provides details of the threat, while TAXII determines the flow of information.
With this connection, admins can send the relevant indicators to be automatically shared and processed with threatER.
Setting up an external list requires the following information for authentication purposes:
-
HTTP URL
-
Feed Name
-
TTL Hours
-
Initial Pull Hours
-
If authentication is required:
-
User Name
-
Password
-
IP List Details for Basic STIX/TAXII
Navigate to Collect in the left-hand navigation menu and click the green ⊕ icon in the top right to get started.

STIX/TAXII is available for the following IP List Types:
-
Block
Provide the following information under List Details (* indicates required field):
|
Field Name |
Description |
|
Name* |
Unique list name required |
|
Source* |
Options include Manual or Plugin but for connectors, select Plugin. |
|
List Type* |
Only option is Block. |
|
Indicator* |
Options include IP or Domain but in this example, select IP |
|
Description |
A brief summary of the list |

Select Next to proceed to the Set Up External List step once all required fields are complete.
Set Up External IP List for Basic STIX/TAXII
Enter the following fields for the Basic STIX/TAXII Plugin:
|
Field Name |
Description |
|
Plugin Name |
Select Basic STIX/TAXII |
|
Interval |
Time between each pull in minutes |
|
HTTP URL |
Service URL that syncs to threatER |
|
Feed Name |
The name of the feed associated with the STIX-TAXII page |
|
TTL Hours |
Time-to-live |
|
Initial Pull Hours |
Time to pull |
|
Authentication Type |
Option includes None or Basic. Some services require a membership, which will require inputting a user name and password in the next fields |
|
User Name |
Admin User Name to STIX/TAXII |
|
Password |
Admin Password to STIX/TAXII |

Click Next to move on to the Applies to Policy step.
Apply STIX/TAXII list to Policies
Entries within an IP list are not blocked until the List is applied to a Policy. To apply this new list to a policy, select the applicable policies. Select the Create List button to create the List once all desired selections are made.

Admins also have the option to create a new policy within the Create List wizard. See this link for more information.
Scroll to the bottom and select Finish to set up the IP list. It may take 15-60 minutes for lists to fully populate. If it is urgent that an IP be blocked immediately, create a manual list and add the IP for immediate effect.
Domain Basic STIX/TAXII Requirements
Setting up an external list requires the following information for authentication purposes:
-
HTTP URL
-
Feed Name
-
TTL Hours
-
Initial Pull Hours
-
Authentication Type
-
If authentication is required:
-
User Name
-
Password
-
Domain List Details for Basic STIX/TAXII
Navigate to Collect in the left-hand navigation menu and click the green ⊕ icon in the top right to get started.
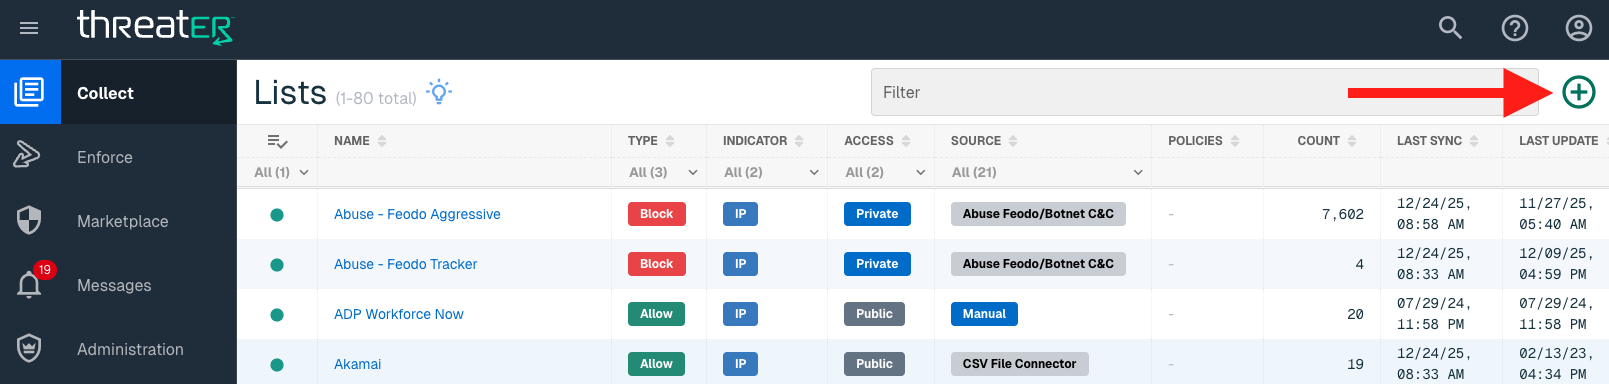
Basic STIX/TAXII is available for the following Domain List Types:
-
Block
Provide the following information under List Details (* indicates required field):
|
Field Name |
Description |
|
Name* |
Unique list name required |
|
Source* |
Options include Manual or Plugin but for connectors, select Plugin. |
|
List Type* |
Only option is Block |
|
Indicator* |
Options include IP or Domain but in this example, select Domain. |
|
Description |
A brief summary of the list |
|
Enabled* |
Position the Enabled toggle (above the Name field) to the right to enable this list globally for all policies. This means the toggle will turn blue when enabled. |

Select Next to proceed to the Set Up External List step once all required fields are complete.
Set Up External Domain List for Basic STIX/TAXII
Enter the following fields for the Basic STIX/TAXII Plugin:
|
Field Name |
Description |
|
Plugin Name |
Select Basic STIX/TAXII |
|
Interval |
Time between each pull in minutes |
|
HTTP URL |
Service URL that syncs to threatER |
|
Feed Name |
The name of the feed associated with the STIX-TAXII page |
|
TTL Hours |
Time-to-live |
|
Initial Pull Hours |
Time to pull |
|
Authentication Type |
Option includes None or Basic. Some services require a membership, which will require inputting a user name and password in the next fields |
|
User Name |
Admin User Name to STIX/TAXII |
|
Password |
Admin Password to STIX/TAXII |
Apply Basic STIX/TAXII Domain List to Policies
Entries within an Domain list are not allowed or blocked until the List is applied to a Policy. To apply this new list to a policy, select the applicable policies. Select the Create List button to create the List once all desired selections are made.

Admins also have the option to create a new policy within the Create List wizard. See this link for more information.
It may take 15-60 minutes for lists to fully populate. If it is urgent that an IP be allowed or blocked immediately, create a manual list and add the IP for immediate effect.